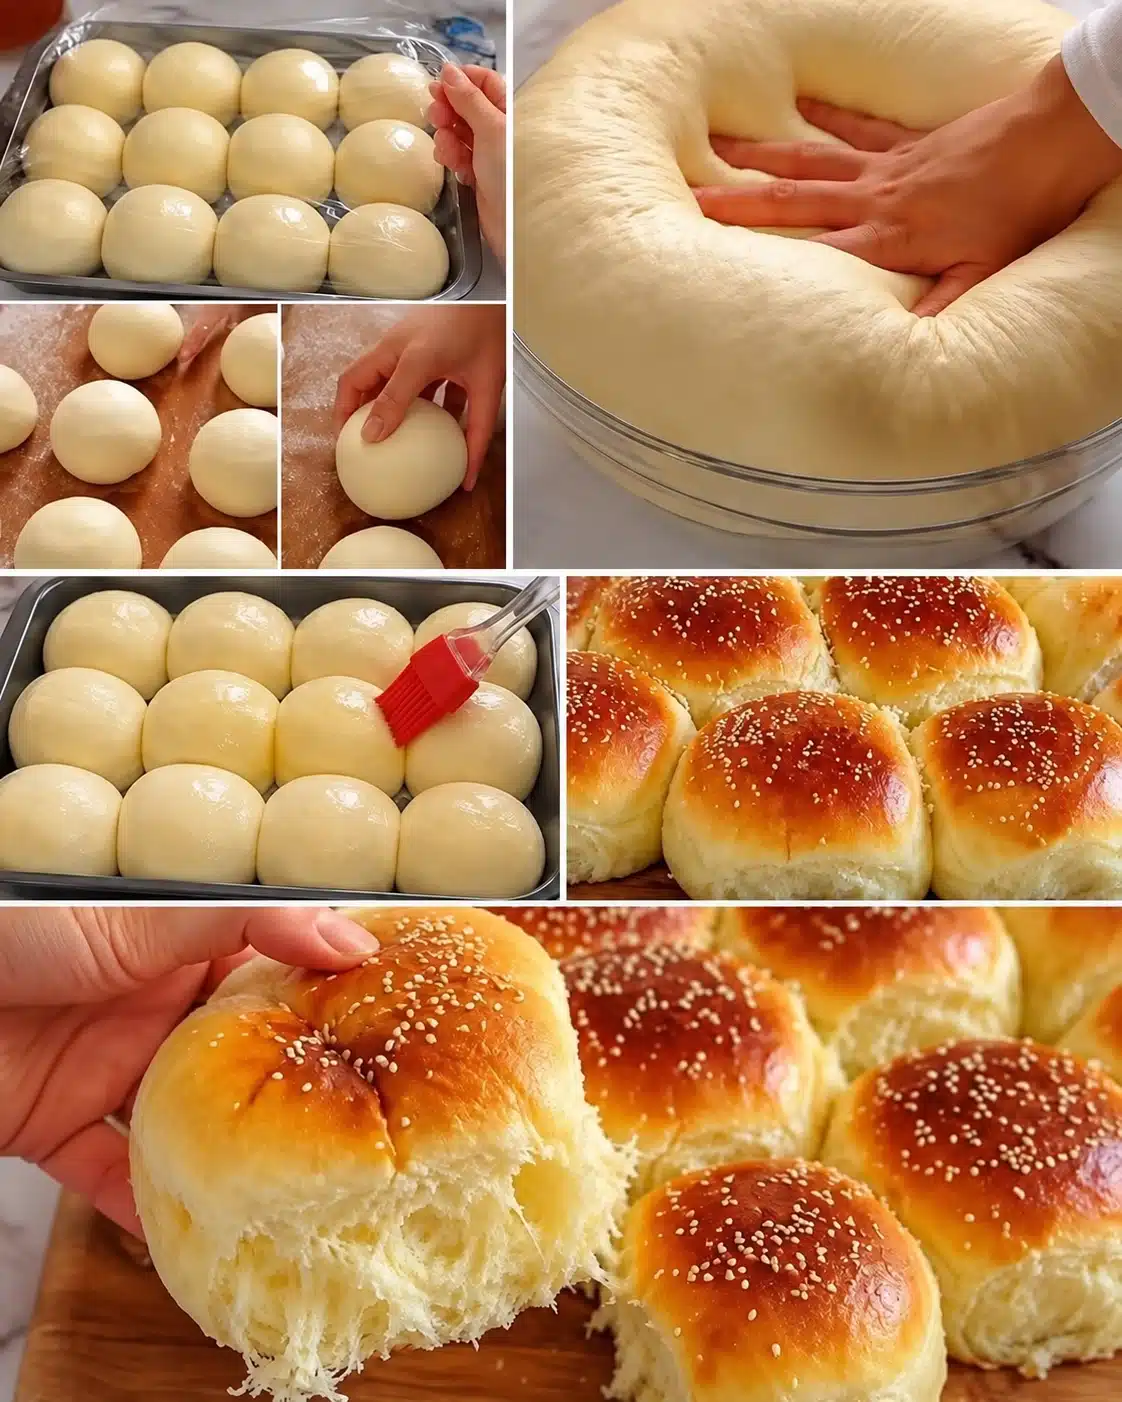
These Fluffy Homemade Dinner Rolls are everything a good homemade bread roll should be: beautifully golden on top, incredibly soft inside, lightly buttery, and tender enough to pull apart with your fingers. Inspired by the step-by-step rolls in the image, this recipe uses a rich milk-and-butter dough that rises until airy, gets shaped into smooth balls, and bakes into tall bakery-style rolls with a delicate sesame topping.
The secret to achieving that soft, stretchy interior is not a complicated ingredient. It comes from keeping the dough slightly soft, kneading it until elastic, and giving it enough time to rise properly. When the dough is rushed or overloaded with flour, dinner rolls often become dense instead of light and fluffy.
These homemade rolls are excellent for everyday dinners, but they are also perfect for Thanksgiving, Christmas, Easter, Sunday meals, potlucks, breakfast sandwiches, burgers, and sliders. Serve them warm with regular butter, garlic herb butter, honey butter, jam, or alongside a rich gravy.
Because the recipe freezes and reheats beautifully, you can prepare a large batch and keep extras ready for future meals. Once you learn the basic technique, this can easily become one of your most useful homemade bread recipes.
Recipe Overview
| Recipe Details | Information |
|---|---|
| Recipe Name | Fluffy Homemade Dinner Rolls |
| Focus Keyword | Fluffy Homemade Dinner Rolls |
| Prep Time | 25 minutes |
| First Rise | 60–90 minutes |
| Second Rise | 35–50 minutes |
| Bake Time | 18–22 minutes |
| Total Time | About 2½–3 hours |
| Yield | 12 large rolls |
| Course | Bread, Side Dish |
| Cuisine | American / Homemade Baking |
| Difficulty | Easy to Intermediate |
| Texture | Soft, airy, buttery |
| Topping | Egg wash and sesame seeds |
| Best For | Family dinners, holidays, sliders |
| Make-Ahead Friendly | Yes |
| Freezer Friendly | Yes |
Why You’ll Love These Fluffy Homemade Dinner Rolls
These dinner rolls have a soft and tender crumb without being fragile. You can pull them apart easily, spread them with butter, or slice them horizontally for sandwiches and sliders.
Milk, egg, and butter enrich the dough and create more flavor than a simple flour-and-water bread. A small amount of sugar helps the yeast work while also giving the rolls a subtle sweetness that pairs well with both savory and sweet foods.
The dough is also versatile. Make the rolls exactly as written, turn them into garlic butter rolls, add cheese, sprinkle them with everything seasoning, or make smaller portions for slider buns.
Another major advantage is that the recipe can be prepared ahead. You can refrigerate the dough overnight, freeze the baked rolls, or warm leftovers just before serving.
Complete Grocery List
| Ingredient | Amount | Purpose |
|---|---|---|
| All-purpose flour | 4–4½ cups | Main dough structure |
| Whole milk | 1¼ cups | Softness and moisture |
| Instant yeast | 2¼ tsp | Makes dough rise |
| Granulated sugar | 1/4 cup | Flavor and yeast support |
| Large egg | 1 | Richness and structure |
| Unsalted butter | 5 tbsp | Tender crumb |
| Salt | 1½ tsp | Balances flavor |
| Egg for wash | 1 | Golden shiny top |
| Milk for wash | 1 tbsp | Softens egg wash |
| Sesame seeds | 1–2 tbsp | Optional topping |
| Melted butter | 1 tbsp | Finishing |
Ingredients
For the Dough
- 4 cups all-purpose flour, plus a little more if needed
- 1¼ cups warm whole milk
- 2¼ teaspoons instant yeast
- 1/4 cup granulated sugar
- 1 large egg, room temperature
- 5 tablespoons unsalted butter, softened
- 1½ teaspoons salt
For the Egg Wash
- 1 large egg
- 1 tablespoon milk
For the Topping
- 1 to 2 tablespoons sesame seeds
- 1 tablespoon melted butter for brushing after baking
Best Flour for Soft Dinner Rolls
All-purpose flour is an excellent choice because it produces rolls that are light, tender, and soft without becoming excessively chewy. It is also easy to find and reliable for everyday baking.
Bread flour can also be used. Its higher protein content creates slightly stronger gluten, which may produce a taller roll with a little more chew.
For a balance between tenderness and structure, you can use half all-purpose flour and half bread flour. The most important rule is to avoid adding too much flour during kneading.
The dough should feel soft and slightly tacky rather than dry and stiff.
Why Milk Makes Dinner Rolls Softer
Milk contributes fat, protein, and natural sugars that improve both flavor and texture. It helps create a softer crumb and encourages attractive browning during baking.
Whole milk produces particularly rich rolls, but 2% milk can also work. Plant-based milk can be substituted if needed, although flavor and texture may change slightly depending on the type.
Warm the milk gently before mixing. It should feel pleasantly warm rather than hot because excessive heat can weaken or kill the yeast.
Understanding the Yeast
Instant yeast is particularly convenient because it can usually be mixed directly into the flour or liquid ingredients.
If you are using active dry yeast, combine it first with the warm milk and a small amount of sugar. Let it rest for about 5 to 10 minutes until the surface becomes foamy.
If there is no activity after several minutes, the yeast may be old or the milk may have been too hot.
Fresh yeast and proper proofing are essential if you want dinner rolls that rise tall instead of remaining dense.
Kitchen Equipment
| Equipment | Purpose |
|---|---|
| Large mixing bowl | Mixing and rising dough |
| Stand mixer | Optional kneading |
| Dough hook | Kneading attachment |
| Kitchen scale | Even portions |
| 9×13-inch baking pan | Baking rolls |
| Pastry brush | Egg wash and butter |
| Bench scraper | Dividing dough |
| Clean towel or wrap | Covering dough |
| Cooling rack | Cooling after baking |
Step-by-Step Instructions
Step 1: Warm the Milk
Warm the milk until it is comfortably warm but not hot. If you have a thermometer, around 105–110°F is a useful range.
Pour the milk into a large mixing bowl and stir in the sugar and yeast.
Step 2: Add the Egg
Add the room-temperature egg and whisk until combined. Using a room-temperature egg helps prevent the dough mixture from becoming too cold.
If your egg is cold, place it in a bowl of warm water for several minutes before using.
Step 3: Add the Flour and Salt
Add about 3½ cups flour along with the salt. Mix with a wooden spoon or the dough hook until a rough dough begins to form.
Add the remaining flour slowly instead of adding everything at once. The exact amount can vary depending on humidity, flour brand, and how the flour was measured.
Step 4: Add the Butter
Add the softened butter gradually while mixing. The dough may initially appear slippery or slightly separated, but continue kneading.
Within a few minutes, the butter will become fully incorporated and the dough will become smoother.
Step 5: Knead the Dough
Using a stand mixer, knead on medium-low speed for approximately 7 to 9 minutes. If kneading by hand, knead on a lightly floured surface for around 10 to 12 minutes.
The finished dough should feel soft, smooth, elastic, and only slightly tacky.
Avoid repeatedly adding flour every time the dough touches your fingers. A slightly softer dough generally produces softer rolls.
Step 6: Check Gluten Development
Pinch off a small piece of dough and stretch it carefully between your fingers. Properly kneaded dough should stretch quite thin before tearing.
This is often called the windowpane test.
If the dough tears immediately and feels rough, knead it for another few minutes.
Step 7: First Rise
Lightly grease a clean bowl and place the dough inside. Turn the dough once so the surface receives a light coating of oil.
Cover the bowl and place it in a warm, draft-free location.
Allow the dough to rise until approximately doubled in size, usually 60 to 90 minutes.
The dough should look very soft, airy, and expanded, similar to the dramatic risen dough shown in the image.
Step 8: Gently Deflate the Dough
Press gently into the risen dough to release large air pockets. You do not need to punch the dough aggressively.
Transfer it to a clean work surface.
Step 9: Divide Into 12 Portions
Divide the dough into 12 approximately equal pieces.
A kitchen scale gives the most consistent results, but you can also divide by eye.
Equal portions produce rolls that rise and bake at the same rate.
Step 10: Shape Smooth Balls
Take one dough portion and pull its edges toward the bottom.
Place the seam side against the work surface and cup your hand around the dough.
Move your hand in small circles until the dough develops a smooth, tight surface.
Repeat with the remaining portions.
Step 11: Arrange the Rolls
Lightly grease a 9×13-inch baking pan.
Arrange the 12 dough balls in the pan, leaving a small amount of space between them.
During the second rise, the rolls will expand and begin touching one another, which creates the soft pull-apart sides.
Step 12: Second Rise
Cover the pan loosely and allow the shaped rolls to rise for approximately 35 to 50 minutes.
They should become visibly larger, extremely soft, and puffy.
Do not rush this proofing stage. Under-proofed rolls are one of the most common reasons homemade bread becomes dense.
Step 13: Preheat the Oven
Preheat the oven to 350°F / 175°C during the last 20 minutes of the second rise.
The oven should be completely preheated before baking begins.
Step 14: Prepare the Egg Wash
Beat one egg with one tablespoon milk until smooth.
Using a pastry brush, gently coat the tops of the proofed rolls.
Use a light hand so you do not deflate the dough.
Step 15: Add Sesame Seeds
Sprinkle sesame seeds over the egg-washed rolls.
The seeds are optional, but they create the attractive bakery-style appearance shown in the image.
You can also use poppy seeds, everything seasoning, or leave the rolls plain.
Step 16: Bake Until Golden
Bake the rolls for approximately 18 to 22 minutes.
They should become evenly golden brown on top while remaining soft inside.
If the tops become dark before the centers are finished, loosely cover the pan with foil.
Step 17: Brush with Butter
Immediately after removing the rolls from the oven, brush the tops lightly with melted butter.
This adds flavor while softening the outer crust.
The combination of egg wash before baking and butter afterward gives the rolls a beautiful glossy finish.
Step 18: Rest Before Serving
Let the rolls rest in the pan for about 10 minutes.
Serve them warm, or transfer them to a cooling rack if you plan to store them.
How to Make Extremely Fluffy Dinner Rolls
The biggest mistake in homemade bread is usually adding too much flour. Dough that feels completely dry before the first rise often produces heavier rolls.
Start with the smaller flour amount and add more only as necessary. A soft dough is easier for yeast gases to expand, which helps create an airy crumb.
Proper kneading is equally important because gluten creates the elastic network that traps those gases.
Finally, both rises matter. A beautifully kneaded dough will still bake dense if it is placed in the oven before it has proofed enough.
How to Know When the Dough Has Risen Enough
Proofing time depends strongly on temperature.
In a warm kitchen, dough might double in less than an hour. During winter, the same dough may require 90 minutes or longer.
Judge the dough by appearance rather than relying only on a timer.
For the first rise, the dough should approximately double in volume.
For the second rise, the shaped rolls should appear noticeably swollen and should be touching or nearly touching.
Press one lightly with a fingertip. If the indentation returns slowly instead of instantly springing back, the dough is usually ready.
Pro Tips for Bakery-Style Results
Use fresh yeast and make sure the milk is warm rather than hot. Measure flour carefully and stop adding it once the dough becomes soft, smooth, and manageable.
Knead until the dough is elastic, then be patient with both proofing stages. The dough should rise based on volume rather than an exact clock time.
Shape each roll tightly enough to create a smooth top. This surface tension helps the rolls rise upward instead of spreading outward.
Use egg wash for deep color and melted butter after baking for softness. Let the rolls cool slightly before pulling them apart so the interior crumb can finish setting.
Delicious Variations
Garlic Butter Dinner Rolls
Mix melted butter with fresh minced garlic, chopped parsley, and a small pinch of salt. Brush generously over the warm rolls after baking.
These rolls are excellent with pasta, chicken, steak, soup, and holiday dinners.
Honey Butter Rolls
Combine softened butter with honey and a pinch of salt.
Serve some alongside the rolls and brush a thin layer over them while still warm for a lightly sweet finish.
Parmesan Herb Rolls
Sprinkle Parmesan over the rolls after applying the egg wash.
Add dried Italian seasoning or a small amount of garlic powder for extra flavor.
Everything Dinner Rolls
Replace sesame seeds with everything-bagel seasoning.
These work particularly well for breakfast sandwiches, burgers, and savory sliders.
Cheddar Dinner Rolls
Fold shredded cheddar into the dough near the end of kneading.
You can also sprinkle additional cheddar over the tops before baking.
Rosemary Butter Rolls
Add finely chopped fresh rosemary to the dough.
Brush with melted butter and a small amount of flaky salt after baking.
Smaller Slider Rolls
Divide the dough into 15 or 16 portions rather than 12.
Arrange closely together and begin checking them several minutes earlier during baking.
What to Serve with Homemade Dinner Rolls
| Main Dish | Why It Works |
|---|---|
| Roast chicken | Excellent with gravy |
| Pot roast | Classic comfort-food pairing |
| Beef stew | Perfect for dipping |
| Chicken soup | Adds a filling side |
| Pasta | Great with garlic butter |
| Turkey dinner | Holiday classic |
| BBQ chicken | Soaks up extra sauce |
| Salisbury steak | Excellent with onion gravy |
| Meatloaf | Traditional family dinner |
| Breakfast eggs | Great with butter and jam |
Serving Suggestions
Serve these rolls warm in a bread basket alongside butter. For holiday meals, honey butter, cinnamon butter, or garlic herb butter can make a simple basket of bread feel more special.
They also make excellent sandwiches the following day. Slice them horizontally and fill with eggs and cheese for breakfast, leftover turkey after Thanksgiving, pulled chicken, roast beef, or mini burgers.
For soup night, warm the rolls briefly before serving. Their soft interior is perfect for soaking up broth without immediately falling apart.
Make-Ahead Instructions
The dough can be prepared the evening before you plan to bake.
After kneading, place it in a lightly greased covered bowl and refrigerate overnight. The cold temperature slows fermentation while allowing flavor to develop.
The next day, remove the dough from the refrigerator and allow it to warm slightly before dividing and shaping.
You can also shape the rolls first, place them in the baking pan, cover tightly, and refrigerate overnight.
Before baking, allow the chilled rolls enough time at room temperature to become very puffy.
Storage
Allow baked rolls to cool completely before storing them.
Place them in an airtight container or tightly sealed food-storage bag.
At room temperature, they are generally best within about 2 to 3 days.
Avoid leaving the bag open because bread loses moisture quickly.
Reheating
For several rolls, wrap them loosely in foil and warm at 300°F / 150°C for about 8 to 10 minutes.
For an individual roll, microwave for approximately 10 to 20 seconds.
Do not microwave for too long because soft bread can become surprisingly tough after excessive heating.
Brushing a reheated roll with a little butter makes it taste much closer to freshly baked.
Freezing Instructions
Dinner rolls freeze extremely well.
Once they are completely cool, place them in a freezer-safe bag and remove as much excess air as possible.
Freeze for approximately 2 to 3 months for best quality.
You can freeze the entire batch together or wrap individual rolls so you can thaw only what you need.
Thaw at room temperature, then warm them briefly in the oven before serving.
Common Mistakes and How to Avoid Them
Adding Too Much Flour
This is one of the most common reasons dinner rolls become dense. Keep the dough soft and slightly tacky instead of making it completely dry.
Using Very Hot Milk
Excessively hot liquid can damage yeast. Warm milk should feel comfortable rather than scalding.
Not Kneading Enough
Poor gluten development prevents the dough from holding enough gas. Knead until smooth and elastic.
Rushing the First Rise
Let the dough approximately double before dividing it.
Rushing the Second Rise
The shaped rolls should be visibly puffy before baking.
Over-Proofing
Dough left for far too long can become weak and collapse. Bake once it is properly risen.
Overbaking
Dinner rolls do not need to become dark brown all over. Remove them once the tops are evenly golden.
Skipping the Butter Finish
The melted butter after baking adds flavor and helps create an exceptionally soft crust.
Troubleshooting Guide
| Problem | Likely Cause | Solution |
|---|---|---|
| Rolls are dense | Too much flour | Keep dough soft |
| Dough does not rise | Old yeast | Use fresh yeast |
| Dough rises slowly | Room too cold | Move to warmer area |
| Dough too sticky | Needs more kneading | Knead before adding flour |
| Dough too dry | Too much flour | Add a little milk |
| Rolls spread | Weak gluten | Knead longer |
| Tops are pale | No egg wash | Brush before baking |
| Tops get too dark | Oven heat | Cover loosely with foil |
| Rolls are dry | Overbaked | Reduce baking time |
| Bottom burns | Pan too close to heat | Use center oven rack |
Nutrition Estimate
| Nutrition | Approximate Amount |
|---|---|
| Calories | 220–270 |
| Protein | 6–8 g |
| Carbohydrates | 36–42 g |
| Fat | 6–9 g |
| Fiber | 1–2 g |
| Sugar | 4–7 g |
| Sodium | 250–350 mg |
| Serving Size | 1 large roll |
Nutrition information is approximate and depends on flour quantity, milk, butter, egg wash, toppings, and the final size of each roll.
Frequently Asked Questions
Why aren’t my dinner rolls fluffy?
The most common causes are too much flour, inactive yeast, inadequate kneading, or insufficient proofing.
Can I use all-purpose flour?
Yes. All-purpose flour produces soft and tender dinner rolls.
Is bread flour better?
Bread flour provides more structure and chew, but it is not required.
Can I use active dry yeast?
Yes. Activate it in warm milk with a little sugar before continuing with the recipe.
Can I knead the dough by hand?
Absolutely. Expect approximately 10 to 12 minutes of hand kneading.
Why is the dough still slightly sticky?
Soft enriched dough is naturally a little tacky. Kneading often reduces stickiness without requiring large amounts of extra flour.
How long should the dough rise?
Usually 60 to 90 minutes for the first rise, but temperature has a major effect.
Can I let the dough rise in the oven?
You can place it in a turned-off oven with the light on, provided the interior is only gently warm.
Do I have to use egg wash?
No, but it creates the glossy golden top.
Can I skip the sesame seeds?
Yes. They are purely optional.
Can I use poppy seeds?
Yes.
Can I use everything seasoning?
Yes. It creates an excellent savory variation.
Can I add garlic?
Yes. Garlic butter brushed over the baked rolls is one of the easiest variations.
Can I make the dough overnight?
Yes. Refrigerate the dough after kneading or refrigerate the shaped rolls.
Can I make smaller rolls?
Yes. Divide the dough into 15 to 18 portions and reduce baking time slightly.
Can I make burger buns?
Yes. Divide into fewer, larger portions and shape into smooth buns.
Can I make sliders?
Yes. Smaller rolls are ideal for sliders.
How do I make the tops shinier?
Use egg wash before baking and melted butter afterward.
How do I keep the rolls soft?
Avoid overbaking and store them airtight once completely cooled.
How long do dinner rolls last?
They are best within about 2 to 3 days at room temperature.
Can I refrigerate them?
You can, but refrigeration tends to make bread become firm more quickly.
Can I freeze baked rolls?
Yes. They freeze very well for approximately 2 to 3 months.
How do I reheat frozen rolls?
Thaw first, then warm them in a low oven.
Can I use these rolls for Thanksgiving?
Yes. They are excellent with turkey, gravy, mashed potatoes, stuffing, and other traditional holiday dishes.
Can I make them sweeter?
Yes. Increase the sugar slightly or serve them with honey butter.
Can I turn this dough into cinnamon rolls?
The enriched dough can be adapted for sweet rolls, though the shaping and filling would need to change.
Final Thoughts
These Fluffy Homemade Dinner Rolls are soft, buttery, beautifully golden, and easy enough to become a regular part of your family dinner rotation. The rich milk dough creates a tender interior while the egg wash gives the tops the glossy bakery-style appearance seen in the image.
The biggest secrets are simple: use active yeast, avoid overheating the milk, keep the dough soft, knead until elastic, and allow enough time for both rises. Those techniques matter much more than complicated ingredients.
Once shaped, the rolls should become noticeably puffy before going into the oven. After baking, a quick brushing of melted butter gives the crust extra flavor and helps maintain softness.
Serve them fresh with dinner, turn them into sandwiches or sliders, use them for holiday meals, or freeze a batch for later. With garlic butter, honey butter, cheese, herbs, or simple salted butter, these rolls can fit almost any meal.