Introduction
This Ultimate Chocolate Icebox Cake with Whipped Cream is a rich, creamy, chocolate-filled no-bake dessert made with layers of crisp chocolate cookies, fluffy vanilla whipped cream, and glossy chocolate sauce. After several hours in the refrigerator, the cookies absorb moisture from the cream and transform into soft, cake-like layers that slice beautifully and taste surprisingly close to a traditional chocolate layer cake.
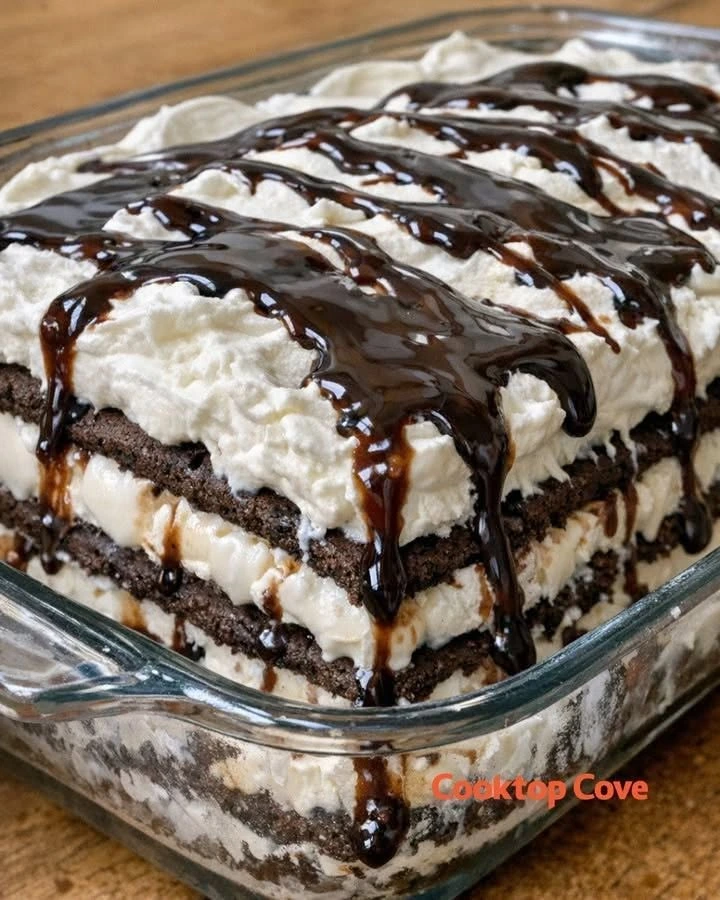
The dessert shown in the image has exactly the kind of texture that makes an icebox cake so irresistible: dark chocolate layers separated by generous amounts of white cream, with extra whipped cream spread over the top and thick ribbons of chocolate sauce running across the entire surface. Every slice gives you soft chocolate, cold cream, and rich sauce in one bite.
One of the best things about this recipe is how little effort it requires compared with a regular cake. There is no oven, no cake batter, no worrying about layers rising evenly, and no complicated frosting technique. You simply whip the cream, build the layers, refrigerate the dessert, and let time do most of the work.
This makes chocolate icebox cake especially useful for warm weather, busy holidays, birthdays, family dinners, potlucks, summer barbecues, weekend gatherings, or any occasion where you need a dessert that can be prepared well in advance.
The recipe is also very flexible. You can use chocolate graham crackers, chocolate wafer cookies, Oreos, or another crisp chocolate cookie. You can keep the filling light with whipped cream, make it thicker with cream cheese, add chocolate pudding between the layers, or create different versions with caramel, peanut butter, berries, bananas, espresso, or crushed cookies.
The key to a truly great icebox cake is giving it enough chilling time. The dessert may look like separate layers when first assembled, but after several hours in the refrigerator, the chocolate cookies soften and merge with the cream into a tender layered dessert that can be cut into thick squares.
Serve it cold straight from the refrigerator, finish it with extra chocolate drizzle, and you have a simple but impressive dessert that looks much more difficult than it actually is.
Recipe Overview
| Detail | Information |
|---|---|
| Recipe Name | Ultimate Chocolate Icebox Cake |
| Prep Time | 25 minutes |
| Chill Time | 8 hours minimum |
| Best Chill Time | Overnight |
| Total Time | About 8–12 hours |
| Servings | 10–12 |
| Course | Dessert |
| Cuisine | American No-Bake Dessert |
| Difficulty | Very Easy |
| Cooking Method | No-Bake |
| Main Ingredients | Chocolate cookies, whipped cream, chocolate sauce |
| Texture | Soft, creamy, layered, cake-like |
| Flavor | Chocolate, vanilla, cream |
| Best For | Parties, holidays, summer, birthdays |
| Make-Ahead Friendly | Excellent |
| Freezer Friendly | Yes |
| Best Served | Cold |
Why You’ll Love This Chocolate Icebox Cake
There are many reasons this dessert is worth keeping in your recipe collection.
It is completely no-bake.
The ingredient list is simple.
It can be made the night before.
It serves a crowd.
It slices beautifully after chilling.
The texture becomes soft and cake-like without actually baking a cake.
The chocolate and vanilla flavors are familiar enough for almost everyone to enjoy.
Another big advantage is that this recipe is extremely forgiving. If one cookie breaks, you simply use the pieces to fill gaps. If the cream layer is not perfectly smooth, it does not matter because the dessert settles as it chills.
Unlike many delicate desserts, the final result actually improves after sitting in the refrigerator.
That makes it one of the best desserts for entertaining.
What Is an Icebox Cake?
An icebox cake is a chilled layered dessert traditionally made from crisp cookies or wafers and whipped cream.
The term “icebox” comes from the refrigerators used before modern electric refrigeration became common.
Instead of baking the dessert, the layers are assembled and refrigerated.
As the dessert rests, the cream slowly softens the cookies.
Eventually, the cookies lose their crisp texture and begin to resemble thin layers of cake.
That is what makes the dessert so interesting.
You start with crunchy cookies and fluffy cream.
You finish with something that looks and tastes like a soft layered cake.
What Makes This Version Special?
This version uses several techniques that make the finished cake richer and more stable.
The whipped cream is lightly sweetened rather than overly sugary.
A small amount of cream cheese can be added for structure.
The chocolate sauce is used between some layers but not too heavily, preventing the dessert from becoming slippery.
The top is finished with a thick cream layer and generous chocolate drizzle.
The result is creamy but still sliceable.
Ingredients
For the Whipped Cream Filling
| Ingredient | Amount |
|---|---|
| Cold heavy whipping cream | 3 cups |
| Powdered sugar | 1/2 cup |
| Vanilla extract | 2 teaspoons |
| Cream cheese, softened | 4 oz |
| Fine salt | Small pinch |
The cream cheese is technically optional, but it gives the filling more stability and helps the cake hold beautiful layers after chilling.
For the Chocolate Layers
| Ingredient | Amount |
|---|---|
| Chocolate graham crackers or crisp chocolate cookies | 30–36 pieces |
| Chocolate fudge sauce or chocolate syrup | 3/4 cup |
| Mini chocolate chips | 1/3 cup, optional |
| Crushed chocolate cookies | 1/2 cup, optional |
Optional Finishing Ingredients
You can finish the cake with:
- Chocolate curls
- Cocoa powder
- Chocolate chips
- Crushed cookies
- Fresh strawberries
- Raspberries
- Caramel sauce
- Chopped nuts
- Whipped cream rosettes
Choosing the Best Chocolate Cookies
Different cookies create slightly different textures.
Chocolate Graham Crackers
Chocolate graham crackers are one of the easiest options.
They are flat, easy to arrange, and soften evenly.
They create neat horizontal layers that look especially nice when sliced.
Chocolate Wafer Cookies
Thin chocolate wafer cookies create a more delicate cake.
Because they are thinner, they soften faster.
They also create a deeper chocolate flavor.
Oreos
Oreos make the dessert richer and sweeter.
You can use whole cookies, separated cookies, or crushed Oreos.
Whole Oreos create thicker layers and need a little more chilling time.
Chocolate Digestive Biscuits
Chocolate digestive biscuits can also work.
They create a slightly more substantial texture.
Break them as needed to fill the baking dish.
Homemade Whipped Cream vs. Whipped Topping
Both work.
Homemade Whipped Cream
Homemade cream gives the dessert a fresher, richer flavor.
It is especially good if you plan to serve the cake within 1–2 days.
Whipped Topping
Whipped topping is convenient and stable.
It is a good choice if you need the dessert to hold longer or if you want the easiest possible version.
You can also combine both.
Ingredient Notes
Heavy Whipping Cream
The cream must be cold.
Cold cream traps air much better than warm cream.
For even better results, chill the mixing bowl for 10–15 minutes before whipping.
Powdered Sugar
Powdered sugar dissolves easily into cream.
It also contains a small amount of starch, which can help stabilize whipped cream slightly.
Cream Cheese
Cream cheese gives the filling more body.
It makes the dessert taste slightly like chocolate cheesecake while keeping the texture light.
Make sure it is softened before mixing.
Vanilla
Vanilla adds warmth and rounds out the chocolate flavor.
Without vanilla, the cream can taste flat.
Chocolate Sauce
Use a thick chocolate sauce rather than a very thin syrup if possible.
Thicker sauce gives better visual layers and does not soak excessively into the cream.
Equipment Needed
| Equipment | Purpose |
|---|---|
| 9×9-inch baking dish | Building the cake |
| Large mixing bowl | Whipping cream |
| Electric mixer | Whipping |
| Rubber spatula | Folding cream |
| Offset spatula | Smoothing layers |
| Measuring cups | Ingredients |
| Measuring spoons | Vanilla and sugar |
| Sharp knife | Cutting portions |
Step-by-Step Instructions
Step 1: Prepare the Baking Dish
Use a 9×9-inch baking dish for thick layers.
You can also use a 9×13-inch dish for a wider, thinner cake.
No greasing is required.
If desired, line the dish with parchment paper for easier lifting.
Step 2: Beat the Cream Cheese
Place the softened cream cheese in a mixing bowl.
Beat for approximately 1–2 minutes until smooth.
Add the powdered sugar and vanilla.
Beat again until creamy.
This step prevents lumps in the final filling.
Step 3: Whip the Heavy Cream
In a separate cold bowl, whip the heavy cream.
Start at medium speed.
Once it begins to thicken, increase to medium-high.
Beat until stiff peaks form.
Do not continue much beyond this stage.
Overwhipped cream can become grainy and eventually turn into butter.
Step 4: Combine the Cream Mixtures
Add a small amount of whipped cream to the cream cheese mixture.
Fold gently.
This lightens the cream cheese.
Then fold in the remaining whipped cream in two or three additions.
The final mixture should be thick, fluffy, and smooth.
Step 5: Spread the First Cream Layer
Spread a thin layer of cream across the bottom of the dish.
This acts like glue for the cookies.
It helps keep the first layer from moving.
Step 6: Add the First Chocolate Layer
Arrange chocolate cookies in one flat layer.
Break cookies as necessary to fill gaps.
Try to cover most of the cream.
Small spaces are fine.
Step 7: Add a Thick Cream Layer
Spread approximately one-quarter of the cream mixture over the cookies.
Use a spatula to smooth the surface.
Do not press too hard.
You want the filling to remain airy.
Step 8: Add Chocolate Sauce
Drizzle a small amount of chocolate sauce over the cream.
Use thin ribbons rather than covering the entire surface.
This gives chocolate flavor without making the layers slippery.
Step 9: Repeat the Layers
Repeat:
- Chocolate cookies
- Cream filling
- Chocolate drizzle
Continue until you have used most of the ingredients.
Depending on the dish and cookie size, you should get approximately 3–4 chocolate layers.
Step 10: Add the Final Cream Layer
Spread the remaining cream over the top.
Make this layer slightly thicker than the others.
You can leave it rustic with soft peaks or smooth it completely.
Both styles look good.
Step 11: Add Chocolate Drizzle
Drizzle chocolate sauce generously across the top.
Let some of it naturally run into the cream.
For a dramatic appearance like the image, use thick zigzag ribbons.
Step 12: Cover and Chill
Cover the dish carefully.
Refrigerate for at least 8 hours.
Overnight is ideal.
Do not skip this step.
The cookies need time to soften completely.
Step 13: Check the Texture
After chilling, insert a thin knife through the layers.
The cookies should feel soft rather than crunchy.
If they are still firm, refrigerate for several more hours.
Step 14: Slice
Use a sharp knife.
Cut straight down through the layers.
Wipe the blade between cuts.
This helps reveal the dark and white striped layers.
Step 15: Serve
Serve immediately after slicing.
Add extra:
- Chocolate sauce
- Whipped cream
- Chocolate curls
- Berries
Keep the remaining dessert refrigerated.
The Secret to Perfect Cake-Like Layers
The transformation happens because the cookies absorb moisture from the cream.
If there is not enough cream, they may stay crunchy.
If the dessert is not chilled long enough, the texture may remain uneven.
The ideal balance is enough cream to surround each cookie layer without turning the cake into a bowl of cream.
Overnight chilling gives the most reliable result.
How Thick Should the Cream Layers Be?
Aim for approximately 1/2 inch of cream between cookie layers.
Very thin layers may not provide enough moisture.
Very thick layers can make the cake difficult to slice.
The top layer can be thicker because it also acts as decoration.
How to Get Perfectly Clean Slices
Chill the cake overnight.
Use a sharp knife.
Run the knife under hot water.
Dry it completely.
Cut one slice.
Wipe and repeat.
This technique produces much cleaner edges.
How to Keep the Cake from Sliding
Do not use too much chocolate sauce between layers.
Use stabilized whipped cream.
Chill thoroughly.
Keep the cookie layers flat.
Do not stack the cookies unevenly.
These steps make the finished dessert much more stable.
Homemade Chocolate Sauce
You can make a quick chocolate sauce with:
- 1/2 cup heavy cream
- 4 oz chopped semi-sweet chocolate
- 1 tablespoon butter
Heat the cream until steaming.
Pour over the chocolate.
Let sit for 2 minutes.
Add butter.
Stir until glossy.
Cool before adding to the icebox cake.
Chocolate Ganache Version
For an even richer dessert, use ganache instead of chocolate syrup.
Let the ganache cool until thick but pourable.
Drizzle only a small amount between layers.
Use more on top.
Ganache creates a more intense chocolate flavor.
Double Chocolate Icebox Cake
Add chocolate pudding between the layers.
Layer:
- Chocolate cookies
- Chocolate pudding
- Whipped cream
- Chocolate sauce
Repeat.
This version is much richer and especially good for serious chocolate lovers.
Oreo Icebox Cake
Replace the chocolate crackers with Oreos.
For extra Oreo flavor, crush several cookies and mix them into the whipped cream.
Finish with:
- Oreo crumbs
- Chocolate sauce
- Extra whipped cream
This variation is excellent for birthdays.
Chocolate Peanut Butter Icebox Cake
Mix approximately 1/2 cup creamy peanut butter with part of the whipped cream.
Alternate:
- Chocolate cookies
- Peanut butter cream
- Vanilla cream
Finish with chocolate drizzle.
Chocolate and peanut butter create a much richer dessert.
Chocolate Strawberry Icebox Cake
Add thinly sliced strawberries between some of the cream layers.
Pat the berries dry first.
Too much strawberry juice can loosen the cream.
Fresh berries add acidity and make the dessert feel lighter.
Chocolate Raspberry Icebox Cake
Use fresh raspberries or a thin layer of raspberry preserves.
Chocolate and raspberry pair especially well.
If using preserves, spread them very thinly.
Chocolate Banana Icebox Cake
Add thin banana slices between the layers.
Use ripe but firm bananas.
Serve this version within 1–2 days because bananas darken over time.
Salted Caramel Chocolate Icebox Cake
Drizzle caramel sauce between some layers.
Use only a little.
Finish the top with:
- Chocolate sauce
- Caramel
- Flaky sea salt
The salt helps balance the sweetness.
Mocha Chocolate Icebox Cake
Mix 1–2 teaspoons instant espresso powder into the cream.
Coffee deepens the chocolate flavor without making the dessert taste strongly like coffee.
This variation is excellent for adults and dinner parties.
Mint Chocolate Icebox Cake
Add a small amount of peppermint extract to the cream.
Use very little.
Peppermint extract is strong.
Finish with crushed chocolate mint candies or chocolate curls.
Cookies and Cream Version
Use Oreo cookies.
Fold crushed cookies into the cream.
Layer whole Oreos between the cream.
Top with extra crumbs.
This creates a thicker, chunkier texture.
Cheesecake Icebox Cake
Increase the cream cheese to 8 oz.
Reduce heavy cream slightly.
The final filling becomes thicker and tangier.
This variation sits somewhere between cheesecake and icebox cake.
Chocolate Pudding Layer
A layer of pudding creates extra creaminess.
Use chilled pudding.
Keep each pudding layer thin.
Too much pudding can make the cake difficult to slice.
How to Make Individual Icebox Cups
Instead of one large cake, build individual servings.
Use:
- Dessert cups
- Small jars
- Clear glasses
Layer crushed cookies and whipped cream.
Repeat.
Finish with chocolate sauce.
Individual cups are excellent for parties and meal prep.
Mini Icebox Cakes
You can build mini cakes using small loaf pans or ramekins.
Line the container with plastic wrap.
Layer cookies and cream.
Chill overnight.
Turn out before serving.
This creates neat individual desserts.
How to Make It Less Sweet
Use unsweetened whipped cream or reduce powdered sugar.
Choose dark chocolate cookies.
Use dark chocolate sauce instead of milk chocolate.
Add berries.
Add a pinch of salt.
These adjustments help balance the richness.
How to Make It Richer
Add:
- Cream cheese
- Ganache
- Chocolate pudding
- More chocolate drizzle
- Chocolate chips
For very rich versions, cut smaller portions.
How to Make It Lighter
Use:
- Less cream cheese
- Light whipped topping
- Fresh berries
- Less chocolate sauce
You can also make thinner layers.
What to Serve with Chocolate Icebox Cake
| Serving Idea | Why It Works |
|---|---|
| Strawberries | Bright and fresh |
| Raspberries | Adds tartness |
| Coffee | Balances sweetness |
| Espresso | Excellent with chocolate |
| Vanilla ice cream | Very indulgent |
| Whipped cream | Adds softness |
| Chopped nuts | Adds crunch |
| Caramel sauce | Adds depth |
Party Serving Ideas
For a party, cut the cake into smaller squares.
Place each square on a plate.
Finish with:
- One strawberry
- Chocolate drizzle
- Small whipped cream swirl
This simple presentation makes the dessert look much more elegant.
Birthday Dessert Idea
Add:
- Chocolate sprinkles
- Mini chocolate chips
- Crushed cookies
You can also pipe whipped cream around the edges.
The cake is easy to decorate because the top does not need to be perfectly flat.
Summer Dessert Idea
Keep the dessert extra cold.
Serve with berries.
Use lighter whipped cream.
This makes it ideal for hot days when you do not want to bake.
Holiday Version
For Christmas or winter holidays, add:
- Peppermint
- Chocolate curls
- Crushed peppermint candy
For Thanksgiving, try:
- Caramel
- Pecans
- Chocolate drizzle
Make-Ahead Instructions
This dessert is one of the best make-ahead recipes.
Prepare it one full day before serving.
Cover tightly.
Refrigerate overnight.
The texture becomes better with time.
If adding delicate decorations such as berries or chocolate curls, add those shortly before serving.
Storage
Keep the cake covered in the refrigerator.
It stays good for approximately 3–4 days.
The texture becomes softer each day.
For the best balance between structure and softness, serve within the first 48 hours.
How to Keep It Fresh
Cover tightly.
Keep refrigerated.
Do not leave at room temperature for long periods.
Avoid storing uncovered because the cream can absorb refrigerator odors.
Freezing
Chocolate icebox cake freezes surprisingly well.
Cover tightly.
Freeze for up to 1 month.
For a frozen dessert texture, serve partially thawed.
For a softer cake texture, thaw overnight in the refrigerator.
Frozen Icebox Cake Version
If you want a dessert closer to ice cream cake, freeze the assembled cake for several hours.
Let it sit at room temperature for about 10 minutes before slicing.
This creates a firmer, colder dessert.
Common Mistakes to Avoid
Not Chilling Long Enough
This is the biggest mistake.
The cookies need time to soften.
Making the Cream Too Soft
Underwhipped cream may not hold the layers.
Whip to stiff peaks.
Overwhipping the Cream
Overwhipped cream becomes grainy.
Stop as soon as stiff peaks form.
Using Too Much Chocolate Sauce
Excess sauce makes the layers slide.
Use modest amounts inside the cake.
Using Too Little Cream
The cookies need moisture to soften.
Make sure every cookie layer is surrounded by cream.
Using Very Thick Cookies
Thicker cookies need more chilling time.
Plan for overnight refrigeration.
Troubleshooting Guide
| Problem | Cause | Solution |
|---|---|---|
| Cookies remain crunchy | Not enough chilling | Refrigerate longer |
| Layers slide | Too much sauce | Use less between layers |
| Cream is runny | Underwhipped | Whip to stiff peaks |
| Cream is grainy | Overwhipped | Stop earlier |
| Cake is too soft | Too much filling | Use thinner cream layers |
| Cake is too dry | Too little cream | Add more between layers |
| Chocolate sauce sinks | Too warm | Cool before using |
| Slices look messy | Cake not cold enough | Chill longer |
| Dessert tastes too sweet | Too much syrup | Use dark chocolate and less sugar |
Nutrition Estimate
| Nutrition | Approximate Amount |
|---|---|
| Calories | 360–520 per serving |
| Protein | 4–7 g |
| Carbohydrates | 38–55 g |
| Fat | 22–34 g |
| Sugar | 25–40 g |
| Serving Size | 1 square |
Nutrition values are approximate and depend on cookies, cream, cream cheese, chocolate sauce, and portion size.
Frequently Asked Questions
What exactly is an icebox cake?
It is a no-bake cake made by layering cookies with a creamy filling and refrigerating until the cookies soften into cake-like layers.
Does icebox cake really taste like cake?
Yes.
After enough chilling time, the cookies become surprisingly soft and tender.
How long does chocolate icebox cake need to chill?
At least 8 hours is best.
Overnight gives the most consistent texture.
Can I make it with Cool Whip?
Yes.
Cool Whip or another whipped topping works very well and makes the recipe even easier.
Can I use Oreos?
Yes.
Oreos create a rich cookies-and-cream version.
Can I use chocolate graham crackers?
Yes.
They are one of the best choices for neat layers.
Can I use regular graham crackers?
Yes.
The dessert will have a milder chocolate flavor.
You can compensate with extra chocolate sauce.
Can I use chocolate pudding?
Yes.
Keep pudding layers relatively thin.
Can I use cream cheese?
Yes.
Cream cheese improves stability and creates a cheesecake-like flavor.
Can I make this without cream cheese?
Absolutely.
Use whipped cream only.
Can I add strawberries?
Yes.
Dry them thoroughly before adding.
Can I add raspberries?
Yes.
Their tartness works especially well with chocolate.
Can I add bananas?
Yes.
Serve banana versions quickly because the fruit darkens.
Can I add peanut butter?
Yes.
Mix peanut butter into part of the cream.
Can I add coffee?
Yes.
Espresso powder makes an excellent mocha version.
Can I make individual portions?
Yes.
Use small clear cups or jars.
Can I prepare this two days ahead?
Yes.
The dessert will be very soft by the second day but still delicious.
Why are my cookies still crunchy after chilling?
They may be unusually thick, or there may not be enough cream touching them.
Give the cake more time.
Why is my filling runny?
The cream may not have been whipped enough.
Warm ingredients can also soften the filling.
Can I use whipped cream from a can?
It is not ideal for the main filling because it deflates quickly.
Use heavy whipped cream or stabilized whipped topping instead.
Can I freeze icebox cake?
Yes.
It can be frozen for approximately 1 month.
Do I thaw it before serving?
You can.
For cake-like texture, thaw in the refrigerator.
For a frozen-dessert texture, serve partially thawed.
How long can it stay at room temperature?
Because it contains dairy, keep room-temperature serving time limited and return leftovers to the refrigerator promptly.
What is the best chocolate topping?
Thick fudge sauce or cooled ganache creates the richest appearance.
Can I use white chocolate sauce?
Yes.
White chocolate can be added as an additional drizzle.
How can I make it look more professional?
Use thick even cream layers, chill overnight, cut with a hot clean knife, and decorate the top shortly before serving.
Final Thoughts
This Ultimate Chocolate Icebox Cake with Whipped Cream is one of the easiest ways to create a dramatic layered dessert without baking a single cake layer.
The recipe begins with crisp chocolate cookies, light whipped cream, vanilla, and chocolate sauce, but several hours of chilling completely transform those simple ingredients. The cookies soften, the cream settles between them, and the entire dessert develops a tender layered texture that looks and tastes like a real cake.
The key is not complicated technique. It is patience.
Whip the cream properly, build even layers, use chocolate sauce in moderation, and let the dessert chill overnight whenever possible.
Once you have the basic method, the variations are almost endless. Add Oreos, strawberries, peanut butter, caramel, pudding, coffee, bananas, cream cheese, or ganache depending on the occasion.
Serve it cold in thick squares with extra chocolate drizzle and a little whipped cream on the side.
It is creamy, chocolatey, simple to prepare, perfect for making ahead, and impressive enough to become one of those no-bake desserts people ask you to make again.