Introduction
These Bakery-Style Glazed Apple Slab Pie Bars are everything you want from a homemade apple dessert: flaky golden pastry, a thick layer of tender cinnamon-spiced apples, buttery edges, and a sweet vanilla glaze that settles over the top like a bakery finish.
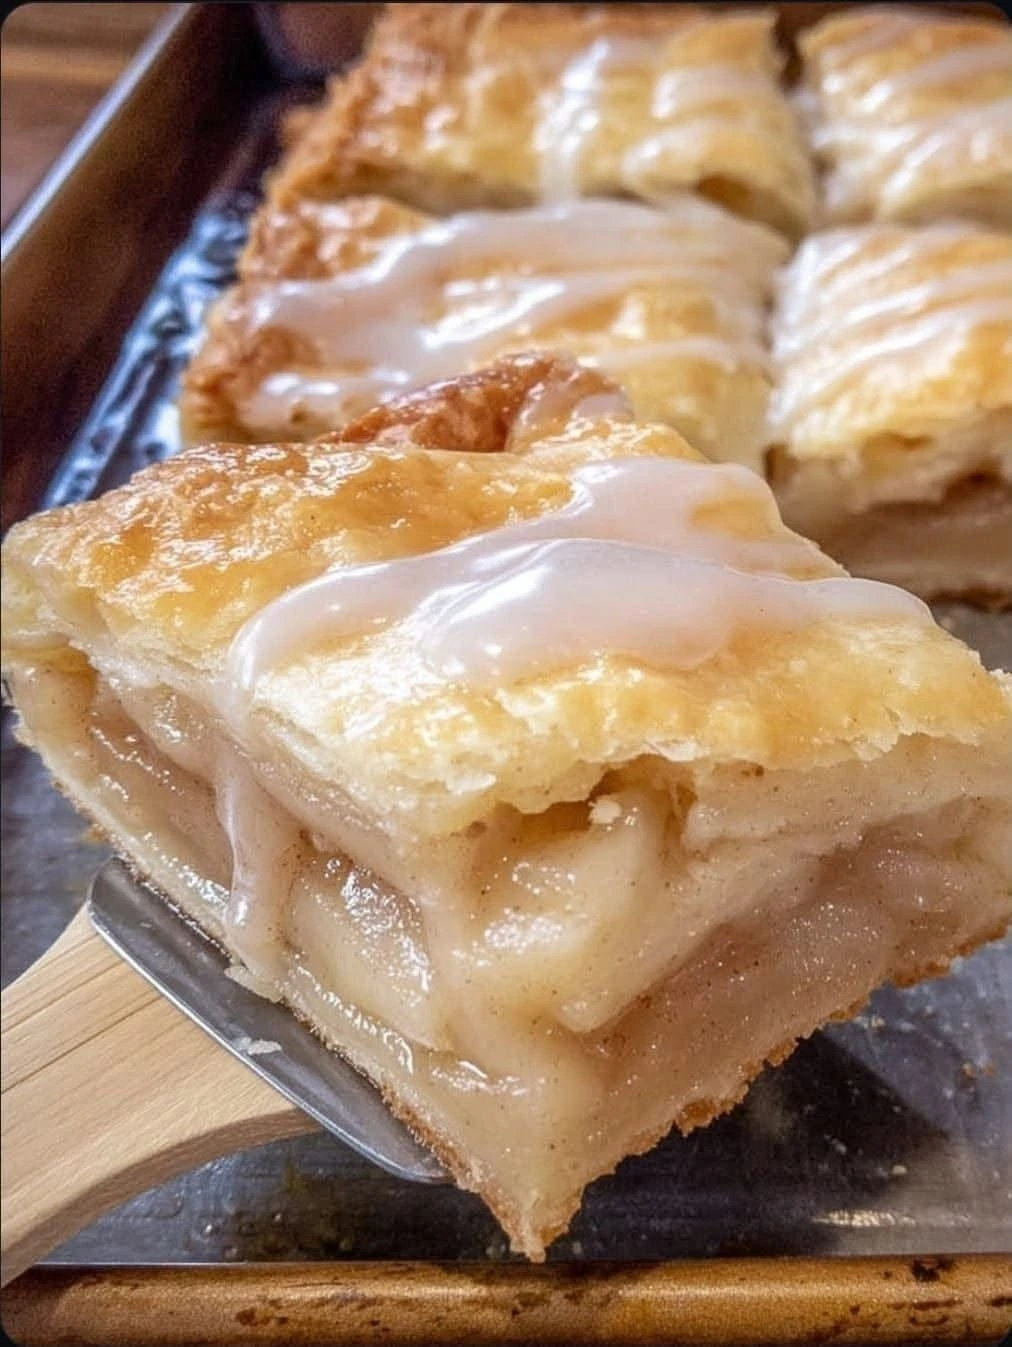
The dessert is inspired by the image, where each square has a generous apple filling enclosed between two crisp layers of pastry. The apples are soft and glossy without being watery, while the top crust is deeply golden and lightly glazed for a rich, comforting finish.
What makes this recipe especially useful is the format. Instead of baking a traditional round pie and cutting narrow slices, a slab pie is baked in a rectangular pan and cut into generous squares. That makes it perfect for Thanksgiving, Christmas, fall parties, potlucks, church gatherings, bake sales, weekend desserts, or any occasion where you need to serve several people.
The texture is one of the best parts. The bottom crust stays sturdy enough to support the fruit, the apple layer stays soft and juicy, and the top pastry remains flaky around the edges. A simple vanilla glaze adds sweetness without hiding the flavor of the apples and cinnamon underneath.
This recipe also gives you flexibility. You can use homemade pie crust, refrigerated pastry, or puff pastry for a faster version. You can add caramel, pecans, walnuts, maple glaze, or stronger fall spices depending on the flavor you want.
Recipe Overview
| Detail | Information |
|---|---|
| Recipe Name | Bakery-Style Glazed Apple Slab Pie Bars |
| Prep Time | 35 minutes |
| Dough Chill Time | 30 minutes |
| Bake Time | 45–55 minutes |
| Cooling Time | 45 minutes |
| Total Time | About 2 hours 45 minutes |
| Servings | 12–16 bars |
| Course | Dessert |
| Cuisine | American Baking |
| Difficulty | Intermediate |
| Cooking Method | Oven-Baked |
| Main Ingredients | Apples, pastry, cinnamon, brown sugar |
| Texture | Flaky crust, thick tender apple filling |
| Flavor | Buttery, cinnamon-spiced, caramel-like |
| Best For | Holidays, potlucks, fall baking |
| Make-Ahead Friendly | Yes |
| Freezer Friendly | Yes |
| Best Served | Slightly warm or room temperature |
Why You’ll Love These Apple Slab Pie Bars
These bars give you the classic flavor of apple pie in a form that is much easier to serve.
The filling is thick and generous.
The pastry is flaky.
The apples stay tender.
The cinnamon flavor is warm but balanced.
The glaze gives the finished dessert a beautiful bakery-style appearance.
They also travel well. A rectangular pan is easier to transport than a round pie dish, and the bars can be cut into equal portions before serving.
Another advantage is that the filling cooks more evenly than in a very deep pie. The apples are spread across a wide layer, so they soften at a more consistent rate.
What Makes a Great Apple Slab Pie?
A great slab pie needs three things:
A crust strong enough to hold the filling.
Apples that soften without turning to mush.
Enough thickener to keep the filling juicy but sliceable.
If the crust is too thin, the bars fall apart.
If the apples are too soft, the filling loses texture.
If there is not enough cornstarch, the juices run out when the bars are cut.
The goal is a thick apple layer that holds together when lifted with a spatula, just like the slice shown in the image.
Ingredients
For the Homemade Pastry
| Ingredient | Amount |
|---|---|
| All-purpose flour | 3 1/2 cups |
| Granulated sugar | 2 tablespoons |
| Salt | 1 teaspoon |
| Unsalted butter, very cold and cubed | 1 1/4 cups |
| Ice water | 7–10 tablespoons |
This amount gives enough dough for both the bottom and top crust.
For the Apple Filling
| Ingredient | Amount |
|---|---|
| Apples, peeled and thinly sliced | 8 medium |
| Granulated sugar | 1/2 cup |
| Brown sugar | 1/3 cup |
| Ground cinnamon | 2 teaspoons |
| Ground nutmeg | 1/4 teaspoon |
| Cornstarch | 1/4 cup |
| Lemon juice | 1 tablespoon |
| Vanilla extract | 1 teaspoon |
| Salt | 1/4 teaspoon |
| Unsalted butter, cut into small pieces | 2 tablespoons |
For the Egg Wash
- 1 large egg
- 1 tablespoon milk or cream
For the Vanilla Glaze
| Ingredient | Amount |
|---|---|
| Powdered sugar | 1 1/4 cups |
| Milk or cream | 2–3 tablespoons |
| Vanilla extract | 1 teaspoon |
| Salt | Tiny pinch |
Best Apples to Use
A slab pie needs apples that hold their shape during baking.
Granny Smith
Granny Smith apples are firm and tart.
They are excellent because they balance the sweetness of the sugar and glaze.
Honeycrisp
Honeycrisp apples are sweet, juicy, and crisp.
They soften well without immediately breaking down.
Pink Lady
Pink Lady apples have a bright flavor and stay pleasantly firm during baking.
Braeburn
Braeburn apples have a strong apple flavor and work especially well with cinnamon.
Fuji
Fuji apples are sweeter and softer.
They are best when combined with a firmer tart variety.
Best Apple Combination
For a balanced filling, use a mixture of tart and sweet apples.
A great combination is:
- 4 Granny Smith apples
- 4 Honeycrisp apples
This gives the filling good structure, sweetness, and acidity.
Using more than one variety also creates a more interesting apple flavor.
How Thin Should the Apples Be?
Slice the apples approximately 1/4 inch thick.
Slices that are too thick may remain firm after the crust is finished.
Slices that are paper-thin can disappear into a soft filling.
Consistent thickness helps every apple cook evenly.
Ingredient Notes
Cold Butter
Cold butter is one of the most important parts of flaky pastry.
When cold butter melts in the oven, it creates steam.
That steam separates the dough into flaky layers.
If the butter becomes too warm while preparing the crust, the dough becomes denser and less flaky.
Cornstarch
Cornstarch is essential because apples release a lot of juice.
It converts that juice into a thick, glossy filling.
A slab pie needs enough thickener because the bars need to hold their shape when cut.
Lemon Juice
Lemon juice adds acidity.
It balances the brown sugar and keeps the filling from tasting overly sweet.
It also helps preserve the apple flavor.
Brown Sugar
Brown sugar gives the filling a deeper caramel note.
It pairs especially well with cinnamon and butter.
Equipment Needed
| Equipment | Purpose |
|---|---|
| 9×13-inch baking pan | Main baking pan |
| Rolling pin | Rolling pastry |
| Large mixing bowl | Apple filling |
| Medium bowl | Pastry |
| Sharp knife | Slicing apples |
| Cutting board | Apple preparation |
| Pastry cutter | Cutting butter into flour |
| Measuring cups | Dry and liquid ingredients |
| Measuring spoons | Spices |
| Pastry brush | Egg wash |
| Cooling rack | Cooling bars |
| Spatula | Serving |
Step-by-Step Instructions
Step 1: Make the Pastry Dough
In a large bowl, whisk together:
- Flour
- Sugar
- Salt
Add the cold butter cubes.
Use a pastry cutter or your fingertips to work the butter into the flour.
Stop when the mixture contains a combination of coarse crumbs and pea-sized pieces of butter.
Those visible pieces of butter are important for a flaky crust.
Step 2: Add Ice Water
Add ice water one tablespoon at a time.
Toss the mixture gently after each addition.
Stop when the dough begins to hold together when pressed.
The dough should not feel wet or sticky.
Too much water makes pastry tough.
Step 3: Divide and Chill
Divide the dough into two portions.
Make the bottom portion slightly larger than the top.
Flatten both pieces into rectangles.
Wrap tightly.
Refrigerate for at least 30 minutes.
This chill time allows the flour to hydrate and the butter to become firm again.
Step 4: Prepare the Apple Filling
Peel and core the apples.
Slice them evenly.
Place them in a large bowl.
Add:
- Granulated sugar
- Brown sugar
- Cinnamon
- Nutmeg
- Cornstarch
- Lemon juice
- Vanilla
- Salt
Toss gently until every slice is coated.
Let the apples sit for approximately 10 minutes.
Step 5: Check the Apple Juices
After resting, the apples may release some liquid.
A small amount is good.
If there is a large puddle at the bottom of the bowl, remove only a small amount.
Do not drain the apples completely.
You still need enough juice to create a thick, glossy filling.
Step 6: Roll the Bottom Crust
Remove the larger dough portion from the refrigerator.
Lightly flour the work surface.
Roll the dough into a rectangle slightly larger than the pan.
Transfer it carefully to the baking pan.
Press gently into the corners and along the sides.
Avoid stretching the dough because stretched pastry can shrink while baking.
Step 7: Optional Barrier for Extra-Crisp Bottom Crust
For an even better bottom crust, sprinkle approximately 2 tablespoons fine breadcrumbs or crushed graham crackers over the pastry.
Use only a thin layer.
This absorbs a little apple juice while baking and helps protect the crust from becoming soggy.
The flavor should remain almost invisible.
Step 8: Add the Filling
Spread the apples evenly over the bottom pastry.
Arrange them rather than dumping everything into the center.
A flat, even layer cooks more consistently.
Dot the apples with small pieces of butter.
Step 9: Roll the Top Crust
Roll the second piece of dough into a rectangle.
Place it over the apples.
Trim any large excess.
Fold the top and bottom edges together.
Press firmly to seal.
Crimp with a fork or your fingers.
Step 10: Cut Steam Vents
Cut several small slits in the top crust.
These vents allow steam to escape while the apples cook.
Without them, the pastry can puff excessively and separate from the filling.
Step 11: Chill Before Baking
Place the assembled slab pie in the refrigerator for 15–20 minutes.
This final chill gives the pastry a better chance of staying flaky.
It also helps prevent the butter from melting before the pie enters the oven.
Step 12: Add Egg Wash
Whisk the egg with milk or cream.
Brush a thin layer over the top crust.
Avoid letting egg wash pool along the edges.
This gives the pastry a glossy golden color.
Step 13: Bake
Bake at 375°F / 190°C for approximately 45–55 minutes.
The crust should be deeply golden.
The apple juices should bubble visibly through the vents.
Visible bubbling is important because it shows that the cornstarch has reached the temperature needed to thicken properly.
Step 14: Protect the Crust if Needed
If the edges begin browning too quickly, cover them loosely with foil.
Continue baking until the center crust is golden and the apple filling is bubbling.
Do not remove the pie just because the edges look done.
The center must also bake fully.
Step 15: Cool Before Cutting
Let the slab pie cool for at least 45 minutes.
This is one of the most important steps.
Fresh from the oven, the apple filling is still loose and extremely hot.
As it cools, the cornstarch thickens the juices into a glossy filling.
Cutting too soon can cause the fruit to spill out.
Step 16: Make the Vanilla Glaze
Whisk together:
- Powdered sugar
- 2 tablespoons milk
- Vanilla
- Tiny pinch of salt
The glaze should be thick but pourable.
Add more milk one teaspoon at a time if necessary.
Step 17: Glaze the Slab Pie
Drizzle the glaze across the cooled crust.
For the thick glazed appearance in the image, add generous ribbons rather than a very thin drizzle.
Let the glaze set for approximately 10–15 minutes.
Step 18: Cut Into Bars
Use a sharp knife.
Cut into:
- 12 large bars
or
- 16 smaller squares
Wipe the knife between cuts if you want cleaner edges.
Lift each piece using a wide spatula.
How to Get a Thick Apple Filling
A great slab pie filling should be juicy but not watery.
Use enough cornstarch.
Bake until the filling bubbles.
Cool before cutting.
Use firm apples.
Do not add extra liquid.
These four steps make the biggest difference.
How to Keep the Bottom Crust Crisp
Several techniques help prevent sogginess.
Keep the dough cold.
Do not use overly juicy apples.
Use cornstarch.
Bake the slab pie on a lower-middle oven rack.
For even more bottom heat, preheat a heavy baking sheet in the oven and place the slab pie pan directly on it.
The hot metal gives the bottom crust an immediate burst of heat.
How to Make the Crust Extra Flaky
Leave visible pieces of cold butter in the dough.
Use ice water.
Do not knead.
Chill before rolling.
Chill again before baking.
Handle the dough as little as possible.
The less the butter melts before the oven, the better the pastry layers.
How to Tell When the Pie Is Fully Baked
Look for three signs.
The crust should be golden brown.
The filling should bubble through the vents.
The bottom edges should look cooked rather than pale or doughy.
If the crust is brown but the filling is not bubbling, cover the top loosely with foil and continue baking.
Why Did My Apple Filling Turn Watery?
Possible causes include:
Too little cornstarch.
Very juicy apple varieties.
Removing the pie before the filling bubbled.
Cutting before the pie cooled.
Using too much lemon juice or other added liquid.
The filling needs both sufficient heat and cooling time to set properly.
Bakery-Style Thick Glaze
For an opaque glaze like the one shown in the image, use less milk.
Start with only 2 tablespoons.
The glaze should fall slowly from the whisk.
If it runs like water, add more powdered sugar.
For a richer finish, replace the milk with heavy cream.
Caramel Apple Slab Pie
Drizzle caramel sauce over each finished bar.
A small pinch of flaky salt makes the caramel flavor even better.
Avoid adding too much caramel underneath the top crust because excessive liquid can interfere with setting.
Apple Cinnamon Pecan Slab Pie
Add 3/4 cup toasted chopped pecans to the apple filling.
The nuts provide extra crunch and a buttery flavor.
Reserve a few pecans to sprinkle over the glaze.
Apple Walnut Slab Pie
Use chopped walnuts instead of pecans.
Walnuts have a stronger flavor and work beautifully with cinnamon and dark brown sugar.
Maple Glazed Apple Slab Pie
For a fall-inspired maple glaze, combine:
- 1 cup powdered sugar
- 1 tablespoon pure maple syrup
- 1–2 tablespoons milk
- Pinch of salt
Drizzle over the cooled pie.
Brown Butter Glaze
Melt 3 tablespoons butter in a small saucepan.
Continue cooking until golden brown and nutty-smelling.
Cool slightly.
Mix with powdered sugar, milk, and vanilla.
Brown butter gives the glaze a deeper caramel flavor.
Puff Pastry Apple Bars
For a faster version, use store-bought puff pastry.
Place one sheet on the bottom.
Add the apple filling.
Cover with another sheet.
Seal the edges.
Cut vents.
Brush with egg wash.
Bake until deeply golden and puffed.
This creates an especially flaky top crust.
Refrigerated Pie Crust Shortcut
Refrigerated pie dough also works well.
Roll the crusts slightly thinner so they fit the rectangular pan.
Use enough dough to completely cover both the bottom and top.
This shortcut reduces preparation time significantly.
Apple Slab Pie with Streusel
Instead of using a top pastry crust, add streusel.
Combine:
- 1 cup flour
- 3/4 cup brown sugar
- 1 teaspoon cinnamon
- 6 tablespoons cold butter
Crumble over the apple filling.
Bake until golden.
This variation tastes like a combination of apple pie and apple crisp.
What to Serve with Apple Slab Pie
| Serving Idea | Why It Works |
|---|---|
| Vanilla ice cream | Classic warm apple pairing |
| Cinnamon ice cream | Adds more spice |
| Whipped cream | Light and creamy |
| Caramel sauce | Adds deep sweetness |
| Hot coffee | Excellent bakery pairing |
| Black tea | Balances richness |
| Fresh cream | Simple and elegant |
| Cheddar cheese | Traditional sweet-savory combination |
Best Way to Serve It Warm
Place one square on a plate.
Warm for approximately 10–20 seconds in the microwave.
Add a scoop of vanilla ice cream.
Let the ice cream melt slightly over the warm pastry.
Finish with caramel if desired.
Holiday Serving Idea
For Thanksgiving or Christmas, cut the slab pie into smaller squares.
Arrange the pieces on a large serving platter.
Drizzle with glaze shortly before serving.
Add vanilla ice cream or whipped cream on the side.
This makes dessert service much easier than slicing several round pies.
Make-Ahead Instructions
You can prepare this dessert one day ahead.
Bake completely.
Cool fully.
Cover the pan.
Leave the glaze off until closer to serving for the freshest appearance.
The apple filling often tastes even better after resting overnight.
Storage
Store leftover bars tightly covered.
At cool room temperature, they can stay fresh for approximately 1–2 days.
Refrigerate for up to 5 days for longer storage.
Let refrigerated bars come to room temperature or warm them briefly before serving.
Reheating
Oven Method
Place bars on a baking sheet.
Warm at 325°F / 160°C for approximately 8–12 minutes.
This method restores some crispness to the pastry.
Air Fryer Method
Heat one bar at approximately 320°F / 160°C for a few minutes.
The air fryer is especially good for restoring flaky pastry.
Microwave Method
Microwave for approximately 10–20 seconds.
This is quick, but the crust becomes softer.
Freezing
These bars freeze very well.
For best results, freeze before glazing.
Cool completely.
Cut into individual portions.
Wrap tightly.
Store in a freezer-safe container for up to 3 months.
Thaw overnight in the refrigerator.
Warm slightly and add fresh glaze before serving.
Common Mistakes to Avoid
Using Only Soft Apples
Very soft varieties can turn mushy.
Use firm baking apples.
Making the Dough Too Wet
Too much water creates tough pastry.
Add ice water slowly.
Letting the Butter Get Warm
Warm butter reduces flakiness.
Chill the dough whenever it becomes soft.
Using Too Little Thickener
Apple juices need enough cornstarch to become sliceable.
Removing the Pie Before the Filling Bubbles
The starch needs enough heat to activate.
Bake until visible bubbling occurs.
Cutting While Hot
Hot filling is loose.
Cool before slicing.
Making the Glaze Too Thin
Add milk gradually.
A thick glaze gives a more bakery-style appearance.
Troubleshooting Guide
| Problem | Likely Cause | Solution |
|---|---|---|
| Bottom is soggy | Excess moisture | Use thickener and hotter bottom heat |
| Filling runs out | Cut too early | Cool longer |
| Apples are hard | Slices too thick | Slice thinner |
| Apples are mushy | Variety too soft | Use firm apples |
| Crust is tough | Dough overworked | Handle less |
| Crust is pale | Underbaked | Bake longer |
| Crust shrinks | Dough stretched | Lay dough gently |
| Glaze disappears | Pie too warm | Cool before glazing |
| Filling tastes too sweet | Apples too sweet | Mix in tart apples |
Nutrition Estimate
| Nutrition | Approximate Amount |
|---|---|
| Calories | 340–480 per bar |
| Protein | 4–6 g |
| Carbohydrates | 50–68 g |
| Fat | 15–24 g |
| Sugar | 26–42 g |
| Fiber | 3–5 g |
| Serving Size | 1 bar |
Nutrition values are approximate and depend on pastry thickness, apple variety, glaze amount, and serving size.
Frequently Asked Questions
What is an apple slab pie?
It is a large rectangular pie made in a sheet-style pan and cut into squares instead of wedges.
Is slab pie easier than regular apple pie?
For serving a crowd, yes.
The rectangular shape makes it easier to cut equal portions and transport.
Which apples are best?
Granny Smith, Honeycrisp, Pink Lady, Braeburn, Fuji, and Jonagold are excellent choices.
Can I mix different apple varieties?
Yes.
Using both tart and sweet apples gives better flavor.
Can I use store-bought pie crust?
Yes.
Store-bought crust is a very convenient shortcut.
Can I use puff pastry?
Yes.
Puff pastry gives the bars a lighter and especially flaky texture.
Do I need to peel the apples?
Peeling creates the smoothest filling.
You can leave the skin on if you prefer more texture.
Why is my apple filling watery?
Common reasons include insufficient thickener, underbaking, very juicy apples, or cutting the pie before it cools.
How do I know the filling is thick enough?
After cooling, it should stay mostly in place when a square is lifted from the pan.
Can I add caramel?
Yes.
Caramel is excellent with cinnamon apples.
Can I add pecans?
Yes.
Toasted pecans add excellent flavor and crunch.
Can I use walnuts?
Yes.
Walnuts work very well too.
Can I make the bars a day ahead?
Yes.
They are an excellent make-ahead dessert.
Can I freeze them?
Yes.
Freeze for up to approximately 3 months.
Should I freeze them with glaze?
For best appearance, freeze without glaze and add fresh glaze after thawing.
How long do they keep?
About 1–2 days at cool room temperature or up to 5 days refrigerated.
Can I make the filling less sweet?
Yes.
Reduce the granulated sugar and use more tart apples.
How do I get a very flaky top crust?
Keep the butter cold, chill the dough well, and avoid overworking it.
Why does my bottom crust remain pale?
Try baking the slab pie on a preheated metal baking sheet to give the bottom more direct heat.
Can I serve these cold?
Yes.
They are good cold, room temperature, or slightly warm.
Slightly warm usually gives the best flavor.
Final Thoughts
These Bakery-Style Glazed Apple Slab Pie Bars bring together everything that makes homemade apple pie so comforting: buttery pastry, tender cinnamon apples, brown sugar, and a sweet vanilla glaze.
The rectangular format makes them especially useful for holidays and gatherings because one pan produces plenty of easy-to-serve portions. You get the flavor of traditional pie without having to cut delicate wedges or prepare multiple desserts.
The best results come from using firm apples, keeping the pastry cold, thickening the filling properly, and baking until you can see apple juices bubbling through the crust. Then give the pie enough cooling time before cutting so every square holds together beautifully.
Finish with a thick vanilla glaze, serve slightly warm, and add ice cream or caramel when you want an especially indulgent dessert.
The result is flaky on the outside, soft and juicy in the middle, and exactly the kind of bakery-style apple dessert people usually come back for a second piece.
Extra One-Line Facebook Caption
Would you grab one of these thick Glazed Apple Slab Pie Bars with flaky golden pastry, warm cinnamon apples, and sweet vanilla glaze? 🍎🥧🤍