
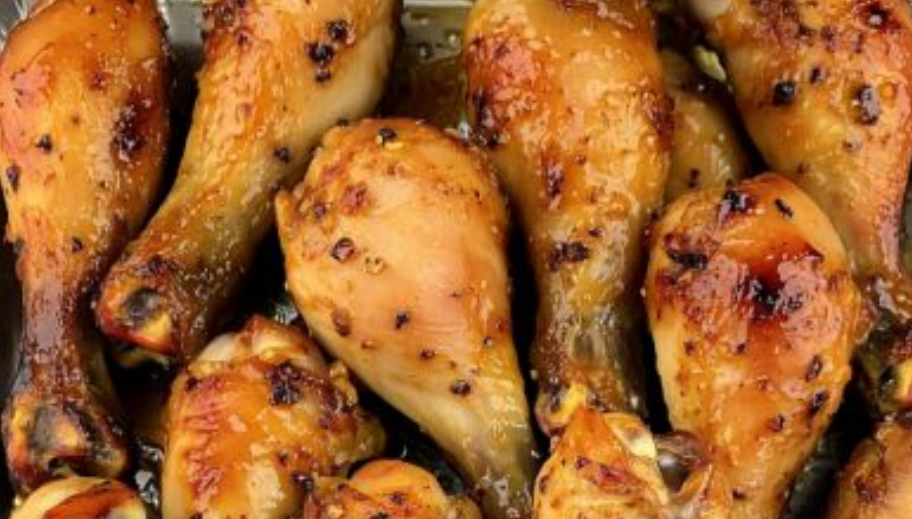
If you’re searching for the perfect chicken dinner that’s easy to prepare, packed with flavor, budget-friendly, and guaranteed to impress, these Honey Garlic Chicken Drumsticks are exactly what you need. Tender chicken drumsticks are coated in a rich, sticky honey garlic glaze made with honey, fresh garlic, soy sauce, and seasonings, then baked until beautifully caramelized and golden brown.
The result is juicy chicken with crispy skin and an irresistible sweet-and-savory glaze that clings to every bite. Whether you’re preparing a simple weeknight dinner, feeding a hungry family, hosting friends for game day, or planning your weekly meal prep, this honey garlic chicken recipe delivers restaurant-quality flavor using simple pantry ingredients.
One of the best things about chicken drumsticks is that they are affordable, flavorful, and difficult to overcook. Combined with a sticky honey garlic sauce, they become a meal that both kids and adults absolutely love.
Why These Honey Garlic Chicken Drumsticks Are So Popular
This recipe has become a favorite among home cooks because it offers everything people want in an easy dinner:
- Simple ingredients
- Incredible flavor
- Minimal preparation
- Budget-friendly protein
- Family-friendly meal
- Crispy baked chicken
- Sticky honey garlic glaze
- Perfect for meal prep
- Great for parties and gatherings
- Delicious leftovers
The combination of sweet honey, savory garlic, and rich caramelization creates a flavor profile that’s impossible to resist.
Ingredients
For the Chicken
- 12 chicken drumsticks
- 2 tablespoons olive oil
- 1 teaspoon kosher salt
- 1 teaspoon black pepper
- 1 teaspoon smoked paprika
- 1 teaspoon garlic powder
- 1 teaspoon onion powder
- 1 teaspoon Italian seasoning
For the Honey Garlic Sauce
- ¾ cup pure honey
- 8 garlic cloves, minced
- ⅓ cup low-sodium soy sauce
- 2 tablespoons ketchup
- 1 tablespoon Dijon mustard
- 1 tablespoon apple cider vinegar
- 2 tablespoons brown sugar
- 1 tablespoon sesame oil
- ½ teaspoon crushed red pepper flakes
- 1 teaspoon cornstarch
- 1 tablespoon water
Garnishes
- Chopped parsley
- Green onions
- Sesame seeds
- Fresh cracked black pepper
Equipment Needed
- Large baking sheet
- Mixing bowls
- Small saucepan
- Silicone brush
- Aluminum foil
- Meat thermometer
- Wire rack (optional)
Step 1: Prepare the Chicken
Remove the chicken drumsticks from the refrigerator approximately 20 minutes before cooking.
Pat each drumstick completely dry using paper towels.
Removing excess moisture helps create crispier skin.
Place drumsticks into a large bowl.
Add:
- Olive oil
- Salt
- Black pepper
- Paprika
- Garlic powder
- Onion powder
- Italian seasoning
Massage the seasonings thoroughly into every drumstick.
Allow the chicken to rest while preparing the glaze.
Step 2: Prepare the Honey Garlic Glaze
In a medium saucepan combine:
- Honey
- Garlic
- Soy sauce
- Ketchup
- Dijon mustard
- Apple cider vinegar
- Brown sugar
- Sesame oil
- Red pepper flakes
Whisk everything together.
Place over medium heat.
Bring to a gentle simmer.
Cook for approximately 5 minutes while stirring frequently.
Mix cornstarch and water in a small bowl.
Slowly pour into the sauce.
Continue whisking until the glaze becomes shiny and slightly thickened.
Remove from heat.
The aroma at this stage is absolutely incredible.
Step 3: Preheat the Oven
Preheat oven to:
400°F (200°C)
Line a baking sheet with parchment paper or foil.
For maximum crispiness, place a wire rack on top of the baking sheet.
Arrange the drumsticks in a single layer.
Do not overcrowd the pan.
Step 4: First Bake
Bake the seasoned drumsticks for:
25 minutes
This initial bake allows the chicken to begin cooking and develop color before adding the glaze.
Step 5: Apply the Honey Garlic Glaze
Remove the drumsticks from the oven.
Using a pastry brush, generously coat each drumstick with the honey garlic glaze.
Turn the chicken and coat the opposite side.
Reserve some glaze for later.
Return to the oven.
Step 6: Continue Baking
Bake for another:
20 to 25 minutes
Halfway through baking, brush another generous layer of glaze over each drumstick.
As the honey cooks, it caramelizes beautifully, creating a glossy coating packed with flavor.
The chicken should reach:
165°F (74°C)
when measured at the thickest part.
Step 7: Create the Perfect Sticky Finish
For the ultimate restaurant-style appearance:
Turn your oven broiler to HIGH.
Broil for 2–4 minutes.
Watch carefully.
The glaze will bubble and caramelize, creating irresistible golden-brown edges.
This step transforms good chicken into unforgettable chicken.
Step 8: Rest Before Serving
Allow the drumsticks to rest for:
5–10 minutes
This helps the juices redistribute throughout the meat.
Brush with any remaining warm glaze.
Sprinkle with:
- Sesame seeds
- Green onions
- Fresh parsley
Serve immediately.
Homemade Garlic Butter Honey Glaze Variation
Want even richer flavor?
Add:
- 3 tablespoons butter
- Extra minced garlic
to the glaze.
The butter creates an incredibly luxurious sauce that’s perfect over rice or mashed potatoes.
Spicy Honey Garlic Drumsticks
For heat lovers:
Add:
- 1 teaspoon cayenne pepper
- 1 tablespoon hot sauce
- Extra chili flakes
The sweetness of the honey balances the spice perfectly.
Asian-Inspired Honey Garlic Chicken Drumsticks
Enhance the flavor by adding:
- Fresh grated ginger
- Sesame oil
- Rice vinegar
- Extra soy sauce
Finish with toasted sesame seeds and sliced scallions.
Honey Garlic BBQ Drumsticks
Combine:
- ½ cup honey garlic glaze
- ½ cup barbecue sauce
The result is a smoky, sweet, sticky coating that’s perfect for cookouts.
Air Fryer Honey Garlic Drumsticks
Ingredients
Use the same ingredients listed above.
Instructions
- Preheat air fryer to 380°F.
- Arrange drumsticks in a single layer.
- Cook for 18 minutes.
- Brush generously with glaze.
- Continue cooking 8–10 minutes.
- Brush again before serving.
The air fryer creates exceptionally crispy skin.
Slow Cooker Honey Garlic Drumsticks
Perfect for busy days.
Instructions
- Place seasoned drumsticks into slow cooker.
- Pour half the glaze over the chicken.
- Cook on LOW for 5–6 hours.
- Transfer to baking sheet.
- Brush with remaining glaze.
- Broil for 3–5 minutes.
The meat becomes fall-off-the-bone tender.
Grilled Honey Garlic Drumsticks
Perfect for summer barbecues.
Instructions
- Preheat grill to medium heat.
- Grill drumsticks for 25–30 minutes.
- Turn frequently.
- Brush with glaze during the last 10 minutes.
The slight char adds amazing flavor.
Best Side Dishes
These drumsticks pair wonderfully with:
Rice
- Garlic butter rice
- Jasmine rice
- Fried rice
- Coconut rice
- Cilantro lime rice
Potatoes
- Mashed potatoes
- Roasted potatoes
- Potato wedges
- Sweet potato fries
Vegetables
- Roasted broccoli
- Green beans
- Asparagus
- Brussels sprouts
- Honey-glazed carrots
Salads
- Caesar salad
- Garden salad
- Coleslaw
- Cucumber salad
Bread
- Garlic bread
- Dinner rolls
- Buttermilk biscuits
Meal Prep Instructions
Honey garlic chicken drumsticks are excellent for meal prep.
Divide into containers with:
- Rice
- Roasted vegetables
- Steamed broccoli
Store for easy lunches and dinners throughout the week.
Storage
Refrigerator
Store leftovers in an airtight container for up to:
4 days
Freezer
Freeze cooked drumsticks for up to:
3 months
Reheating
Bake at:
350°F (175°C)
for 10–15 minutes until heated through.
Frequently Asked Questions
Can I use chicken thighs?
Absolutely. Chicken thighs are incredibly juicy and work perfectly.
Can I marinate overnight?
Yes. Marinating overnight creates even deeper flavor.
Can I use bone-in chicken breasts?
Yes, but cooking times will vary.
What honey works best?
Pure raw honey provides the richest flavor.
Why are my drumsticks not crispy?
Make sure to pat them dry before seasoning and avoid overcrowding the baking sheet.
Can I make this recipe gluten-free?
Yes. Use gluten-free soy sauce or tamari.
Can I prepare the glaze in advance?
Yes. The glaze can be refrigerated for up to one week.
Final Thoughts
These Honey Garlic Chicken Drumsticks deliver everything you could want in a homemade chicken dinner: crispy skin, juicy meat, a sticky caramelized honey garlic glaze, and incredible flavor in every bite. Whether baked, grilled, air-fried, or slow-cooked, this versatile recipe is guaranteed to become a family favorite. Serve it with rice, potatoes, vegetables, or salad for a complete meal that’s comforting, satisfying, and packed with irresistible sweet-and-savory goodness.