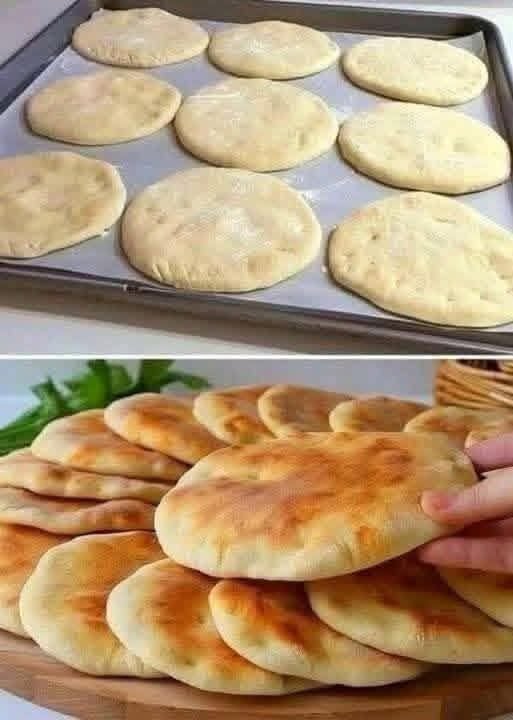
There’s nothing quite like the aroma of freshly baked homemade pita bread straight from the oven. Soft, fluffy, slightly chewy, and perfectly puffed, this classic Middle Eastern flatbread is incredibly versatile and surprisingly easy to make at home. Whether you’re filling it with grilled chicken, using it to scoop up creamy hummus, or serving it alongside soups and salads, homemade pita bread tastes far better than anything you’ll find at the grocery store.
One of the most exciting parts of making pita bread is watching each round of dough puff up into a beautiful pocket during baking. That signature pocket makes pita perfect for stuffing with your favorite fillings, while its soft texture also makes it ideal for wraps, sandwiches, and dipping into flavorful sauces.
Made with only a handful of pantry staples like flour, yeast, water, olive oil, salt, and sugar, this foolproof recipe delivers bakery-quality pita bread every single time. Whether you’re an experienced baker or trying homemade bread for the first time, this recipe is simple enough for beginners while producing professional results.
Recipe Overview
| Detail | Information |
|---|---|
| Recipe Name | Homemade Soft Pita Bread |
| Prep Time | 20 minutes |
| Rise Time | 1 hour 30 minutes |
| Cook Time | 10 minutes |
| Total Time | About 2 hours |
| Servings | 10 pita breads |
| Course | Bread |
| Cuisine | Middle Eastern |
| Difficulty | Easy |
Why You’ll Love This Recipe
This homemade pita bread recipe is guaranteed to become a favorite because it’s:
- Soft and fluffy
- Creates beautiful pockets
- Made with simple pantry ingredients
- Budget-friendly
- Better than store-bought
- Perfect for sandwiches
- Great for meal prep
- Freezer-friendly
- No special equipment required
- Delicious warm from the oven
Fresh pita has a soft texture and rich flavor that simply can’t be matched by packaged bread.
Ingredients
For the Dough
| Ingredient | Amount |
|---|---|
| Bread flour or all-purpose flour | 4 cups |
| Warm water (110°F / 43°C) | 1½ cups |
| Active dry yeast | 2¼ teaspoons (1 packet) |
| Granulated sugar | 1 tablespoon |
| Salt | 2 teaspoons |
| Olive oil | 2 tablespoons |
Optional for Brushing
- Olive oil
- Melted butter
- Garlic butter
- Sesame seeds
- Fresh parsley
Equipment Needed
- Large mixing bowl
- Measuring cups
- Measuring spoons
- Rolling pin
- Baking sheet or pizza stone
- Parchment paper
- Kitchen towel
- Cooling rack
Step-by-Step Instructions
Step 1: Activate the Yeast
In a large bowl, combine the warm water, sugar, and yeast.
Let the mixture sit for 5–10 minutes until it becomes foamy.
This indicates the yeast is active and ready to use.
Step 2: Mix the Dough
Add the olive oil and salt.
Gradually mix in the flour until a shaggy dough forms.
Continue mixing until all the flour is incorporated.
Step 3: Knead
Transfer the dough to a lightly floured surface.
Knead for 8–10 minutes until the dough becomes smooth, soft, and elastic.
If using a stand mixer, knead with the dough hook for about 6 minutes.
Step 4: First Rise
Lightly oil a clean bowl.
Place the dough inside and cover with a kitchen towel or plastic wrap.
Allow it to rise in a warm place for about 1 to 1½ hours or until doubled in size.
Step 5: Divide the Dough
Punch down the dough gently.
Divide it into 10 equal pieces.
Roll each piece into a smooth ball.
Cover and let rest for 15 minutes.
This resting period makes rolling much easier.
Step 6: Roll the Pitas
Roll each dough ball into a circle about 6–7 inches wide and approximately ¼ inch thick.
Try to keep the thickness even so every pita puffs properly.
Step 7: Bake
Preheat the oven to 475°F (245°C).
Place a baking stone or baking sheet inside while preheating.
Carefully place several pita rounds onto the hot baking surface.
Bake for 5–7 minutes.
The pitas should puff dramatically and become lightly golden.
Avoid overbaking, which can make them dry.
Step 8: Cool
Transfer the baked pitas immediately to a clean towel.
Cover them while cooling.
This traps steam and keeps the bread wonderfully soft.
Pro Tips for Perfect Pita Bread
- Use fresh yeast.
- Heat the oven completely before baking.
- Roll every pita evenly.
- Don’t overwork the dough after rising.
- Bake on a very hot surface.
- Cover baked pitas with a towel immediately.
- Use bread flour for extra chewiness.
Best Flour to Use
Different flours create slightly different textures.
Excellent options include:
- Bread flour
- All-purpose flour
- White whole wheat flour
- Half whole wheat and half bread flour
Bread flour creates the softest, chewiest pita.
Delicious Variations
Whole Wheat Pita
Replace half of the flour with whole wheat flour.
Garlic Herb Pita
Brush with garlic butter and sprinkle with parsley after baking.
Sesame Pita
Top each pita with sesame seeds before baking.
Mini Pitas
Divide the dough into smaller portions for snack-sized breads.
Greek Style Flatbread
Roll slightly thicker for a pocketless soft flatbread.
Za’atar Pita
Brush with olive oil and sprinkle generously with za’atar seasoning before baking.
What to Serve with Homemade Pita Bread
Fresh pita pairs beautifully with many dishes.
Popular serving ideas include:
- Hummus
- Baba ganoush
- Tzatziki
- Falafel
- Chicken shawarma
- Beef gyro
- Grilled kebabs
- Greek salad
- Lentil soup
- Creamy spinach dip
It’s also excellent for breakfast with butter, honey, or jam.
Make-Ahead Instructions
Prepare the dough one day ahead.
After the first rise, refrigerate overnight.
Allow it to come to room temperature before shaping and baking.
Storage
Store cooled pita bread in an airtight bag.
It stays soft at room temperature for up to 3 days.
For longer storage, refrigerate for up to one week.
Reheating
Warm pita in a skillet over medium heat for about 30 seconds per side.
You can also warm it in a 350°F oven for 3–5 minutes.
Microwaving for 10–15 seconds also works well.
Freezing
Homemade pita freezes beautifully.
Stack the cooled pitas with parchment paper between each one.
Place in a freezer-safe bag.
Freeze for up to 3 months.
Thaw at room temperature before reheating.
Common Mistakes to Avoid
Not Preheating the Oven
A hot oven is essential for creating the famous pita pocket.
Rolling Unevenly
Uneven thickness prevents proper puffing.
Using Cold Water
Yeast activates best in warm water.
Overbaking
Too much baking dries the bread.
Leaving Bread Uncovered
Fresh pita loses moisture quickly.
Always cover it while cooling.
Nutrition Estimate
| Serving | Amount |
|---|---|
| Calories | 185 |
| Protein | 6 g |
| Carbohydrates | 35 g |
| Fat | 3 g |
| Fiber | 2 g |
| Sodium | 360 mg |
Nutrition values are approximate.
Frequently Asked Questions
Why didn’t my pita puff?
Usually the oven wasn’t hot enough or the dough was rolled unevenly.
Can I cook pita in a skillet?
Yes. A hot cast-iron skillet works very well.
Can I freeze homemade pita?
Absolutely. Freeze for up to 3 months.
Which flour is best?
Bread flour gives the softest and chewiest texture.
Can beginners make this recipe?
Yes. It’s one of the easiest homemade bread recipes.
Can I make the dough ahead of time?
Yes. Refrigerate overnight after the first rise.
How do I keep pita soft?
Cover with a towel immediately after baking.
Can I make mini pita breads?
Yes. Simply divide the dough into smaller portions.
What fillings work best?
Chicken, beef, falafel, vegetables, tuna salad, egg salad, and grilled meats are all excellent.
Can I make this recipe vegan?
Yes. The recipe is naturally vegan when using olive oil.
Final Thoughts
This Homemade Soft Pita Bread Recipe is proof that bakery-quality bread can be made right in your own kitchen with just a few simple ingredients. Soft, fluffy, and beautifully puffed with signature pockets, these homemade pitas are perfect for stuffing, dipping, wrapping, or serving alongside your favorite meals.
Once you taste warm homemade pita fresh from the oven, you’ll never want to go back to store-bought bread again. Easy to prepare, freezer-friendly, and incredibly versatile, this recipe deserves a permanent place in every home baker’s collection.