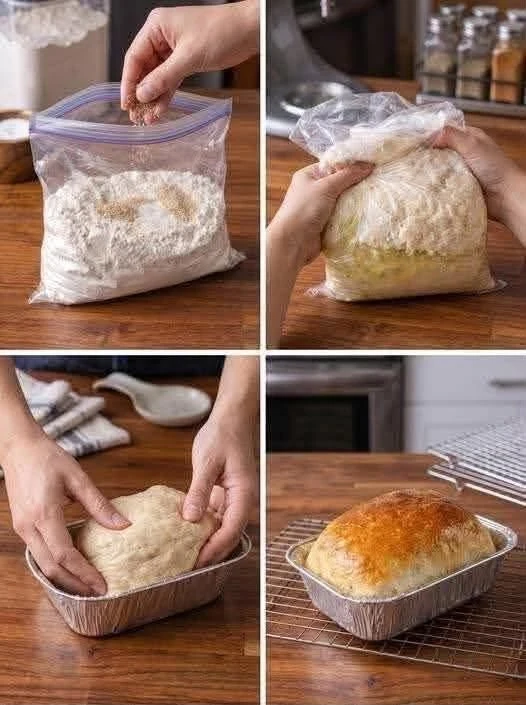
This Easy Bread in a Bag recipe is a clever, beginner-friendly way to make homemade bread without covering the kitchen counter in flour or spending a long time kneading dough by hand. Most of the mixing happens directly inside a large resealable plastic bag, then the dough is shaped, transferred to a loaf pan, allowed to rise, and baked until beautifully golden.
Inspired by the method shown in the image, this recipe is perfect for anyone who wants the smell and flavor of fresh homemade bread without complicated equipment. You do not need a stand mixer, bread machine, or advanced baking skills. The bag becomes your mixing bowl and kneading surface, making cleanup surprisingly easy.
The finished loaf has a soft, tender interior and a lightly crisp golden crust. Slice it for sandwiches, toast it for breakfast, serve it warm with butter and jam, or use it alongside soup, chili, stew, pasta, or a Sunday dinner.
This method is also fun for families and beginning bakers because you can actually watch the dough transform from flour and liquid into a smooth, stretchy bread dough right inside the bag.
Recipe Overview
| Recipe Details | Information |
|---|---|
| Recipe Name | Easy Bread in a Bag |
| Focus Keyword | Bread in a Bag |
| Prep Time | 20 minutes |
| First Rise | 45–60 minutes |
| Second Rise | 30–45 minutes |
| Bake Time | 30–35 minutes |
| Total Time | About 2½ hours |
| Yield | 1 standard loaf |
| Servings | 10–12 slices |
| Course | Bread |
| Cuisine | American / Homemade Baking |
| Difficulty | Beginner-Friendly |
| Main Ingredients | Flour, Yeast, Water |
| Kneading Method | Inside a Resealable Bag |
| Oven Temperature | 350°F / 175°C |
| Best For | Sandwiches, Toast, Dinner |
| Make Ahead | Yes |
| Freezer Friendly | Yes |
Why You’ll Love This Bread in a Bag Recipe
Homemade yeast bread can sound intimidating, especially if you have never worked with dough before.
This recipe simplifies the process.
Instead of putting flour in a bowl and kneading sticky dough all over the counter, you begin inside a large resealable bag.
The bag allows you to mix and squeeze the ingredients together without getting dough all over your hands.
Once the dough begins forming, you can knead it through the plastic.
Then you remove it, shape it briefly, place it into a loaf pan, and allow the yeast to do the rest.
The result is a real homemade loaf with much less cleanup.
What Does Bread in a Bag Taste Like?
The flavor is similar to a classic homemade white sandwich bread.
It is mildly sweet.
Slightly buttery.
Soft inside.
And golden on the outside.
Unlike heavily processed sandwich bread, homemade bread has a fresh yeast aroma and a more substantial texture.
When eaten warm with butter, it is difficult to beat.
The basic flavor is intentionally mild so the loaf can be used for both sweet and savory meals.
Why Make Bread in a Plastic Bag?
The bag is not a special ingredient.
It is simply a convenient mixing method.
It helps contain:
- Flour
- Sticky dough
- Loose yeast
- Water
- Oil
- Sugar
The bag also makes it possible to knead the dough without covering the work surface in flour.
For beginners, this can make homemade bread feel much more manageable.
Ingredients
For the Bread Dough
- 3 cups all-purpose flour, plus a little extra if needed
- 1 packet active dry yeast, about 2¼ teaspoons
- 1 cup warm water
- 3 tablespoons granulated sugar
- 3 tablespoons vegetable oil or melted butter
- 1 teaspoon salt
Optional for the Top
- 1 tablespoon melted butter
- Pinch of coarse salt
- Sesame seeds
- Poppy seeds
- Rolled oats
Ingredient Guide
| Ingredient | Purpose |
|---|---|
| Flour | Creates the structure of the loaf |
| Yeast | Makes the dough rise |
| Warm Water | Activates yeast and hydrates flour |
| Sugar | Feeds yeast and adds mild sweetness |
| Oil or Butter | Keeps bread tender |
| Salt | Adds flavor and controls yeast |
| Melted Butter | Gives crust a soft, glossy finish |
What Flour Works Best?
All-purpose flour is the easiest choice.
It produces a loaf that is soft but still sturdy enough for slicing.
Bread flour can also be used.
Bread flour contains more protein, which creates stronger gluten.
That usually gives the loaf:
- More chew
- Slightly more height
- Better structure
If using bread flour, the dough may need a small amount more water.
Can You Use Whole Wheat Flour?
Yes, but replacing all the white flour with whole wheat flour can create a heavier loaf.
For a balanced version, use:
- 2 cups all-purpose flour
- 1 cup whole wheat flour
This adds whole-grain flavor without making the loaf extremely dense.
If you want 100% whole wheat bread, the liquid and kneading time may need adjustment.
Understanding the Yeast
Yeast is what creates the rise.
As yeast feeds on sugars in the dough, it produces carbon dioxide.
That gas becomes trapped inside the gluten network.
The dough expands.
Then the oven heat sets that structure into bread.
For this recipe, one standard packet of active dry yeast works well.
Instant yeast can also be used.
How Warm Should the Water Be?
The water should feel pleasantly warm, not hot.
A useful range is approximately 105–115°F / 40–46°C for active dry yeast.
Water that is too cold slows the yeast.
Water that is extremely hot can damage or kill it.
If you do not have a thermometer, think of warm bath water rather than boiling water.
How to Test Your Yeast
If you are not sure whether your yeast is active, test it first.
Combine:
- Warm water
- Sugar
- Yeast
Let the mixture stand for about 5–10 minutes.
It should become foamy.
Foam indicates active yeast.
If absolutely nothing happens, your yeast may be old or the water temperature may have been incorrect.
Equipment Needed
You only need a few basic items:
- 1 large gallon-size resealable plastic bag
- Measuring cups
- Measuring spoons
- Standard loaf pan
- Small bowl or measuring jug
- Cooling rack
- Oven
A 9×5-inch loaf pan works very well.
How to Make Bread in a Bag
Step 1: Add the Dry Ingredients
Open a large resealable bag.
Add:
- 1 cup flour
- Sugar
- Yeast
Close the bag.
Shake gently so the ingredients combine.
This first portion creates the beginning of the dough.
Step 2: Add Warm Water
Open the bag.
Pour in the warm water.
Add the oil or melted butter.
Seal the bag carefully.
Make sure most excess air has been released before closing.
Step 3: Mix Inside the Bag
Use your hands to gently squeeze and massage the bag.
The flour and liquid will begin combining.
At first, the mixture may look lumpy.
Continue working it through the bag for approximately 1–2 minutes.
Eventually, it should become smoother.
Step 4: Let the Mixture Rest
Place the sealed bag on the counter.
Let it rest for about 10 minutes.
This gives the yeast time to begin working.
The mixture may become slightly bubbly.
Step 5: Add More Flour and Salt
Open the bag.
Add:
- 1 cup flour
- Salt
Seal again.
Massage the mixture through the bag.
The dough will become noticeably thicker.
Step 6: Add the Remaining Flour
Open the bag again.
Add most of the remaining cup of flour.
Seal.
Continue squeezing and kneading.
The dough should begin pulling together into a soft ball.
If it is still extremely sticky, add additional flour one tablespoon at a time.
Do not add too much.
A slightly tacky dough produces softer bread than an excessively dry dough.
How to Knead Bread Inside the Bag
Place the sealed bag flat on the counter.
Use the heels of your hands to gently push the dough forward through the bag.
Fold the dough back over itself.
Repeat.
Turn the bag occasionally.
Continue for approximately 5–7 minutes.
The dough should gradually become:
- Smoother
- More elastic
- Less sticky
- Easier to shape
You are essentially performing traditional kneading without direct contact.
How to Know When the Dough Is Kneaded Enough
The dough should feel soft and elastic.
If you press it gently, it should slowly spring back.
It should no longer look rough and shaggy.
A perfectly smooth bakery-style dough is not necessary.
This is meant to be an easy home bread recipe.
Step 7: First Rise
Lightly oil the inside surface around the dough if needed.
Keep the dough inside the bag.
Leave a little room for expansion.
Do not seal the bag so tightly that pressure cannot escape; close it loosely or leave a small vent according to your bag setup.
Place it somewhere warm and draft-free.
Let it rise for approximately 45–60 minutes.
The dough should roughly double in size.
Best Place to Let Bread Rise
A comfortably warm room is ideal.
Good options include:
- A warm kitchen counter
- Inside an OFF oven with the light on
- Near, but not directly on, a warm appliance
Avoid high heat.
Yeast likes warmth but does not need to be cooked during the rising stage.
What If My Kitchen Is Cold?
Cold kitchens simply require more time.
Instead of 45 minutes, the first rise may take 75–90 minutes.
Judge by how the dough looks rather than following the clock exactly.
You want noticeable expansion.
Step 8: Remove the Dough from the Bag
Lightly flour your hands and work surface.
Open the bag.
Gently remove the risen dough.
Avoid aggressively pulling or tearing it.
Place it on the counter.
Press it gently to release very large gas bubbles.
Step 9: Shape the Loaf
Flatten the dough into a rough rectangle.
Roll it tightly from one short side toward the other.
Pinch the seam closed.
Tuck the ends slightly underneath.
Place the dough seam-side down in a lightly greased 9×5-inch loaf pan.
Why Shaping Matters
Good shaping creates surface tension.
That tension helps the loaf rise upward instead of spreading outward.
A loose pile of dough can still make bread, but a properly shaped loaf usually has:
- Better height
- More even slices
- Finer crumb
- Better appearance
You do not need professional technique.
A simple tight roll works very well.
Step 10: Second Rise
Cover the loaf loosely with a clean towel.
Let it rise for approximately 30–45 minutes.
It should become puffy and rise above or close to the top edge of the pan.
Do not allow it to rise excessively.
Over-proofed bread can collapse during baking.
How to Tell When Dough Is Ready to Bake
Press one finger gently into the dough.
If the indentation slowly springs back but does not disappear immediately, it is usually ready.
If it springs back instantly, it may need more time.
If the dough deflates easily and the indentation remains deeply sunken, it may have risen too long.
Step 11: Bake
Preheat the oven to 350°F / 175°C.
Place the loaf on the middle rack.
Bake for approximately 30–35 minutes.
The top should become deeply golden.
The loaf should sound slightly hollow when tapped.
How to Know Bread Is Fully Baked
Visual color is useful, but temperature is even better.
The center of a basic white bread loaf is generally done around 190–200°F / 88–93°C.
Insert an instant-read thermometer into the center if available.
This removes much of the guesswork.
Step 12: Brush with Butter
Immediately after baking, brush the top lightly with melted butter.
This adds flavor and softens the crust.
If you prefer a crisper crust, skip the butter.
Step 13: Cool Before Slicing
Remove the loaf from the pan after about 5–10 minutes.
Transfer it to a cooling rack.
Let it cool for at least 45 minutes before slicing.
This may be difficult when the bread smells amazing, but it matters.
Fresh bread continues setting internally as it cools.
Cutting too soon can create a gummy interior.
The Secret to Soft Homemade Bread
Do not add too much flour.
This is probably the biggest beginner mistake.
A dough that feels slightly tacky can seem uncomfortable, so people continue adding flour until it becomes firm.
That extra flour produces a drier loaf.
Add only enough flour to create a soft, workable dough.
Why Bread Sometimes Turns Out Dense
Several problems can cause dense bread.
The yeast may be old.
The water may have been too hot.
The dough may not have risen long enough.
Too much flour may have been added.
The dough may have been under-kneaded.
Or the second rise may have been rushed.
Bread baking is forgiving, but yeast needs enough time to do its work.
Easy 5-Ingredient Bread in a Bag
If you want an even simpler version, use:
- 3 cups flour
- 2¼ teaspoons yeast
- 1 cup warm water
- 2 tablespoons sugar
- 1 teaspoon salt
You can technically make bread without added oil.
The crumb will be slightly less tender, but the loaf will still work.
Buttery Bread in a Bag
Replace the vegetable oil with 4 tablespoons melted butter.
Brush additional melted butter over the baked loaf.
This creates a richer flavor and softer crust.
It is excellent for toast and dinner bread.
Honey Bread Version
Replace the sugar with:
- 3 tablespoons honey
Honey gives the loaf mild floral sweetness.
Because honey contains liquid, you may need a small amount of extra flour.
This version is especially good for breakfast toast.
Garlic Herb Bread
Add to the flour:
- 1 teaspoon garlic powder
- 1 teaspoon dried Italian seasoning
- 1/2 teaspoon dried oregano
Before baking, brush the top with melted garlic butter.
This bread is excellent with pasta, soup, and lasagna.
Parmesan Herb Bread
Add:
- 1/2 cup finely grated Parmesan
- 1 teaspoon Italian seasoning
- 1/2 teaspoon garlic powder
Sprinkle additional Parmesan over the loaf before baking.
The cheese develops a deeply savory crust.
Cheddar Bread
Fold approximately 1 cup shredded cheddar into the dough after the first rise.
Shape normally.
You can also sprinkle a little cheese over the top during the final 10 minutes of baking.
Serve with chili or soup.
Cinnamon Sugar Bread
For a sweeter loaf, roll the dough into a rectangle after the first rise.
Brush lightly with melted butter.
Sprinkle with:
- 1/3 cup brown sugar
- 1 teaspoon cinnamon
Roll tightly.
Place into the loaf pan.
Rise and bake.
The finished loaf has a cinnamon swirl through the center.
Cinnamon Raisin Bread
Add approximately 3/4 cup raisins to the dough.
For softer raisins, soak them in warm water for about 10 minutes.
Drain thoroughly.
Combine with cinnamon for an easy breakfast bread.
Whole Wheat Version
Use:
- 2 cups all-purpose flour
- 1 cup whole wheat flour
Add an extra tablespoon or two of water if the dough feels too firm.
Whole wheat absorbs more moisture.
Honey works especially well as the sweetener in this variation.
Oatmeal Bread
Replace about 1/2 cup flour with quick oats.
Add 2 tablespoons honey.
Sprinkle rolled oats over the top before baking.
The finished loaf has a slightly heartier texture.
Seeded Bread
Before baking, brush the loaf with water or milk.
Sprinkle with:
- Sesame seeds
- Sunflower seeds
- Pumpkin seeds
- Poppy seeds
Press very gently so the seeds stick.
Dinner Roll Version
Instead of shaping one loaf, divide the dough into 10–12 pieces.
Shape each piece into a smooth ball.
Arrange in a greased baking dish.
Let rise.
Bake at 375°F / 190°C for approximately 18–22 minutes.
Brush with butter after baking.
Mini Loaves
Divide the dough between small loaf pans.
Mini loaves make excellent homemade gifts.
Because they are smaller, they bake faster.
Begin checking them early.
Bread Bowl Version
Divide the dough into 3–4 round portions.
Shape tightly.
Allow to rise.
Bake until deeply golden.
Once cooled, cut off the tops and hollow out the centers.
Fill with thick soup or dip.
Can You Make This Without a Resealable Bag?
Absolutely.
The bag is simply the method shown in the image.
You can make the same dough in a large mixing bowl.
Combine the ingredients.
Knead on a lightly floured surface.
Then continue with the same rising and baking instructions.
Can You Use a Stand Mixer?
Yes.
Use the dough-hook attachment.
Mix until the dough comes together.
Knead on low speed for approximately 5–7 minutes.
Then transfer the dough to an oiled bowl for the first rise.
The bag method, however, is especially useful when you want minimal cleanup.
Why Homemade Bread Smells So Good
Bread develops hundreds of aromatic compounds during fermentation and baking.
Yeast contributes its characteristic aroma.
Then, in the oven, the crust browns through reactions between proteins and sugars.
That browning produces the toasted, nutty aroma associated with freshly baked bread.
This is also why a pale loaf often tastes less flavorful than a properly browned one.
What to Serve with Homemade Bread
| Serving Idea | Why It Works |
|---|---|
| Butter | Classic and simple |
| Jam | Perfect for breakfast |
| Honey | Adds natural sweetness |
| Peanut Butter | Filling snack |
| Scrambled Eggs | Great breakfast |
| Soup | Bread absorbs broth |
| Chili | Perfect comfort-food pairing |
| Beef Stew | Great for dipping |
| Pasta | Excellent with sauce |
| Meatloaf | Traditional dinner combination |
| Roast Chicken | Classic family meal |
| Grilled Cheese | Ideal sandwich bread |
Best Bread for Sandwiches
Allow the loaf to cool completely.
Use a sharp serrated bread knife.
Cut into slices about 1/2 inch thick.
Use it for:
- Turkey sandwiches
- Ham and cheese
- Tuna sandwiches
- Egg salad
- Chicken salad
- Grilled cheese
- Peanut butter and jelly
The mild flavor works with almost any filling.
How to Make Perfect Toast
Slice the bread slightly thicker.
Toast until golden.
Spread with butter while still hot.
For sweet toast, add:
- Jam
- Honey
- Cinnamon sugar
- Peanut butter
For savory toast, add:
- Avocado
- Eggs
- Cheese
- Garlic butter
French Toast with Leftover Bread
Homemade bread that is one or two days old makes excellent French toast.
Slightly stale bread absorbs the egg mixture without falling apart.
Dip slices in a mixture of:
- Eggs
- Milk
- Vanilla
- Cinnamon
Cook in butter until golden.
Serve with maple syrup.
Homemade Croutons
Cut older bread into cubes.
Toss with:
- Olive oil
- Garlic powder
- Italian seasoning
- Salt
Bake until crisp.
Use over salads and soups.
This is a great way to avoid wasting bread.
Homemade Breadcrumbs
Allow bread slices to dry completely.
Toast until crisp if necessary.
Process into crumbs.
Use for:
- Meatloaf
- Meatballs
- Chicken coating
- Casserole toppings
- Stuffing
Freeze breadcrumbs if you do not need them immediately.
Make-Ahead Instructions
You can prepare the dough earlier in the day.
After kneading, allow it to rise briefly.
Then refrigerate.
Cold fermentation slows the yeast while allowing more flavor to develop.
When ready to bake, shape the dough, place it in the loaf pan, and allow enough time to come back toward room temperature and rise before baking.
Overnight Refrigerator Method
After the dough is kneaded, place it in a lightly oiled container or bag with room to expand.
Refrigerate overnight.
The next day, remove the dough.
Shape it.
Place it in the pan.
Allow it to rise until puffy.
Bake normally.
Slow cold fermentation can create deeper bread flavor.
Storage
Allow the bread to cool completely before storing.
Place it in:
- A bread bag
- Airtight container
- Reusable bread box
Keep at room temperature for approximately 2–4 days for best quality.
Refrigeration can make bread stale more quickly, so room-temperature storage is usually preferable for a short period.
How to Keep Homemade Bread Soft
Make sure it is completely cool before covering.
Trapping steam around warm bread can make the crust wet.
Once cool, store airtight.
Do not leave slices exposed to air.
If the loaf starts becoming dry, use it for toast, French toast, croutons, or breadcrumbs.
Can You Freeze Homemade Bread?
Yes.
Homemade bread freezes extremely well.
Allow the loaf to cool completely.
You can freeze it whole or sliced.
For convenience, slice before freezing.
Wrap tightly.
Place in a freezer-safe bag.
Freeze for approximately 2–3 months for best quality.
How to Freeze Individual Slices
Place parchment between slices or freeze slices briefly on a tray before transferring them to a bag.
Then you can remove exactly what you need.
Frozen slices can often go directly into the toaster.
This makes homemade bread very convenient for breakfast.
Common Mistakes to Avoid
| Common Mistake | Result | Better Method |
|---|---|---|
| Water too hot | Yeast may fail | Use warm water |
| Old yeast | Dough does not rise | Test yeast first |
| Too much flour | Dry, dense bread | Keep dough slightly tacky |
| Not enough kneading | Weak structure | Knead until elastic |
| Rushing first rise | Dense loaf | Let dough expand |
| Over-proofing | Loaf may collapse | Bake once properly risen |
| Slicing while hot | Gummy interior | Cool before cutting |
| Underbaking | Doughy center | Check color and temperature |
| Too much salt | Yeast activity slows | Measure accurately |
| Loose shaping | Flat loaf | Shape with gentle tension |
Troubleshooting Guide
My Dough Did Not Rise
Possible causes include:
- Old yeast
- Water too hot
- Room too cold
- Too much salt
- Not enough time
Move the dough somewhere warmer and give it additional time.
If there is still no activity after a long period, the yeast may be inactive.
My Dough Is Too Sticky
Add flour one tablespoon at a time.
Do not immediately add half a cup.
A little stickiness is normal.
My Dough Is Too Dry
Add warm water one teaspoon at a time.
Knead between additions.
My Bread Is Dense
The dough may have needed more rising time or more kneading.
Too much flour is another common cause.
My Bread Is Pale
Bake several minutes longer.
Make sure the oven is fully preheated.
My Bread Is Dark but Raw Inside
The oven may be running too hot.
Cover the top loosely with foil and continue baking at a slightly lower temperature.
My Loaf Collapsed
It may have over-proofed.
Next time, bake slightly sooner.
Pro Tips for the Best Bread in a Bag
Use fresh yeast.
Measure flour carefully.
Use warm, not hot, water.
Do not overfill the bag.
Leave space for the dough.
Knead until elastic.
Avoid adding too much extra flour.
Let the dough rise based on appearance, not only time.
Shape the loaf tightly but gently.
Let the second rise finish before baking.
Bake until deeply golden.
Cool completely before slicing.
Brush with butter for a softer crust.
Nutrition Estimate
Approximate values per slice when cut into 12 slices:
| Nutrition | Approximate Amount |
|---|---|
| Calories | 150–180 |
| Protein | 4–5 g |
| Carbohydrates | 28–33 g |
| Fat | 3–5 g |
| Fiber | 1–2 g |
| Sugar | 3–5 g |
| Serving Size | 1 slice |
Exact nutrition depends on flour, butter or oil, and slice thickness.
Frequently Asked Questions
What is Bread in a Bag?
Bread in a Bag is homemade yeast bread where much of the mixing and kneading is done inside a resealable plastic bag.
Is this the exact bread recipe shown in the image?
The image shows a bag-based dough method followed by shaping the dough in a loaf pan and baking it. This recipe recreates that style of bread-making rather than claiming the exact unseen original formula.
Does the bread really rise inside the bag?
Yes, provided the yeast is active and the dough has enough room.
Do I need a stand mixer?
No.
Do I need a bread machine?
No.
Can I knead through the bag?
Yes. That is one of the main advantages of the method.
What size bag should I use?
A large gallon-size resealable bag is usually appropriate for one loaf.
Can I use bread flour?
Yes.
Can I use all-purpose flour?
Yes. It works very well.
Can I use whole wheat flour?
Yes. Replacing about one-third of the flour is a good starting point.
Can I use instant yeast?
Yes.
Can I use active dry yeast?
Yes.
Can I use rapid-rise yeast?
Yes, although rise times may be shorter.
What happens if my water is too hot?
Very hot water can damage the yeast.
How long should the dough rise?
Usually around 45–60 minutes for the first rise and 30–45 minutes after shaping.
What if my kitchen is cold?
Give the dough additional time.
Can I make the dough overnight?
Yes. Refrigerate after kneading and shape the following day.
Do I have to use oil?
No, but oil or butter makes the bread softer.
Can I use melted butter?
Absolutely.
Can I use honey instead of sugar?
Yes.
Can I add cheese?
Yes.
Can I add herbs?
Yes.
Can I add cinnamon and raisins?
Absolutely.
Can I make rolls instead?
Yes.
Can I make mini loaves?
Yes.
What pan should I use?
A 9×5-inch loaf pan is ideal.
What temperature should I bake the bread?
350°F / 175°C works well for this loaf.
How long does it bake?
Approximately 30–35 minutes.
Why is my bread gummy?
It may have been underbaked or sliced while still too hot.
Why is my loaf dry?
Too much flour or excessive baking are common causes.
Why did my loaf not rise?
The yeast may have been inactive, the environment too cold, or the water too hot.
Does homemade bread need refrigeration?
Usually not for short-term storage.
How long does it keep?
About 2–4 days at room temperature for best quality.
Can it be frozen?
Yes. Freeze for approximately 2–3 months for best quality.
Make It More Budget-Friendly
Homemade bread is already one of the more economical baking projects.
Flour, yeast, water, salt, and sugar are inexpensive pantry ingredients.
To save even more:
Buy flour in larger bags.
Purchase yeast in jars rather than individual packets if you bake frequently.
Use vegetable oil rather than butter inside the dough.
Freeze extra slices instead of allowing them to become stale.
Turn older bread into croutons, breadcrumbs, or French toast.
Almost every part of the loaf can be used.
Why This Is a Great Beginner Bread Recipe
Traditional bread recipes sometimes include instructions such as kneading on a floured surface until perfectly smooth, determining gluten development, degassing dough, shaping with tension, and checking proofing.
Those techniques are useful, but they can make new bakers nervous.
The bag method simplifies the beginning of the process.
It contains the mess.
It makes sticky dough easier to handle.
And it allows you to physically feel the dough changing as you knead.
That makes this a useful introduction to yeast baking.
Ad-Friendly Article Structure
| Article Position | Suggested Placement |
|---|---|
| After Introduction | Natural first ad placement |
| After Recipe Overview | Second placement |
| After Ingredient Guide | Third placement |
| Before Main Instructions | High-engagement placement |
| After Baking Instructions | Mid-article break |
| Before Variations | Natural content break |
| Before Storage | Additional placement |
| Before FAQs | Strong late-article placement |
| Before Final Thoughts | Optional placement |
Keep the core mixing, rising, shaping, and baking steps together so readers can easily follow the bread-making process.
Final Thoughts
This Easy Bread in a Bag method proves that homemade yeast bread does not have to involve complicated equipment, an expensive mixer, or a kitchen covered in flour.
You begin with basic pantry ingredients.
Flour provides structure.
Yeast provides the rise.
Warm water activates the dough.
Sugar helps feed the yeast and adds mild sweetness.
Oil or butter creates tenderness.
Salt provides flavor.
And the resealable bag keeps much of the mixing and kneading contained.
Once the dough has risen, all that is left is shaping it into a loaf, allowing it to rise one more time, and baking until the crust becomes beautifully golden.
The finished bread can then become almost anything.
Use it for sandwiches.
Toast it for breakfast.
Serve it with soup.
Turn it into grilled cheese.
Make French toast.
Use older pieces for croutons.
Or simply cut a warm slice and spread it with butter.
Once you master the basic recipe, try honey bread, garlic herb bread, cinnamon raisin bread, Parmesan bread, cheddar bread, whole wheat bread, dinner rolls, or seeded loaves.
The most important rules are simple: use fresh yeast, keep the water comfortably warm rather than hot, do not add excessive flour, give the dough enough time to rise, and let the finished loaf cool before slicing.
Follow those basics and this low-mess bag method can produce a soft, golden homemade loaf that is ideal for beginners and experienced home bakers alike.