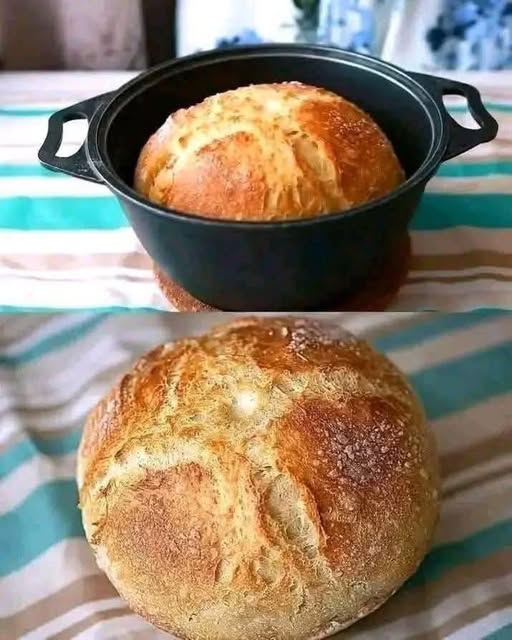
Few things compare to the smell of freshly baked homemade bread straight from the oven. This Dutch Oven Artisan Bread features a beautifully crisp golden crust, an airy and chewy interior, and a rustic appearance that looks like it came from an artisan bakery. Best of all, it’s made with just a handful of simple pantry ingredients.
Baking bread in a Dutch oven creates the perfect environment for professional-quality results. The heavy pot traps steam released from the dough, allowing the loaf to rise dramatically while developing a crisp, crackling crust and a soft, tender crumb.
Whether you’re new to bread baking or an experienced home baker, this foolproof recipe produces consistently delicious results. Serve it warm with butter, use it for sandwiches, toast it for breakfast, or pair it with soups, stews, and pasta dishes.
Recipe Overview
| Detail | Information |
|---|---|
| Recipe Name | Dutch Oven Artisan Bread |
| Prep Time | 15 minutes |
| Rise Time | 12–18 hours |
| Bake Time | 45–50 minutes |
| Total Time | About 13 hours |
| Servings | 10 slices |
| Course | Bread |
| Cuisine | European Artisan |
| Difficulty | Easy |
Why You’ll Love This Recipe
This homemade artisan bread is loved because it’s:
- Crispy golden crust
- Soft and chewy interior
- No kneading required
- Made with only a few ingredients
- Beginner-friendly
- Bakery-quality results
- Perfect for sandwiches
- Excellent with soups
- Freezer-friendly
- Beautiful rustic appearance
The long fermentation develops incredible flavor while the Dutch oven creates a crust that’s nearly impossible to achieve with a regular baking pan.
Ingredients
For the Dough
| Ingredient | Amount |
|---|---|
| Bread flour | 3½ cups |
| Warm water | 1½ cups |
| Instant yeast | 2 teaspoons |
| Salt | 2 teaspoons |
Optional Add-Ins
- Fresh rosemary
- Garlic powder
- Italian seasoning
- Grated Parmesan
- Sesame seeds
- Everything bagel seasoning
- Cracked black pepper
- Dried thyme
Equipment Needed
- Large mixing bowl
- Wooden spoon
- Dutch oven with lid
- Parchment paper
- Sharp bread lame or knife
- Cooling rack
Step-by-Step Instructions
Step 1: Mix the Dough
In a large bowl combine:
- Bread flour
- Salt
- Instant yeast
Slowly pour in the warm water.
Mix with a wooden spoon until no dry flour remains.
The dough will be sticky.
Step 2: First Rise
Cover the bowl with plastic wrap or a clean kitchen towel.
Let the dough rise at room temperature for 12–18 hours.
The dough should double in size and become bubbly.
Step 3: Shape the Dough
Lightly flour your work surface.
Turn out the dough gently.
Fold the edges toward the center several times to form a round loaf.
Avoid overworking the dough.
Place the loaf seam-side down on parchment paper.
Step 4: Second Rise
Cover the dough lightly.
Let it rest for 30–45 minutes.
Meanwhile, preheat the oven.
Step 5: Preheat the Dutch Oven
Place the Dutch oven (with its lid) into the oven.
Preheat to 450°F (230°C) for at least 30 minutes.
A thoroughly heated pot is essential for achieving maximum oven spring.
Step 6: Score the Dough
Using a sharp knife or bread lame, make one or two shallow slashes across the top.
Scoring allows the bread to expand evenly while baking.
Step 7: Bake
Carefully transfer the dough (on the parchment paper) into the hot Dutch oven.
Cover with the lid.
Bake for 30 minutes.
Remove the lid.
Bake an additional 15–20 minutes until the crust becomes deep golden brown.
The internal temperature should reach approximately 205–210°F (96–99°C).
Step 8: Cool
Transfer the loaf to a cooling rack.
Allow it to cool for at least 1 hour before slicing.
This allows the crumb to finish setting.
Pro Tips for Perfect Artisan Bread
- Use bread flour for better gluten development.
- Allow a full overnight rise for the best flavor.
- Preheat the Dutch oven completely.
- Avoid adding too much extra flour.
- Cool completely before slicing.
- Use parchment paper for easier handling.
Best Flour to Use
Excellent choices include:
- Bread flour
- Unbleached all-purpose flour
- Organic bread flour
- White whole wheat flour (partial substitution)
Bread flour creates the chewiest texture and best oven spring.
Delicious Variations
Garlic Herb Bread
Mix garlic powder, rosemary, and thyme into the dough.
Parmesan Bread
Fold grated Parmesan into the dough before the first rise.
Olive Bread
Add sliced black or Kalamata olives.
Jalapeño Cheddar Bread
Mix diced jalapeños and shredded cheddar cheese into the dough.
Everything Bagel Bread
Sprinkle everything bagel seasoning over the loaf before baking.
Cranberry Walnut Bread
Fold dried cranberries and chopped walnuts into the dough.
What to Serve with Artisan Bread
Fresh artisan bread pairs beautifully with:
- Salted butter
- Olive oil and balsamic vinegar
- Tomato soup
- Beef stew
- Chicken noodle soup
- Pasta
- Caesar salad
- Charcuterie boards
- Cheese platters
- Roasted vegetables
It’s also perfect for sandwiches, toast, and grilled cheese.
Make-Ahead Instructions
Prepare the dough the night before.
Allow it to rise overnight at room temperature.
Bake fresh the following morning.
Storage
Store cooled bread in a paper bag or bread box.
It remains fresh for 2–3 days at room temperature.
Avoid storing it in the refrigerator, as this can dry it out more quickly.
Reheating
Warm the loaf in a 350°F (175°C) oven for 8–10 minutes to restore its crisp crust.
Freezing
Slice the cooled bread before freezing.
Store in freezer-safe bags for up to 3 months.
Toast slices directly from frozen.
Common Mistakes to Avoid
Skipping the Long Rise
The extended fermentation develops flavor and texture.
Not Preheating the Dutch Oven
A hot pot is essential for proper oven spring.
Using Too Much Flour
Sticky dough produces lighter, airier bread.
Slicing Too Soon
Fresh bread continues cooking internally after leaving the oven.
Opening the Lid Too Early
Keep the Dutch oven covered during the first stage of baking to trap steam.
Nutrition Estimate
| Serving | Amount |
|---|---|
| Calories | 180 |
| Protein | 6 g |
| Carbohydrates | 36 g |
| Fat | 1 g |
| Fiber | 2 g |
| Sodium | 390 mg |
Nutrition values are approximate.
Frequently Asked Questions
Can I use all-purpose flour?
Yes, although bread flour provides better texture and rise.
Do I really need a Dutch oven?
A Dutch oven gives the best crust by trapping steam, but you can also bake on a baking stone while creating steam in the oven using a pan of hot water.
Why didn’t my bread rise?
Inactive yeast, cold room temperatures, or insufficient rising time are common causes.
Can I freeze artisan bread?
Yes. Freeze sliced or whole loaves for up to 3 months.
How do I get a crispier crust?
Bake uncovered during the final 15–20 minutes and allow the loaf to cool on a wire rack.
Why is my bread dense?
Too much flour, under-proofing, or old yeast can produce a dense loaf.
Can I add seeds?
Absolutely. Sesame, sunflower, pumpkin, and flax seeds all work well.
How do I know when it’s fully baked?
The crust should be deep golden brown, and the internal temperature should reach about 205–210°F (96–99°C).
Can I make this recipe without kneading?
Yes. This recipe is specifically designed as a no-knead artisan bread.
How should I store leftovers?
Keep the loaf in a paper bag or bread box at room temperature, and freeze any leftovers you won’t eat within a few days.
Final Thoughts
This Dutch Oven Artisan Bread delivers everything you could want from homemade bread: a deeply golden, crackling crust, a light and chewy interior, and rich bakery-style flavor developed through slow fermentation. With only four basic ingredients and very little hands-on work, it’s one of the easiest ways to create an impressive loaf at home.
Whether you’re serving it alongside soup, building gourmet sandwiches, or simply enjoying a warm slice with butter, this rustic artisan bread is a recipe you’ll bake again and again. Once you hear that satisfying crackle as it cools and taste its fresh-baked flavor, you’ll understand why homemade Dutch oven bread is a favorite among bread lovers everywhere.