Introduction
These No-Bake Chocolate Peanut Butter Balls are rich, smooth, bite-sized treats with a creamy peanut butter center and a glossy chocolate coating. They are easy to prepare, require no oven, and can be made in large batches, which makes them perfect for holidays, parties, cookie trays, gifting, or simply keeping a sweet treat in the refrigerator.
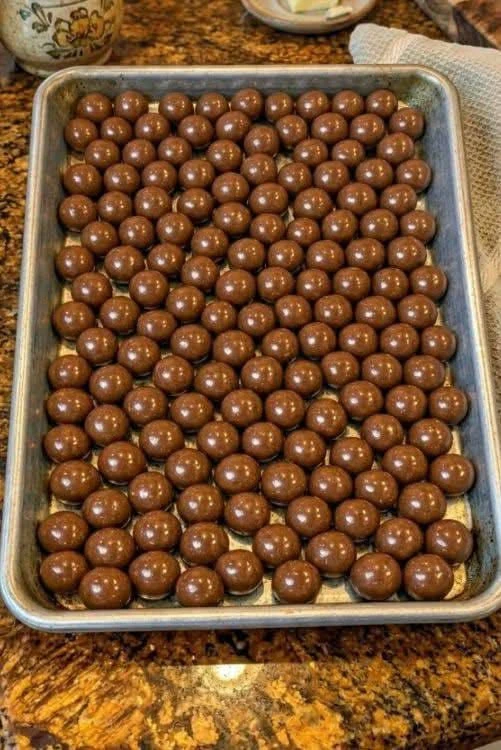
Inspired by the tray of chocolate candy balls shown in the image, this recipe creates dozens of small, evenly shaped bites that are firm enough to handle but soft and creamy once you bite through the chocolate shell. The outside is smooth and chocolatey, while the center combines peanut butter, butter, powdered sugar, and vanilla for a classic homemade candy flavor.
One of the best things about this recipe is how simple the method is. There is no candy thermometer, no baking, no complicated caramel stage, and no special decorating technique. Once the peanut butter mixture is blended, you roll it into balls, chill them until firm, dip them in melted chocolate, and let the coating set.
These candies are especially useful when you need a recipe that makes a large quantity. One batch can easily produce several dozen pieces, and the candies store well in both the refrigerator and freezer.
You can keep them completely classic or customize them with dark chocolate, milk chocolate, white chocolate, crushed peanuts, pretzels, coconut, cookie crumbs, or a tiny sprinkle of flaky salt.
For the smoothest finish, the centers should be thoroughly chilled before dipping, the chocolate should be melted gently, and each candy should be allowed to set completely before being packed or stacked.
The result is a simple homemade treat that looks neat enough for a holiday candy box but is easy enough to make any weekend.
Recipe Overview
| Detail | Information |
|---|---|
| Recipe Name | No-Bake Chocolate Peanut Butter Balls |
| Prep Time | 30 minutes |
| Chill Time | 45–60 minutes |
| Dipping Time | 20–30 minutes |
| Setting Time | 30 minutes |
| Total Time | About 2 hours |
| Yield | About 40–50 balls |
| Course | Dessert, Candy, Snack |
| Cuisine | American-Inspired Homemade Candy |
| Difficulty | Easy |
| Cooking Method | No-Bake |
| Main Ingredients | Peanut butter, chocolate, powdered sugar |
| Texture | Smooth shell, creamy center |
| Flavor | Chocolate, peanut butter, vanilla |
| Best For | Holidays, parties, gifting |
| Make-Ahead Friendly | Excellent |
| Freezer Friendly | Yes |
| Best Served | Chilled or room temperature |
Why You’ll Love These Chocolate Peanut Butter Balls
These candies are simple but incredibly satisfying.
The peanut butter center is creamy and rich.
The chocolate shell adds a firm snap.
The bite-sized shape makes them easy to serve.
They require no baking.
They can be prepared several days ahead.
Another big advantage is that the recipe is easy to scale.
If you need only a small batch, cut the recipe in half.
If you need a large holiday tray, double it.
Because the balls are small, one batch stretches a long way.
What Are Chocolate Peanut Butter Balls?
Chocolate peanut butter balls are a simple no-bake candy made from a sweetened peanut butter filling coated in melted chocolate.
The filling usually contains:
- Peanut butter
- Butter
- Powdered sugar
- Vanilla
The ingredients are mixed until thick enough to roll.
The balls are then chilled and dipped in chocolate.
Once the coating sets, you get a candy with a soft center and firm exterior.
They are similar to homemade peanut butter cups but easier to portion individually.
Ingredients
For the Peanut Butter Filling
| Ingredient | Amount |
|---|---|
| Creamy peanut butter | 1 1/2 cups |
| Unsalted butter, softened | 1/2 cup |
| Powdered sugar | 3 cups |
| Vanilla extract | 2 teaspoons |
| Fine salt | 1/4 teaspoon |
For the Chocolate Coating
| Ingredient | Amount |
|---|---|
| Semi-sweet chocolate | 16 oz |
| Coconut oil or shortening | 1 tablespoon |
Optional Finishing Ingredients
You can also use:
- Crushed peanuts
- Flaky sea salt
- Chocolate sprinkles
- White chocolate drizzle
- Crushed pretzels
- Toasted coconut
- Mini chocolate chips
Choosing the Best Peanut Butter
For the easiest texture, use standard creamy peanut butter.
Natural peanut butter can work, but it often contains more separated oil.
That can make the filling:
- Softer
- Harder to shape
- More oily
If using natural peanut butter, stir it extremely well before measuring.
For the most stable candies, classic processed peanut butter usually gives the most reliable result.
Creamy vs. Crunchy Peanut Butter
Creamy Peanut Butter
Creamy peanut butter produces:
- Smooth filling
- Cleaner shape
- Softer center
This is the best option if you want candies similar to those shown in the image.
Crunchy Peanut Butter
Crunchy peanut butter adds small peanut pieces.
The flavor is excellent, but the balls may not look quite as smooth.
Best Chocolate for Dipping
The chocolate coating makes a major difference.
Semi-Sweet Chocolate
This is the most balanced option.
It is sweet without being overpowering.
Milk Chocolate
Milk chocolate creates a sweeter candy.
This version is especially popular with children.
Dark Chocolate
Dark chocolate gives a stronger cocoa flavor and balances the sweet peanut butter center.
White Chocolate
White chocolate creates a completely different look and sweeter flavor.
You can use it as the main coating or simply drizzle it over dark chocolate candies.
Ingredient Notes
Powdered Sugar
Powdered sugar sweetens the filling and gives it structure.
Granulated sugar should not be substituted directly because it will make the center gritty.
Butter
Butter gives the filling a smoother, richer texture.
Use softened butter rather than melted butter.
Melted butter can make the mixture too loose.
Vanilla
Vanilla brings out the sweetness of both the peanut butter and chocolate.
Salt
Even a small amount of salt makes a major difference.
It prevents the candies from tasting overly sweet.
Coconut Oil
A small amount of coconut oil helps melted chocolate become smoother and easier to coat.
Do not add too much or the chocolate may remain too soft after setting.
Equipment Needed
| Equipment | Purpose |
|---|---|
| Large mixing bowl | Preparing filling |
| Electric mixer | Mixing smoothly |
| Baking sheet | Chilling balls |
| Parchment paper | Preventing sticking |
| Small cookie scoop | Even portions |
| Microwave-safe bowl | Melting chocolate |
| Fork or dipping tool | Coating candies |
| Refrigerator | Chilling |
| Freezer | Optional quick setting |
Step-by-Step Instructions
Step 1: Prepare the Baking Sheet
Line a large baking sheet with parchment paper.
Make sure it fits inside your refrigerator.
Step 2: Beat the Butter and Peanut Butter
Add softened butter and peanut butter to a mixing bowl.
Beat until completely smooth.
The mixture should look creamy and uniform.
Step 3: Add Vanilla and Salt
Add:
- Vanilla
- Salt
Mix again.
Step 4: Add Powdered Sugar Gradually
Add powdered sugar about one cup at a time.
Mix after each addition.
The filling will gradually become thicker.
Step 5: Check the Texture
The mixture should be soft but firm enough to roll.
Take a small amount in your hand.
If it holds shape without sticking excessively, it is ready.
If it feels too soft, add a little more powdered sugar.
Step 6: Portion the Filling
Use a small cookie scoop or teaspoon.
Portion approximately 1 tablespoon of mixture per ball.
Keeping the portions consistent helps the tray look neat and ensures all candies chill at the same rate.
Step 7: Roll Into Smooth Balls
Roll each portion gently between your palms.
Try to create smooth round balls.
Place them on the prepared baking sheet.
Step 8: Chill the Centers
Refrigerate for at least 45–60 minutes.
For faster chilling, freeze for about 20–25 minutes.
The centers should feel firm before dipping.
Do not freeze them completely solid if possible.
Step 9: Prepare the Chocolate
Place the chocolate and coconut oil in a microwave-safe bowl.
Microwave in 20–30 second intervals.
Stir thoroughly after each interval.
Stop as soon as the chocolate is smooth.
Step 10: Avoid Overheating the Chocolate
Chocolate can burn easily.
Short heating intervals are better than one long heating time.
The bowl itself may remain hot enough to melt the final pieces while stirring.
Step 11: Dip the First Ball
Place one chilled peanut butter ball into the melted chocolate.
Use a fork to turn it gently.
Make sure the entire surface is covered.
Step 12: Remove Excess Chocolate
Lift the ball with the fork.
Tap the fork gently against the side of the bowl.
Let excess chocolate drip back into the bowl.
This helps create a thinner, smoother shell.
Step 13: Place Back on Parchment
Slide the coated candy onto the parchment paper.
Repeat with the remaining balls.
Step 14: Work in Batches
Keep half the peanut butter balls in the refrigerator while dipping the other half.
This helps them stay firm.
Warm centers can become difficult to coat.
Step 15: Add Toppings Quickly
If using:
- Peanuts
- Salt
- Sprinkles
add them while the chocolate is still wet.
Once the chocolate sets, toppings will not stick well.
Step 16: Let the Chocolate Set
Allow candies to sit until the coating is firm.
You can leave them at cool room temperature or refrigerate them.
Step 17: Chill Before Serving
For the neatest texture, refrigerate the completed candies for approximately 30 minutes.
The chocolate shell becomes firm and the filling settles.
How to Get Perfectly Round Balls
Use a small cookie scoop.
Chill the filling briefly before rolling if needed.
Roll quickly between your palms.
Do not press too hard.
If the mixture begins sticking to your hands, wash and dry them or chill the mixture for 10 minutes.
How to Get the Smooth Chocolate Finish Shown in the Image
The candies in the image have a very smooth, glossy appearance.
For a similar finish:
Use good melting chocolate.
Do not overheat it.
Add a small amount of coconut oil.
Make sure the centers are cold.
Tap off excess chocolate.
Avoid touching the coating while it sets.
How to Keep Chocolate from Becoming Too Thick
If the chocolate becomes thick while dipping, gently rewarm it.
Microwave for only 10–15 seconds.
Stir thoroughly.
Add a tiny amount of coconut oil if necessary.
Do not add water.
Even a few drops of water can cause melted chocolate to seize.
Why Chilling the Centers Matters
Warm peanut butter filling becomes soft very quickly when placed in warm chocolate.
That can cause:
- Misshapen candies
- Filling leaking
- Difficult dipping
- Thick uneven coating
Cold centers stay firm and are much easier to work with.
How to Prevent Cracked Chocolate
Sometimes very cold centers cause the chocolate shell to crack later as the filling expands.
To reduce this:
Chill the balls rather than freezing them rock-solid.
Use a thin chocolate coating.
Let finished candies set gradually.
How to Make the Filling Softer
For an extra-creamy center, reduce powdered sugar slightly.
Keep in mind that softer filling is harder to roll.
Chill thoroughly before shaping.
How to Make the Filling Firmer
Add extra powdered sugar a few tablespoons at a time.
Do not add too much at once.
A very dry filling can become crumbly.
Milk Chocolate Peanut Butter Balls
Use milk chocolate instead of semi-sweet.
The candies will taste sweeter and creamier.
For balance, add a small amount of flaky salt on top.
Dark Chocolate Peanut Butter Balls
Use dark chocolate with approximately 60–70% cocoa.
The slight bitterness is excellent with the sweet peanut butter filling.
White Chocolate Peanut Butter Balls
Dip the candies in melted white chocolate.
Decorate with:
- Dark chocolate drizzle
- Crushed peanuts
- Sprinkles
These are especially attractive on holiday trays.
Chocolate Drizzle Version
Dip in milk or dark chocolate.
Once set, drizzle with contrasting chocolate.
For example:
Dark chocolate shell + white chocolate drizzle.
Crunchy Peanut Butter Balls
Use crunchy peanut butter.
Or add:
- 1/2 cup finely chopped roasted peanuts
to the filling.
This gives the center extra texture.
Rice Cereal Peanut Butter Balls
Add crispy rice cereal to the filling.
Use approximately 1–1 1/2 cups.
Fold gently.
The filling becomes lighter and crunchier.
Pretzel Peanut Butter Balls
Add finely crushed pretzels.
The salty crunch works beautifully with chocolate and peanut butter.
Use unsalted butter if the pretzels are already heavily salted.
Graham Cracker Peanut Butter Balls
Add finely crushed graham crackers.
They help firm the filling and add a mild honey flavor.
Coconut Peanut Butter Balls
Fold shredded coconut into the filling.
You can also sprinkle coconut over the chocolate coating.
Oreo Peanut Butter Balls
Add finely crushed chocolate sandwich cookies.
Reduce powdered sugar slightly if needed.
The center becomes darker and richer.
Peanut Butter Cookie Balls
Mix crushed peanut butter cookies into the filling.
This creates an extra peanut-forward flavor.
Salted Chocolate Peanut Butter Balls
After dipping, sprinkle each candy with a tiny amount of flaky sea salt.
Salt helps balance the sweetness and intensifies the chocolate flavor.
Holiday Chocolate Peanut Butter Balls
Decorate with:
- Red and green sprinkles
- White chocolate drizzle
- Crushed peppermint
Use them for Christmas candy trays.
Valentine’s Day Version
Decorate with:
- Pink sprinkles
- Red candy pieces
- White chocolate drizzle
Serve in mini paper candy cups.
Easter Version
Use pastel-colored sprinkles.
White chocolate works especially well.
Halloween Version
Use orange and black sprinkles.
Dark chocolate creates a dramatic finish.
How to Make Them Look Professional
Use equal-sized centers.
Roll them smoothly.
Chill before dipping.
Use thin melted chocolate.
Remove excess coating carefully.
Place the finished candies in small paper candy cups.
A uniform size makes homemade candies look much more polished.
Best Serving Ideas
Serve the candies with:
- Coffee
- Espresso
- Hot chocolate
- Cold milk
- Tea
They also work beautifully on dessert boards alongside cookies, fudge, and brownies.
Holiday Candy Tray Idea
Combine these peanut butter balls with:
- Chocolate fudge
- Sugar cookies
- Shortbread
- Chocolate truffles
- Caramel candies
Arrange in small paper cups.
This prevents the candies from touching one another.
Homemade Gift Idea
Place fully set candies inside:
- Decorative tins
- Candy boxes
- Small jars
Use parchment or wax paper between layers.
Keep them cool during transport.
Make-Ahead Instructions
These candies are excellent for preparing ahead.
Make them several days before serving.
Keep covered in the refrigerator.
The texture often becomes even better after several hours because the center firms and the chocolate shell fully sets.
Storage
Store in an airtight container.
Refrigerate for up to 2 weeks.
Place parchment paper between layers.
Keep away from strongly scented foods because chocolate and peanut butter can absorb refrigerator odors.
Room-Temperature Storage
The candies can usually sit at cool room temperature for several hours.
However, if the room is warm, the chocolate may soften.
For the best texture, refrigeration is recommended.
Freezing
Chocolate peanut butter balls freeze extremely well.
Place them in a single layer until firm.
Transfer to a freezer-safe container.
Place parchment between layers.
Freeze for up to 3 months.
How to Thaw
Move the candies from freezer to refrigerator.
Let thaw gradually.
This helps reduce condensation on the chocolate.
Avoid thawing frozen candies immediately in a very warm room.
Common Mistakes to Avoid
Filling Too Soft
The candies will be difficult to roll.
Add more powdered sugar or chill longer.
Filling Too Dry
Too much powdered sugar can make it crumbly.
Add a small spoonful of peanut butter.
Chocolate Too Hot
Very hot chocolate can soften the centers.
Let it cool slightly before dipping.
Chocolate Too Thick
Rewarm gently and add a tiny amount of coconut oil.
Centers Not Chilled Enough
Soft centers are harder to coat.
Chill thoroughly first.
Water in the Chocolate
Even small amounts can make chocolate seize.
Keep bowls and utensils completely dry.
Troubleshooting Guide
| Problem | Likely Cause | Solution |
|---|---|---|
| Filling sticks to hands | Too warm | Chill mixture |
| Balls flatten | Filling too soft | Add sugar or chill |
| Filling crumbles | Too dry | Add peanut butter |
| Chocolate is thick | Overheated or cooling | Rewarm gently |
| Chocolate seizes | Water contamination | Start fresh |
| Shell cracks | Centers too frozen | Chill instead of deep-freezing |
| Coating looks uneven | Chocolate too thick | Thin slightly |
| Toppings fall off | Chocolate already set | Add immediately |
Nutrition Estimate
| Nutrition | Approximate Amount |
|---|---|
| Calories | 120–170 per ball |
| Protein | 2–4 g |
| Carbohydrates | 12–18 g |
| Fat | 8–12 g |
| Sugar | 10–15 g |
| Serving Size | 1 candy |
Nutrition values are approximate and depend on the chocolate, peanut butter, size, and optional toppings used.
Frequently Asked Questions
What are chocolate peanut butter balls?
They are no-bake candies made from a sweet peanut butter filling dipped in chocolate.
Do they need to be baked?
No.
This recipe is completely no-bake.
What peanut butter works best?
Standard creamy peanut butter gives the easiest and most stable texture.
Can I use crunchy peanut butter?
Yes.
The filling will simply have more texture.
Can I use natural peanut butter?
Yes, but stir it thoroughly because separated oil can make the filling softer.
Can I use almond butter?
Yes.
The flavor will be different, but the method is similar.
Can I use cashew butter?
Yes.
Adjust powdered sugar if the texture is softer.
Can I make them without butter?
You can increase peanut butter, but the center will taste and feel different.
Why is powdered sugar used?
It sweetens the filling while also giving it enough structure to roll.
Can I use granulated sugar?
Not recommended.
It can make the center gritty.
Can I use milk chocolate?
Yes.
Can I use dark chocolate?
Yes.
Dark chocolate is especially good if you prefer less sweetness.
Can I use white chocolate?
Yes.
Can I use chocolate chips?
Yes, although bar chocolate or melting wafers often give a smoother coating.
Why add coconut oil to chocolate?
It makes the melted chocolate thinner and easier to dip.
Do I have to use coconut oil?
No.
Shortening can be used, or it can be omitted if the chocolate is already thin enough.
How long should the centers chill?
About 45–60 minutes in the refrigerator.
Can I freeze them before dipping?
Yes, briefly.
Do not freeze until extremely hard if possible.
Why does the chocolate crack?
The centers may have been too cold or the coating too thick.
Why is my filling too soft?
The peanut butter or butter may be warm.
Chill it or add a little powdered sugar.
Why is my filling too dry?
There may be too much powdered sugar.
Add a little more peanut butter.
Can I add Rice Krispies?
Yes.
They create a crunchy variation.
Can I add pretzels?
Yes.
Crushed pretzels add an excellent salty crunch.
Can I add graham crackers?
Yes.
They also help firm the filling.
Can I add coconut?
Yes.
Can I add peanuts?
Yes.
Finely chopped roasted peanuts are excellent.
Can I sprinkle salt on top?
Yes.
Flaky sea salt pairs beautifully with chocolate and peanut butter.
Can I make them ahead?
Yes.
They are ideal for making several days in advance.
How long do they keep?
About 2 weeks refrigerated for best quality.
Can I freeze them?
Yes.
Freeze for up to about 3 months.
How do I stop the balls from sticking together?
Let the chocolate set completely and place parchment between layers.
Can I serve them at room temperature?
Yes.
Let them sit for a few minutes for a softer filling.
Are these good for gifting?
Yes.
They are one of the easiest homemade candies to package and give as gifts.
Final Thoughts
These No-Bake Chocolate Peanut Butter Balls are proof that homemade candy does not need to be complicated.
A simple mixture of peanut butter, butter, powdered sugar, vanilla, and salt creates a creamy center that can be rolled into small, even balls. Once chilled and coated with smooth melted chocolate, those basic ingredients turn into a polished bite-sized treat.
The most important part of the recipe is getting the filling texture right. It should be soft enough to taste creamy but firm enough to hold its shape.
From there, chilling makes dipping much easier.
For the chocolate coating, work gently and avoid overheating. A smooth, slightly thin coating gives the candies the glossy rounded appearance that makes a full tray look so impressive.
Once you master the basic version, there are dozens of ways to customize them. Use dark chocolate, white chocolate, crunchy peanut butter, rice cereal, pretzels, coconut, cookie crumbs, or flaky salt.
Make them for Christmas candy trays, parties, homemade gifts, or simply keep a container in the refrigerator when you want a small chocolate-and-peanut-butter treat.
They are easy to make, easy to store, freezer-friendly, and perfect for preparing in large batches.