Introduction
This Rustic Rosemary Garlic Bread is the kind of homemade loaf that looks like it came straight from an artisan bakery. It has a deeply golden, crisp crust, a soft and airy interior, and a warm savory flavor from rosemary, garlic, olive oil, and just enough salt to bring everything together.
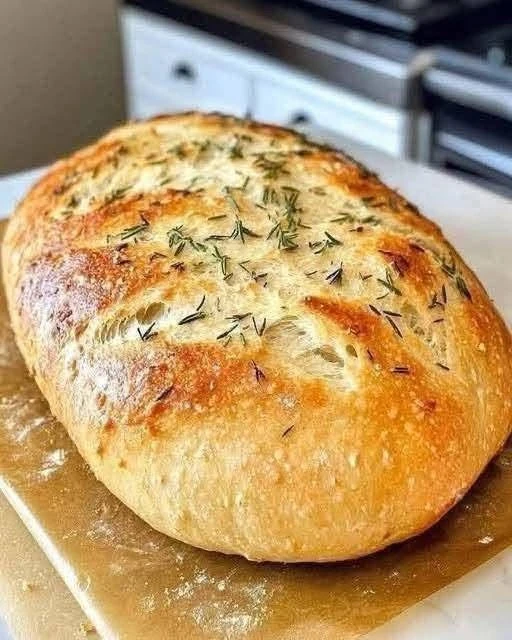
Inspired by the loaf shown in the image, this bread is shaped into a large round rustic boule with a beautifully browned exterior and a scattering of rosemary across the top. The crust develops crisp, blistered edges while the center stays tender and chewy, making it perfect for slicing, dipping, toasting, or serving alongside a hearty dinner.
One of the best things about this recipe is that the ingredients are incredibly simple. Flour, water, yeast, salt, olive oil, rosemary, and garlic are enough to create a loaf that feels special without requiring complicated bakery equipment.
The flavor is savory but balanced. Rosemary adds a woodsy herbal note, garlic gives the bread warmth, and olive oil helps create a softer crumb while adding richness. A small amount of coarse salt on top can make the crust even more flavorful.
This bread works beautifully with soups, stews, pasta, roasted chicken, steak, salads, cheese boards, or simply warm from the oven with butter. It can also be sliced and used for sandwiches, grilled cheese, garlic toast, or crostini.
The key to a great rustic loaf is patience. The dough needs enough time to rise, the oven needs to be properly hot, and the bread should cool before slicing so the crumb can finish setting.
Once you learn the basic method, you can customize the loaf with Parmesan, roasted garlic, thyme, black pepper, olives, sun-dried tomatoes, or different herbs.
Recipe Overview
| Detail | Information |
|---|---|
| Recipe Name | Rustic Rosemary Garlic Bread |
| Prep Time | 20 minutes |
| First Rise | 1–2 hours |
| Second Rise | 30–45 minutes |
| Bake Time | 35–45 minutes |
| Total Time | About 3 hours |
| Yield | 1 large loaf |
| Course | Bread, Side Dish |
| Cuisine | Rustic / Artisan-Style |
| Difficulty | Easy to Intermediate |
| Cooking Method | Oven-Baked |
| Main Ingredients | Flour, yeast, rosemary, garlic |
| Texture | Crisp crust, soft chewy center |
| Flavor | Savory, herby, garlicky |
| Best For | Soups, dinners, sandwiches |
| Make-Ahead Friendly | Yes |
| Freezer Friendly | Yes |
| Best Served | Warm or room temperature |
Why You’ll Love This Rosemary Bread
This loaf looks impressive but uses basic pantry ingredients.
The crust becomes golden and crisp.
The inside stays soft and chewy.
The rosemary gives the bread a fresh herbal aroma.
The garlic adds savory depth.
The olive oil keeps the crumb flavorful and tender.
Another advantage is how versatile the loaf is. It can be served with dinner, toasted for breakfast, used for sandwiches, or cut into cubes for croutons.
It also freezes very well, which makes it a useful bread to bake ahead.
What Makes Rustic Bread Different?
Rustic bread is usually less concerned with perfect symmetry and more focused on texture and flavor.
The loaf is often:
- Hand-shaped
- Thick-crusted
- Soft and airy inside
- Baked at relatively high heat
- Allowed to rise slowly for flavor
The shape does not need to be perfect.
In fact, small cracks and uneven ridges often make the loaf look more homemade and appealing.
Ingredients
Main Dough
| Ingredient | Amount |
|---|---|
| All-purpose flour or bread flour | 4 cups |
| Warm water | 1 1/2 cups |
| Active dry yeast | 2 1/4 teaspoons |
| Granulated sugar or honey | 1 teaspoon |
| Fine salt | 1 1/2 teaspoons |
| Olive oil | 2 tablespoons |
Flavor Ingredients
| Ingredient | Amount |
|---|---|
| Fresh rosemary, finely chopped | 1 1/2 tablespoons |
| Garlic cloves, minced | 3 |
| Garlic powder | 1/2 teaspoon, optional |
| Black pepper | 1/4 teaspoon |
For the Top
- Olive oil
- Extra rosemary
- Coarse salt
- Flour for dusting
Bread Flour vs. All-Purpose Flour
Both work well.
Bread Flour
Bread flour has more protein.
This usually gives:
- More chew
- Better structure
- Stronger rise
All-Purpose Flour
All-purpose flour gives:
- Slightly softer texture
- More tender crumb
- Easier handling
If you want a bakery-style chewy loaf, bread flour is excellent.
Fresh Rosemary vs. Dried Rosemary
Fresh rosemary gives the best flavor and appearance.
If using dried rosemary, use less because the flavor is stronger.
A good substitution is about 1 teaspoon dried rosemary for every tablespoon of fresh rosemary.
Crush dried rosemary slightly before adding it to help release the aroma.
Ingredient Notes
Yeast
Active dry yeast works well.
Instant yeast can also be used.
If using instant yeast, it can usually be mixed directly with the flour.
Water
The water should be warm, not hot.
Very hot water can kill the yeast.
A comfortable warm temperature is best.
Sugar or Honey
A small amount helps activate the yeast.
It does not make the bread noticeably sweet.
Olive Oil
Olive oil adds flavor and helps create a softer interior.
It also works beautifully with rosemary and garlic.
Garlic
Fresh garlic gives the strongest flavor.
Do not add too much raw garlic or it may overpower the bread.
Roasted garlic can be used for a sweeter, milder variation.
Equipment Needed
| Equipment | Purpose |
|---|---|
| Large mixing bowl | Mixing dough |
| Wooden spoon | Initial mixing |
| Measuring cups | Flour and water |
| Measuring spoons | Yeast and seasonings |
| Baking sheet or Dutch oven | Baking |
| Parchment paper | Preventing sticking |
| Sharp knife or bread lame | Scoring |
| Cooling rack | Cooling bread |
Step-by-Step Instructions
Step 1: Activate the Yeast
Combine:
- Warm water
- Sugar or honey
- Yeast
Stir gently.
Let sit for approximately 5–10 minutes.
The surface should become slightly foamy.
This shows the yeast is active.
Step 2: Add Olive Oil
Add the olive oil to the yeast mixture.
Stir.
Step 3: Combine Dry Ingredients
In a large bowl, combine:
- Flour
- Salt
- Rosemary
- Garlic
- Garlic powder
- Black pepper
Mix well.
Step 4: Add the Liquid
Pour the yeast mixture into the flour.
Stir with a wooden spoon.
The dough will begin to look shaggy.
Step 5: Form the Dough
Continue mixing until most of the dry flour is incorporated.
If the dough is extremely dry, add water 1 tablespoon at a time.
If it is very sticky, add a small amount of flour.
The dough should feel soft and slightly tacky.
Step 6: Knead
Turn the dough onto a lightly floured surface.
Knead for approximately 8–10 minutes.
The dough should become smoother and more elastic.
Step 7: First Rise
Place the dough in a lightly oiled bowl.
Turn once to coat.
Cover with a clean towel or plastic wrap.
Let rise in a warm place for approximately 1–2 hours.
The dough should roughly double in size.
Step 8: Deflate Gently
Once risen, gently press the dough down.
Do not aggressively punch out every air bubble.
You want to keep some internal structure.
Step 9: Shape the Loaf
Transfer the dough to a lightly floured surface.
Pull the edges inward toward the center.
Turn the loaf over.
Use your hands to create a round shape.
Tuck the bottom edges underneath.
Step 10: Second Rise
Place the shaped loaf on parchment paper.
Cover lightly.
Let rise for approximately 30–45 minutes.
The dough should look fuller and slightly puffed.
Step 11: Preheat the Oven
Preheat the oven to 425°F / 220°C.
If using a Dutch oven, place it in the oven while preheating.
A very hot oven helps develop a good crust.
Step 12: Score the Bread
Use a sharp knife to make one or two shallow cuts across the top.
Scoring allows the bread to expand in a controlled way.
Step 13: Add the Topping
Brush the top lightly with olive oil.
Sprinkle with:
- Fresh rosemary
- Coarse salt
This gives the bread the rustic herb-covered appearance shown in the image.
Step 14: Bake
Bake for approximately 35–45 minutes.
The top should become deeply golden.
The crust should feel firm.
Step 15: Check for Doneness
The loaf is done when:
- The crust is golden brown
- The bottom sounds hollow when tapped
- The center feels fully baked
If using a thermometer, the interior should generally reach around 200–210°F / 93–99°C.
Step 16: Cool
Transfer to a cooling rack.
Let cool for at least 30–45 minutes before slicing.
This is important.
The inside continues setting while the bread cools.
How to Get a Crispy Artisan Crust
For a better crust, use steam.
If baking on a regular sheet pan, place a small oven-safe pan on a lower rack.
Add hot water just after putting the bread into the oven.
The steam helps the crust expand before it hardens.
A Dutch oven naturally traps steam and gives an even better crust.
Dutch Oven Method
Preheat the Dutch oven at 450°F / 230°C for about 30 minutes.
Carefully transfer the loaf inside.
Cover.
Bake for approximately 25 minutes.
Remove the lid.
Bake another 10–15 minutes until deeply golden.
This method gives one of the best crusts.
How to Get a Soft Interior
Do not add too much flour.
A slightly tacky dough usually gives a lighter crumb.
Let the dough rise fully.
Do not overbake.
Allow the loaf to cool before cutting.
Why Bread Can Turn Dense
Common reasons include:
- Yeast was inactive
- Dough did not rise long enough
- Too much flour was added
- Dough was overworked after rising
- Oven was not hot enough
The dough should feel soft, elastic, and alive before baking.
Garlic Rosemary Bread
For stronger garlic flavor, increase the garlic to 4 cloves.
You can also brush the baked loaf with garlic butter.
Roasted Garlic Rosemary Bread
Roast a whole head of garlic.
Mash several cloves.
Mix them into the dough.
Roasted garlic gives a much sweeter and milder flavor than raw garlic.
Parmesan Rosemary Bread
Add:
- 1/2 cup grated Parmesan
Mix into the dough.
Sprinkle extra Parmesan on top before baking.
This creates a savory cheesy crust.
Cheddar Rosemary Bread
Fold in shredded cheddar during the final kneading stage.
Do not add too much cheese or it can weigh down the dough.
Olive Rosemary Bread
Add:
- 3/4 cup chopped olives
Kalamata olives work especially well.
Drain them thoroughly before adding.
Sun-Dried Tomato Rosemary Bread
Add chopped sun-dried tomatoes.
Pat them dry first.
This gives the bread a stronger Mediterranean flavor.
Thyme and Rosemary Bread
Use both rosemary and thyme.
The two herbs work beautifully together.
Black Pepper Rosemary Bread
Increase black pepper.
Use freshly cracked pepper for stronger flavor.
Garlic Butter Finish
After baking, mix:
- 2 tablespoons melted butter
- 1 minced garlic clove
- Chopped parsley
Brush lightly over the hot crust.
This creates a softer, richer exterior.
What to Serve with Rosemary Garlic Bread
| Dish | Why It Works |
|---|---|
| Beef stew | Perfect for dipping |
| Chicken soup | Comforting combination |
| Tomato soup | Classic pairing |
| Pasta | Great with sauce |
| Roast chicken | Savory match |
| Steak | Hearty combination |
| Salad | Adds texture |
| Cheese board | Excellent with cheese |
| Olive oil dip | Simple and flavorful |
Olive Oil Dipping Sauce
Combine:
- Extra virgin olive oil
- Black pepper
- Garlic
- Italian seasoning
- Parmesan
- Red pepper flakes
Serve in a shallow dish.
Dip warm slices of bread into the seasoned oil.
Garlic Butter Serving Idea
Mix softened butter with:
- Garlic
- Parsley
- Salt
Spread over warm bread.
This turns the loaf into an easy garlic bread.
Soup Serving Idea
Serve thick slices with:
- Tomato soup
- Chicken soup
- Potato soup
- Beef stew
The sturdy crust is excellent for dipping.
Sandwich Bread Idea
Slice the loaf horizontally or into thick pieces.
Use for:
- Turkey sandwiches
- Roast beef sandwiches
- Grilled cheese
- Chicken sandwiches
The rosemary flavor works especially well with savory fillings.
Toasted Rosemary Bread
Toast leftover slices.
Add:
- Butter
- Cream cheese
- Avocado
- Eggs
This makes an excellent breakfast or snack.
Crostini
Slice thinly.
Brush with olive oil.
Bake until crisp.
Top with:
- Tomatoes
- Cheese
- Hummus
- Tapenade
Homemade Croutons
Cut leftover bread into cubes.
Toss with olive oil and seasoning.
Bake until crisp.
Use in salads and soups.
Make-Ahead Instructions
You can prepare the dough ahead.
After the first rise, place it in the refrigerator overnight.
The cold fermentation can actually improve flavor.
Bring the dough closer to room temperature before shaping and baking.
Overnight Refrigerator Method
Mix the dough.
Cover.
Refrigerate for 8–18 hours.
The next day:
Shape.
Let rise.
Bake.
This method often creates deeper flavor and better texture.
Storage
Store cooled bread in a paper bag, bread box, or loosely wrapped container.
For the best crust, avoid sealing warm bread in plastic.
At room temperature, it is best within 2–3 days.
How to Keep the Crust Crisp
Let the loaf cool completely.
Store loosely wrapped.
Reheat in the oven rather than microwave.
Reheating
Place the loaf or slices in a 350°F / 175°C oven.
Heat for approximately 5–10 minutes.
This restores much of the crust texture.
Freezing
This bread freezes very well.
Cool completely.
Wrap tightly.
Freeze for up to 3 months.
Freezing Slices
Slice the loaf before freezing.
Place parchment between slices if needed.
Freeze in a sealed bag.
Remove individual slices as needed.
Toast directly from frozen.
Common Mistakes to Avoid
Water Too Hot
Hot water can kill the yeast.
Use warm water.
Adding Too Much Flour
Too much flour makes the bread dense.
The dough should stay slightly tacky.
Not Rising Long Enough
Use the size of the dough rather than only the clock.
It should roughly double.
Overworking After the First Rise
Handle gently.
You do not want to remove every air bubble.
Cutting Bread Too Soon
Fresh bread smells amazing, but cutting too early can make the inside gummy.
Let it cool.
Troubleshooting Guide
| Problem | Likely Cause | Solution |
|---|---|---|
| Bread did not rise | Inactive yeast | Use fresh yeast |
| Loaf is dense | Too much flour | Use less |
| Bread spreads flat | Dough too wet or weak | Knead longer |
| Crust is pale | Oven too cool | Increase heat |
| Crust is too hard | Overbaked | Reduce bake time |
| Center is gummy | Cut too early | Cool completely |
| Garlic tastes burnt | Garlic exposed on top | Mix into dough |
Nutrition Estimate
| Nutrition | Approximate Amount |
|---|---|
| Calories | 180–230 per slice |
| Protein | 5–7 g |
| Carbohydrates | 32–40 g |
| Fat | 4–7 g |
| Fiber | 1–3 g |
| Sodium | 250–400 mg |
| Serving Size | 1 slice |
Nutrition values are approximate and depend on flour, oil, and slice size.
Frequently Asked Questions
What type of bread is this?
It is a rustic yeast bread flavored with rosemary, garlic, and olive oil.
Can I use all-purpose flour?
Yes.
All-purpose flour works very well.
Is bread flour better?
Bread flour gives a chewier texture and stronger structure.
Can I use instant yeast?
Yes.
Instant yeast works perfectly.
Can I use active dry yeast?
Yes.
Activate it in warm water first.
Can I use dried rosemary?
Yes.
Use less than fresh rosemary.
Can I add garlic?
Yes.
Fresh garlic or roasted garlic both work.
Can I add cheese?
Yes.
Parmesan and cheddar are excellent options.
Can I add olives?
Yes.
Drain and chop them before adding.
Can I use a Dutch oven?
Yes.
A Dutch oven gives an excellent crust.
Do I need a Dutch oven?
No.
A regular baking sheet works.
How do I know the dough has risen enough?
It should roughly double in size.
Why is my dough sticky?
Slightly sticky dough is normal.
Avoid adding excessive flour.
Why is my bread dense?
The dough may have needed more rising time or contained too much flour.
Why did my loaf spread?
The dough may have been too wet or under-kneaded.
Do I need to score the bread?
Scoring helps control how the loaf expands.
Why add steam?
Steam helps create a crisp, bakery-style crust.
How long should bread cool?
At least 30–45 minutes.
Can I make the dough overnight?
Yes.
Cold fermentation gives excellent flavor.
How long does the bread stay fresh?
About 2–3 days at room temperature.
Can I freeze it?
Yes.
Freeze for up to about 3 months.
How do I reheat it?
Use a warm oven for the best crust.
What is the best thing to serve with it?
Soups, stews, pasta, roast chicken, olive oil, and cheese all work beautifully.
Final Thoughts
This Rustic Rosemary Garlic Bread proves that a beautiful artisan-style loaf does not need a complicated ingredient list.
A simple dough made with flour, water, yeast, salt, olive oil, rosemary, and garlic transforms in the oven into a deeply golden loaf with a crisp crust and soft chewy center.
The most important part of the recipe is giving the dough enough time.
Let the yeast work.
Keep the dough slightly soft.
Allow it to rise properly.
Bake it in a thoroughly heated oven.
And resist cutting into the loaf immediately after baking.
From there, you can customize the bread with Parmesan, roasted garlic, olives, thyme, black pepper, cheese, or sun-dried tomatoes.
Serve thick warm slices with butter, dip them into soup or olive oil, or use leftovers for toast, sandwiches, crostini, and croutons.
It is rustic, flavorful, versatile, and exactly the kind of homemade bread that makes a simple meal feel special.