Introduction
These No-Bake Chocolate Peanut Butter Crunch Bars are rich, chewy, crispy, and covered in a thick glossy layer of chocolate from edge to edge. They combine the deep flavor of chocolate with creamy peanut butter and crunchy cereal, creating small square treats that are easy to make, easy to store, and almost impossible to stop eating after just one.
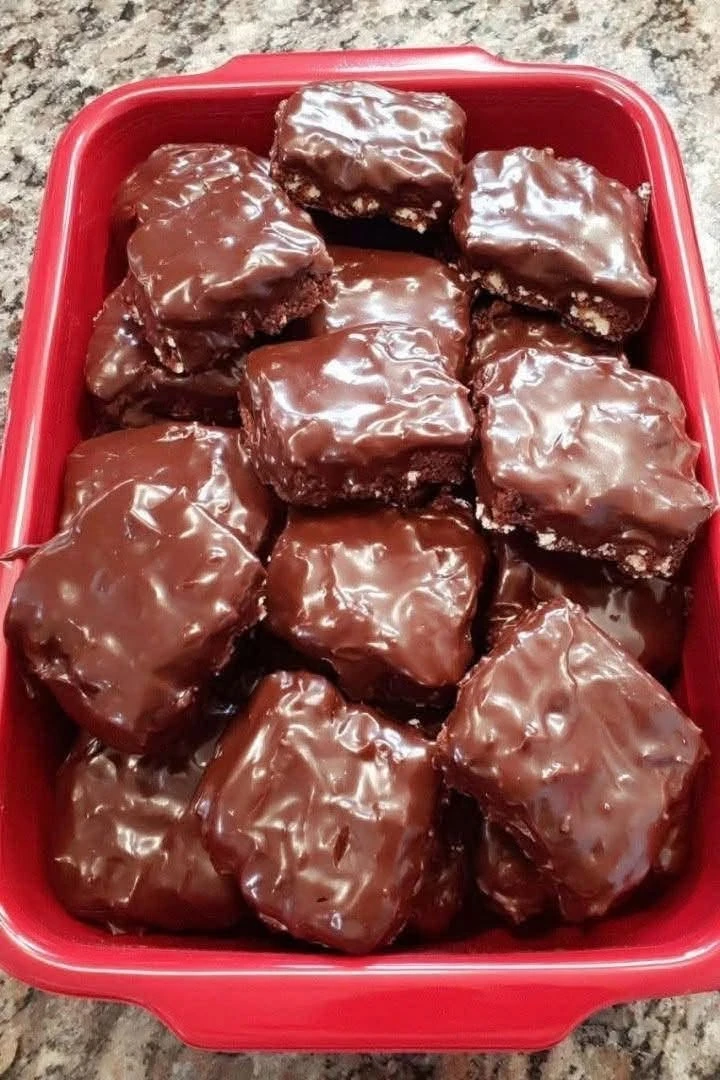
Inspired by the chocolate-covered squares shown in the image, this recipe is designed to create compact bars with a slightly chewy center, little crispy pieces throughout, and a smooth chocolate coating that completely covers the tops and sides. The result is somewhere between a homemade candy bar, chocolate cereal treat, peanut butter square, and fudge-style dessert.
One of the best things about this recipe is that it requires no oven. The base comes together on the stovetop in just a few minutes, then everything is pressed into a pan, chilled until firm, cut into squares, and coated with melted chocolate.
The combination of creamy peanut butter and crisp rice cereal creates the ideal texture. Peanut butter keeps the center soft and rich, while the cereal prevents the bars from becoming too dense. A little butter adds smoothness, powdered sugar helps the filling hold together, and chocolate on the outside gives each square a candy-like finish.
These bars are perfect for holidays, parties, dessert trays, potlucks, homemade gifts, bake sales, or simply keeping a container of chocolate treats in the refrigerator.
They are also easy to customize. You can use milk chocolate, dark chocolate, white chocolate, crunchy peanut butter, crushed pretzels, chopped peanuts, cookie crumbs, coconut, or a small sprinkle of sea salt.
For the cleanest squares and the smoothest coating, the key is chilling the base thoroughly before cutting and dipping. Once firm, the bars hold their shape beautifully and are much easier to coat evenly.
Recipe Overview
| Detail | Information |
|---|---|
| Recipe Name | No-Bake Chocolate Peanut Butter Crunch Bars |
| Prep Time | 25 minutes |
| Chill Time | 1–2 hours |
| Chocolate Coating Time | 20–30 minutes |
| Final Setting Time | 30 minutes |
| Total Time | About 3 hours |
| Yield | 20–24 squares |
| Course | Dessert, Candy, Snack |
| Cuisine | American-Inspired No-Bake Dessert |
| Difficulty | Easy |
| Cooking Method | No-Bake |
| Main Ingredients | Peanut butter, crispy cereal, chocolate |
| Texture | Crispy, chewy, fudgy |
| Flavor | Chocolate, peanut butter, vanilla |
| Best For | Holidays, parties, gifting |
| Make-Ahead Friendly | Excellent |
| Freezer Friendly | Yes |
| Best Served | Chilled or cool room temperature |
Why You’ll Love These Chocolate Crunch Bars
These bars are easy but taste like a homemade candy bar.
The center is crispy.
The peanut butter adds richness.
The chocolate coating is smooth and indulgent.
The squares are easy to portion.
No baking is required.
Another major advantage is that the recipe can be prepared several days in advance.
That makes it especially useful during the holidays when oven space is limited.
The bars also freeze very well, so you can make a large batch and keep extras for later.
What Are Chocolate Peanut Butter Crunch Bars?
These bars are a no-bake dessert made by combining peanut butter, butter, sweetener, and crispy cereal into a compact base.
The base is chilled until firm.
It is then cut into squares and covered with melted chocolate.
The finished texture is a combination of:
- Crunchy cereal treats
- Peanut butter candy
- Chocolate bars
- Soft fudge
That combination is what makes them so satisfying.
Ingredients
For the Crunchy Peanut Butter Center
| Ingredient | Amount |
|---|---|
| Creamy peanut butter | 1 1/2 cups |
| Unsalted butter | 1/2 cup |
| Powdered sugar | 2 cups |
| Crispy rice cereal | 3 cups |
| Vanilla extract | 2 teaspoons |
| Fine salt | 1/4 teaspoon |
For the Chocolate Coating
| Ingredient | Amount |
|---|---|
| Semi-sweet chocolate | 18–20 oz |
| Coconut oil or shortening | 1 1/2 tablespoons |
Optional Add-Ins
You can also add:
- Mini chocolate chips
- Chopped roasted peanuts
- Crushed pretzels
- Toasted coconut
- Graham cracker crumbs
- Crushed chocolate cookies
- Flaky sea salt
- White chocolate drizzle
Best Peanut Butter to Use
For the most reliable result, use standard creamy peanut butter.
Classic peanut butter gives the filling a smooth, stable texture that firms well in the refrigerator.
Natural peanut butter can work, but the oil must be stirred in extremely well.
Too much separated oil can make the bars:
- Softer
- Greasier
- Harder to cut
- More difficult to coat
For neat squares like those shown in the image, regular creamy peanut butter is usually the easiest option.
Can You Use Crunchy Peanut Butter?
Yes.
Crunchy peanut butter adds extra peanut pieces to the filling.
This creates more texture but gives the center a slightly less uniform appearance.
If you want the smoothest-looking bars, creamy peanut butter is better.
Choosing the Right Cereal
Crispy rice cereal is ideal because it stays light and crunchy without making the bars too heavy.
You can also use:
- Cornflakes, lightly crushed
- Crispy wheat cereal
- Rice squares
- Crushed pretzel cereal
Avoid cereal that becomes soggy very quickly.
Best Chocolate for Coating
Semi-Sweet Chocolate
This is the best all-around option.
It balances the sweet filling without becoming too sugary.
Milk Chocolate
Milk chocolate creates a sweeter, softer flavor.
It is especially good if you prefer candy-bar-style desserts.
Dark Chocolate
Dark chocolate creates a more intense cocoa flavor.
It is excellent if you want to balance the sweetness of the peanut butter center.
White Chocolate
White chocolate can be used for a completely different version.
It also works beautifully as a drizzle over dark-coated bars.
Ingredient Notes
Powdered Sugar
Powdered sugar gives structure to the filling.
It also dissolves easily, so the bars stay smooth rather than gritty.
Butter
Butter makes the center richer and helps bind the ingredients.
Use softened or gently melted butter depending on your mixing method.
Vanilla
Vanilla rounds out the peanut butter and chocolate flavors.
A small amount makes the whole dessert taste more balanced.
Salt
Salt keeps the bars from tasting overly sweet.
Even a small amount makes a noticeable difference.
Coconut Oil
Coconut oil thins the melted chocolate slightly.
This makes dipping and coating much easier.
Use only a little.
Too much can make the chocolate shell too soft.
Equipment Needed
| Equipment | Purpose |
|---|---|
| Large mixing bowl | Filling |
| Small saucepan | Melting ingredients |
| 8×8 or 9×9-inch pan | Shaping the base |
| Parchment paper | Easy removal |
| Rubber spatula | Mixing |
| Sharp knife | Cutting squares |
| Microwave-safe bowl | Melting chocolate |
| Fork or dipping tool | Chocolate coating |
| Baking sheet | Setting coated bars |
Step-by-Step Instructions
Step 1: Prepare the Pan
Line an 8×8-inch or 9×9-inch pan with parchment paper.
Leave extra parchment hanging over the sides.
This makes it easy to lift the chilled slab out later.
Step 2: Melt the Peanut Butter and Butter
Place the butter and peanut butter in a saucepan over low heat.
Stir gently.
Heat only until smooth.
Do not boil.
Step 3: Add Vanilla and Salt
Remove from heat.
Add:
- Vanilla
- Salt
Stir well.
Step 4: Add Powdered Sugar
Add powdered sugar gradually.
Stir until smooth.
The mixture will become thicker.
Step 5: Fold in the Crispy Cereal
Add the crispy rice cereal.
Fold gently.
Try not to crush the cereal too much.
The goal is to keep plenty of crisp texture.
Step 6: Transfer to the Pan
Spoon the mixture into the prepared pan.
Spread evenly.
Step 7: Press Firmly but Gently
Use the back of a spoon or another piece of parchment paper.
Press the mixture into an even layer.
Do not crush it aggressively.
You want the bars compact enough to hold together but still light and crispy.
Step 8: Chill
Refrigerate for at least 1–2 hours.
The slab should become firm enough to cut cleanly.
For faster results, freeze for about 30–40 minutes.
Step 9: Lift Out of the Pan
Use the parchment handles to lift the chilled slab onto a cutting board.
Remove the parchment.
Step 10: Cut into Squares
Use a sharp knife.
Cut into approximately 20–24 squares.
For clean cuts, wipe the knife between slices.
Step 11: Chill the Squares Again
Place the squares on a baking sheet.
Return to the refrigerator for approximately 20 minutes.
This helps them stay firm while dipping.
Step 12: Melt the Chocolate
Place chocolate and coconut oil in a microwave-safe bowl.
Microwave in 20–30 second intervals.
Stir after every interval.
Stop heating as soon as the chocolate becomes smooth.
Step 13: Dip the First Square
Place one chilled square into the melted chocolate.
Use a fork to turn it gently.
Make sure the top, bottom, and sides are coated.
Step 14: Remove Excess Chocolate
Lift the square.
Tap the fork gently against the side of the bowl.
Allow extra chocolate to drip off.
Step 15: Transfer to Parchment
Place the coated square onto parchment paper.
Repeat with the remaining pieces.
Step 16: Work in Small Batches
Keep some squares refrigerated while dipping the others.
Cold squares are much easier to coat.
Step 17: Add Toppings
If using:
- Sea salt
- Chopped nuts
- Sprinkles
add them before the chocolate sets.
Step 18: Let the Coating Set
Leave the bars at cool room temperature or place them in the refrigerator.
The chocolate should become completely firm.
Step 19: Chill Before Serving
For the best texture, refrigerate the finished squares for another 20–30 minutes.
How to Get the Thick Chocolate Coating Shown in the Image
The squares in the image appear completely covered in chocolate.
For that look:
Use enough melted chocolate.
Dip the entire square rather than coating only the top.
Keep the center cold.
Use a fork to turn the square gently.
Allow only a little excess chocolate to drip off.
A slightly thicker coating creates the glossy candy-bar appearance.
How to Get a Smooth Chocolate Finish
Use high-quality melting chocolate.
Melt slowly.
Do not overheat.
Add a small amount of coconut oil.
Keep water away from the chocolate.
Once dipped, avoid touching the bars until fully set.
Why Chocolate Can Turn Thick While Dipping
Chocolate cools as you work.
If it becomes too thick:
Microwave for 10 seconds.
Stir thoroughly.
Repeat only if needed.
Do not overheat.
Why Water Ruins Melted Chocolate
Even a tiny amount of water can cause chocolate to seize.
It may suddenly become:
- Thick
- Grainy
- Clumpy
Make sure bowls and utensils are completely dry.
How to Keep the Bars Crunchy
Do not add excessive liquid.
Do not overheat the peanut butter mixture.
Fold the cereal in only after removing from heat.
Store the bars in an airtight container.
These steps help preserve the crisp texture.
How to Make Firmer Bars
If your mixture feels very soft, add:
- More powdered sugar
or
- Slightly more crispy cereal
Chill thoroughly before cutting.
How to Make Softer Bars
Reduce powdered sugar slightly.
Increase peanut butter by a small amount.
Keep in mind that softer bars are harder to coat.
Classic Chocolate Peanut Butter Crunch Bars
Use:
- Creamy peanut butter
- Crispy rice cereal
- Semi-sweet chocolate
This is the closest version to the bars shown in the image.
Dark Chocolate Crunch Bars
Use dark chocolate for the coating.
This creates a less sweet, more intense version.
Milk Chocolate Crunch Bars
Use milk chocolate.
The bars become sweeter and more candy-like.
White Chocolate Crunch Bars
Coat the squares in white chocolate.
Finish with:
- Dark chocolate drizzle
- Peanuts
- Sprinkles
Salted Chocolate Peanut Butter Bars
Sprinkle each freshly dipped square with flaky sea salt.
This gives the dessert a sweet-and-salty finish.
Pretzel Peanut Butter Crunch Bars
Replace about 1 cup cereal with crushed pretzels.
The pretzels add saltiness and extra crunch.
Peanut Crunch Bars
Add:
- 1/2 cup chopped roasted peanuts
Fold them into the filling.
This creates a nuttier center.
Graham Cracker Crunch Bars
Add finely crushed graham crackers.
The crumbs make the center slightly denser and add a honey-like flavor.
Oreo Peanut Butter Crunch Bars
Add crushed chocolate sandwich cookies.
Reduce powdered sugar slightly if needed.
The filling becomes more chocolate-forward.
Coconut Crunch Bars
Add:
- 1/2 cup shredded coconut
You can also sprinkle toasted coconut over the finished chocolate.
Caramel Chocolate Crunch Bars
Add a thin layer of thick caramel over the chilled peanut butter base before cutting.
Chill again.
Then coat with chocolate.
This creates a more decadent candy-bar-style treat.
Holiday Version
Decorate with:
- Red and green sprinkles
- White chocolate drizzle
- Crushed peppermint
These bars work beautifully on Christmas dessert trays.
Valentine’s Day Version
Finish with:
- Pink sprinkles
- Red sprinkles
- White chocolate drizzle
Cut into smaller pieces for gift boxes.
Halloween Version
Use:
- Orange sprinkles
- Black sprinkles
Dark chocolate works particularly well.
What to Serve with Chocolate Crunch Bars
Serve with:
- Coffee
- Espresso
- Hot chocolate
- Cold milk
- Tea
They also work perfectly as part of a dessert board.
Dessert Tray Idea
Pair these bars with:
- Peanut butter balls
- Brownies
- Fudge
- Chocolate chip cookies
- Shortbread
- Truffles
The square shape adds variety to a mixed dessert tray.
Homemade Gift Idea
Once fully set, place the bars in:
- Candy boxes
- Decorative tins
- Holiday containers
Use parchment or wax paper between layers.
Store the gift box in a cool place.
Make-Ahead Instructions
These bars are ideal for making ahead.
Prepare them up to several days before serving.
Store covered in the refrigerator.
The chocolate becomes fully set and the center stays firm.
Storage
Store in an airtight container.
Place parchment between layers.
Refrigerate for up to 10–14 days for best quality.
Room-Temperature Storage
They can sit at cool room temperature for several hours.
If your kitchen is warm, keep them refrigerated because the chocolate can soften.
Freezing
These bars freeze extremely well.
Place them in a single layer until firm.
Transfer to an airtight freezer container.
Use parchment between layers.
Freeze for up to 3 months.
How to Thaw
Move frozen bars to the refrigerator.
Let them thaw slowly.
This reduces condensation on the chocolate.
Common Mistakes to Avoid
Filling Too Soft
Add more powdered sugar or cereal.
Filling Too Dry
Add a small amount of peanut butter.
Cutting Before Chilling
The bars can crumble.
Chill until firm first.
Chocolate Too Hot
Very hot chocolate can soften the filling.
Let it cool slightly before dipping.
Chocolate Too Thick
Reheat gently.
Wet Utensils
Water can make chocolate seize.
Keep everything dry.
Stacking Before Chocolate Sets
The coating can stick together.
Let every piece set completely.
Troubleshooting Guide
| Problem | Likely Cause | Solution |
|---|---|---|
| Bars fall apart | Not chilled enough | Chill longer |
| Filling too sticky | Too much peanut butter | Add powdered sugar |
| Filling too dry | Too much sugar | Add peanut butter |
| Chocolate coating is thick | Chocolate cooled | Reheat gently |
| Chocolate looks grainy | Overheated | Melt more slowly |
| Chocolate seized | Water contamination | Start with fresh chocolate |
| Bars lose crunch | Too much moisture | Store airtight |
| Coating cracks | Centers too frozen | Use refrigerated centers |
Nutrition Estimate
| Nutrition | Approximate Amount |
|---|---|
| Calories | 210–290 per square |
| Protein | 4–6 g |
| Carbohydrates | 22–30 g |
| Fat | 13–20 g |
| Sugar | 17–24 g |
| Serving Size | 1 square |
Nutrition values are approximate and depend on chocolate, peanut butter, cereal, and square size.
Frequently Asked Questions
What are chocolate peanut butter crunch bars?
They are no-bake peanut butter and cereal squares covered completely in chocolate.
Do I need an oven?
No.
The entire recipe is no-bake.
What cereal works best?
Crispy rice cereal is the easiest and most classic option.
Can I use cornflakes?
Yes.
Crush them lightly before mixing.
Can I use Rice Krispies?
Yes.
They work extremely well.
Can I use crunchy peanut butter?
Yes.
The bars will simply have more texture.
Can I use natural peanut butter?
Yes, but stir it thoroughly before measuring.
Why are my bars too soft?
The filling may need more powdered sugar, more cereal, or more chilling.
Why are my bars crumbly?
The mixture may be too dry.
Add a little more peanut butter.
Do I need coconut oil in the chocolate?
No.
It simply makes the coating easier to work with.
Can I use shortening instead?
Yes.
Can I use chocolate chips?
Yes.
Melting wafers or chopped chocolate may create a smoother coating, but chocolate chips still work.
Can I use milk chocolate?
Yes.
Can I use dark chocolate?
Yes.
Dark chocolate is excellent with peanut butter.
Can I use white chocolate?
Yes.
Can I coat only the tops?
Yes.
That creates a simpler version.
For the appearance shown in the image, coat the whole square.
Why does the chocolate crack?
The centers may be too frozen.
Refrigerated centers are usually better.
Why does melted chocolate get grainy?
It may have overheated or come into contact with water.
Can I add chopped peanuts?
Yes.
Can I add pretzels?
Yes.
They create an excellent salty crunch.
Can I add coconut?
Yes.
Can I add cookie crumbs?
Yes.
Oreos and graham crackers both work.
Can I add caramel?
Yes.
Use a thick caramel layer and chill well before coating.
How long should I chill the base before cutting?
At least 1–2 hours in the refrigerator.
Can I make these the day before?
Yes.
They are excellent made ahead.
How long do they keep in the fridge?
About 10–14 days for best quality.
Can I freeze them?
Yes.
They freeze well for up to about 3 months.
Should I serve them cold?
They are excellent chilled, but letting them sit for a few minutes gives the filling a softer texture.
Are these good for holiday trays?
Yes.
They are especially useful because they can be made ahead and do not need oven space.
Are they good for gifting?
Yes.
Once the chocolate is completely set, they package very well.
Final Thoughts
These No-Bake Chocolate Peanut Butter Crunch Bars are the kind of dessert that proves you do not need complicated baking techniques to make something rich, impressive, and satisfying.
The peanut butter filling is creamy and sweet, while crispy cereal adds enough crunch to keep the center light. Once the chilled squares are coated completely in melted chocolate, they become little homemade candy bars with a glossy exterior and a soft-crisp center.
The biggest secrets are simple.
Keep the filling firm enough to hold together.
Do not crush the cereal.
Chill thoroughly before cutting.
Keep the squares cold while dipping.
And melt the chocolate gently.
Once those basics are right, this recipe becomes incredibly easy to customize.
Use dark chocolate for a deeper flavor.
Add pretzels for saltiness.
Mix in peanuts for extra crunch.
Add coconut.
Drizzle with white chocolate.
Or finish every square with a few flakes of sea salt.
Whether you make them for Christmas, a party, a dessert tray, homemade gifts, or simply because you want something chocolatey in the refrigerator, these bars are easy to prepare, easy to store, and extremely easy to enjoy.