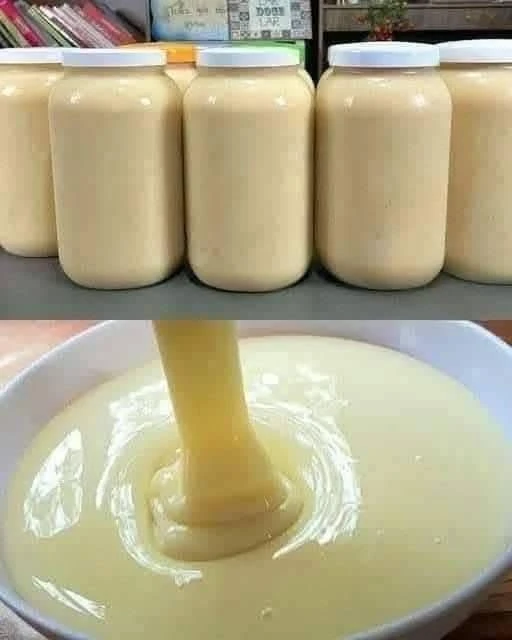
This Homemade Sweetened Condensed Milk is rich, silky, beautifully thick, and surprisingly easy to prepare with a few basic ingredients. Milk and sugar are slowly reduced until they transform into a smooth, glossy mixture with the familiar creamy sweetness used in pies, puddings, cakes, coffee drinks, ice cream, fudge, and countless no-bake desserts.
Inspired by the thick pale-golden mixture shown in the image, this recipe is designed to create a pourable condensed milk that becomes even thicker as it cools. The finished texture should fall from a spoon in a slow ribbon rather than pour like ordinary milk, with a smooth surface and no graininess.
One of the biggest advantages of making condensed milk at home is control. You can decide how thick you want it, adjust the sweetness slightly, add vanilla for extra flavor, or use a faster milk-powder method when you do not have time to simmer milk on the stove.
It is also an excellent recipe to keep when a dessert calls for a can of sweetened condensed milk and you suddenly realize there is none in the pantry.
Recipe Overview
| Recipe Details | Information |
|---|---|
| Recipe Name | Homemade Sweetened Condensed Milk |
| Focus Keyword | Homemade Sweetened Condensed Milk |
| Prep Time | 5 minutes |
| Cook Time | 35–50 minutes |
| Cooling Time | 30 minutes |
| Total Time | About 1 hour 15 minutes |
| Yield | About 1¼–1½ cups |
| Course | Dessert Ingredient / Sauce |
| Cuisine | International |
| Difficulty | Easy |
| Main Ingredients | Milk & Sugar |
| Texture | Thick, Smooth & Creamy |
| Cooking Method | Stovetop |
| Make Ahead | Yes |
| Refrigerator Life | About 1 week |
| Freezer Friendly | Yes |
Why You’ll Love This Homemade Condensed Milk
Homemade sweetened condensed milk is much easier than it looks.
There is no complicated candy-making technique, and you do not need special equipment. The main requirement is patience because the milk needs time to reduce gently.
As water evaporates from the milk, the mixture becomes concentrated.
The sugar dissolves into the milk and creates sweetness.
A small amount of butter adds richness and helps produce a glossy finish.
Vanilla is optional, but it gives the condensed milk a warm dessert-like aroma.
Once chilled, the mixture becomes noticeably thicker.
That means you should stop cooking while it is still slightly looser than the final consistency you want.
What Is Sweetened Condensed Milk?
Sweetened condensed milk is milk that has had a significant portion of its water removed and has been sweetened with sugar.
The result is much thicker than regular milk.
It is also different from evaporated milk.
Evaporated milk is concentrated milk without the same high amount of sugar.
Sweetened condensed milk is thick, sticky, creamy, and very sweet.
It is commonly used in recipes where it provides both sweetness and structure.
Sweetened Condensed Milk vs. Evaporated Milk
These two ingredients may look similar in the grocery store, but they are not interchangeable in most recipes.
| Sweetened Condensed Milk | Evaporated Milk |
|---|---|
| Very sweet | Unsweetened |
| Thick and syrupy | Thin and pourable |
| Used in desserts | Used in sweet and savory dishes |
| Contains a large amount of sugar | No significant added sugar |
| Sticky texture | Milk-like texture |
If a recipe calls for sweetened condensed milk, replacing it with evaporated milk will usually make the dessert far less sweet and can change the texture dramatically.
Ingredients
Classic Stovetop Version
- 4 cups whole milk
- 1⅓ cups granulated sugar
- 2 tablespoons unsalted butter
- 1 teaspoon vanilla extract, optional
- Small pinch of salt
That is all you need for the basic recipe.
Ingredient Guide
| Ingredient | Purpose |
|---|---|
| Whole Milk | Creates the creamy base |
| Sugar | Sweetens and helps thicken |
| Butter | Adds richness and shine |
| Vanilla | Adds warm flavor |
| Salt | Balances sweetness |
Best Milk to Use
Whole milk gives the best balance of flavor, richness, and consistency.
Because some of the water will evaporate during cooking, the natural milk solids and fat become concentrated.
That creates a smoother final product.
You can use 2% milk, but the mixture may not taste quite as rich.
Skim milk is possible, although it produces a noticeably lighter result.
For a luxurious version, replace part of the milk with heavy cream.
Can You Use Heavy Cream?
Yes, but you do not need to use only cream.
Using only heavy cream can make the finished condensed milk extremely rich.
A better ratio is:
- 3 cups whole milk
- 1 cup heavy cream
This produces a thick, rich condensed milk that works beautifully in desserts.
Because cream contains less water than milk, the mixture may reduce more quickly.
Can You Use Milk Powder?
Absolutely.
Milk powder is the easiest shortcut version.
Instead of spending 40 minutes reducing milk, you can combine powdered milk with hot water, sugar, and butter.
The result is especially useful for baking and no-bake desserts.
I have included that method later in the article.
Equipment Needed
You only need basic kitchen equipment:
- Heavy-bottomed saucepan
- Wooden spoon or silicone spatula
- Measuring cups
- Measuring spoons
- Whisk
- Heatproof jar or container
- Fine-mesh strainer, optional
A heavy saucepan is important because thin pans can develop hot spots that scorch milk.
How to Make Homemade Sweetened Condensed Milk
Step 1: Add Milk and Sugar
Pour the whole milk into a heavy-bottomed saucepan.
Add the granulated sugar.
Place the pan over medium-low heat.
Stir gently until the sugar completely dissolves.
At this stage, the mixture will still look almost exactly like ordinary milk.
Step 2: Bring to a Gentle Simmer
Once the sugar has dissolved, increase the heat slightly.
Bring the mixture to a gentle simmer.
Do not bring it to a hard rolling boil.
Milk can scorch quickly, and aggressive boiling may create an unpleasant cooked flavor.
Small bubbles around the sides of the pan are exactly what you want.
Why Low Heat Is So Important
Slow reduction gives you a smoother texture.
If the heat is too high, several problems can happen:
The milk can scorch on the bottom.
The sugars can caramelize too quickly.
The mixture can boil over.
And the final condensed milk can taste overly cooked.
Moderate heat requires more patience but produces a much better result.
Step 3: Let the Milk Reduce
Allow the mixture to simmer gently for approximately 35–50 minutes.
Stir occasionally.
As the milk reduces, you will notice several changes.
The volume becomes smaller.
The color changes from bright white to pale cream.
The mixture begins coating the spoon.
And the bubbles become slightly thicker and slower.
Do not scrape dried milk solids from the sides of the saucepan back into the mixture because they can create lumps.
How Much Should the Milk Reduce?
You are aiming to reduce approximately 4 cups of milk mixture down to around 1¼–1½ cups.
You do not need to measure constantly.
Watch the consistency instead.
The mixture should eventually coat the back of a spoon.
If you drag your finger through that coating, a visible line should remain.
Remember that it thickens more after cooling.
Step 4: Add Butter
Once the mixture has reduced substantially, remove the saucepan from the heat.
Add the butter.
Stir until completely melted.
The butter makes the condensed milk smoother and gives it a beautiful glossy appearance.
Step 5: Add Vanilla
Stir in the vanilla extract if using.
Vanilla is optional.
If you plan to use the condensed milk in many different recipes, you may prefer leaving it plain.
For desserts, coffee, or fruit dips, vanilla is especially good.
Step 6: Strain for an Extra-Smooth Texture
If you notice any small milk solids or lumps, pour the mixture through a fine-mesh strainer.
This step is optional but creates a particularly smooth finish.
Transfer the condensed milk to a clean heatproof container.
Step 7: Cool
Allow the condensed milk to cool at room temperature for about 20–30 minutes.
Then cover and refrigerate.
Do not judge the final thickness while it is still hot.
It becomes significantly thicker once chilled.
What Should the Final Consistency Look Like?
Warm condensed milk should pour in a slow, smooth ribbon.
After refrigeration, it should become much thicker.
It should resemble commercial sweetened condensed milk:
- Glossy
- Thick
- Smooth
- Sticky
- Easily spoonable
If yours appears slightly thin while warm, do not immediately continue cooking.
Let a small spoonful cool first and check the texture.
The Spoon Test
Dip a spoon into the warm condensed milk.
Lift it.
The mixture should coat the spoon rather than run off immediately like ordinary milk.
Draw one finger through the coating.
If the path remains visible, you are very close to the correct consistency.
Why Homemade Condensed Milk Thickens After Cooling
Heat makes liquids appear thinner.
As condensed milk cools, the milk solids, sugar, and fat create a thicker consistency.
That is why overcooking is a common mistake.
If you keep reducing until the mixture is extremely thick while hot, it can become much too dense after refrigeration.
Fast Milk Powder Condensed Milk
If you want a much faster version, milk powder works beautifully.
Ingredients
- 1 cup dry milk powder
- 2/3 cup granulated sugar
- 1/3 cup boiling water
- 3 tablespoons melted butter
- 1 teaspoon vanilla, optional
Method
Place the milk powder and sugar in a blender.
Add the boiling water and melted butter.
Blend until completely smooth.
Add vanilla.
Continue blending for about 30–60 seconds.
Transfer to a jar.
The mixture thickens as it cools.
This method takes only a few minutes and is excellent when you need condensed milk immediately for another recipe.
Which Version Is Better?
| Stovetop Version | Milk Powder Version |
|---|---|
| Deeper cooked-milk flavor | Much faster |
| Very smooth | Very convenient |
| Takes 35–50 minutes | Takes about 5 minutes |
| Uses fresh milk | Uses powdered milk |
| Great for sauces and desserts | Great for baking |
Both are useful.
The stovetop version tastes slightly more traditional.
The milk powder version wins when speed matters.
Blender Version Without Long Simmering
You can also make a quick version with:
- 1 cup whole milk powder
- 1 cup powdered sugar
- 1/3 cup hot water
- 1/4 cup melted butter
Blend until silky.
Using powdered sugar instead of granulated sugar helps the mixture become smooth almost immediately.
If the texture is too thick, add hot water one teaspoon at a time.
How to Make It Thicker
If the condensed milk is too thin after cooling, you have two options.
Return it to a saucepan and simmer gently for another 5–10 minutes.
Or use it as-is in recipes where a slightly thinner consistency is not a problem.
Do not add cornstarch if you want it to behave like traditional condensed milk in baking.
Reduction is the better method.
What If It Becomes Too Thick?
Do not worry.
Warm the condensed milk gently over low heat.
Add milk one tablespoon at a time.
Stir until the desired texture returns.
You can also microwave a small amount briefly and stir in a splash of milk.
How to Prevent Grainy Condensed Milk
Graininess is usually related to sugar crystals.
Make sure the sugar dissolves before the milk begins reducing heavily.
Keep the heat moderate.
Avoid scraping dried sugar crystals from the sides of the saucepan into the mixture.
And do not stir aggressively once the liquid becomes highly concentrated.
How to Prevent Scorching
Milk scorches easily.
Use a heavy-bottomed pan.
Keep the heat low to medium-low.
Stir more frequently during the final 10–15 minutes.
Pay special attention to the corners of the pan.
Once condensed milk starts thickening, the risk of scorching increases.
Why Did My Condensed Milk Turn Brown?
A pale cream or light golden color is normal.
Dark brown condensed milk usually means the sugar or milk solids caramelized more than intended.
This can happen from:
- Excessively high heat
- Cooking too long
- A thin saucepan
- Not stirring enough near the end
A slightly caramelized version is still useful and can taste delicious, but it will have a stronger dulce-de-leche-like flavor.
Homemade Condensed Milk with Brown Sugar
You can replace some or all of the white sugar with brown sugar.
The mixture becomes darker and tastes more like caramel.
Try:
- 1 cup granulated sugar
- 1/3 cup brown sugar
This creates a subtle caramel flavor without turning it into full dulce de leche.
Vanilla Condensed Milk
Add 1–2 teaspoons vanilla after removing the pan from the heat.
Do not add vanilla during a long simmer because some of the aroma can cook away.
This version is especially good in:
- Coffee
- Iced drinks
- Fruit desserts
- Ice cream
- Puddings
Cinnamon Condensed Milk
Add one cinnamon stick while the milk reduces.
Remove it before storing.
This produces a warm flavor that is excellent in coffee or fall desserts.
You can also add a tiny pinch of ground cinnamon after cooking.
Coconut Condensed Milk
Use full-fat canned coconut milk instead of dairy milk.
Simmer it gently with sugar until reduced.
Coconut condensed milk has a noticeable coconut flavor and is excellent in tropical desserts.
Because canned coconut milk is already concentrated, cooking time may be shorter.
Dairy-Free Condensed Milk
For a dairy-free version, coconut milk is usually the easiest option.
Combine:
- 2 cans full-fat coconut milk
- 1 cup sugar
Simmer gently until reduced and thick.
The result will not taste identical to dairy condensed milk, but it performs well in many desserts.
Lower-Sugar Version
Traditional sweetened condensed milk relies on a significant amount of sugar for both sweetness and texture.
You can reduce the sugar modestly, but reducing it dramatically changes the consistency.
If you use only half the sugar, expect a thinner product with a different shelf life and behavior in recipes.
For baking recipes that depend on condensed milk for structure, use the standard ratio.
How to Use Homemade Sweetened Condensed Milk
Once you have a jar in the refrigerator, there are dozens of ways to use it.
It can be stirred into coffee.
Used in pies.
Mixed into cheesecake.
Added to no-churn ice cream.
Used for fudge.
Poured over fruit.
Mixed into puddings.
Used for tres leches cake.
Added to flan.
Mixed into coconut desserts.
Or drizzled over pancakes and waffles.
Sweetened Condensed Milk in Coffee
A spoonful turns ordinary coffee into a rich café-style drink.
Add 1–2 tablespoons to hot coffee.
Stir well.
Taste before adding more.
Because condensed milk contains both dairy and sugar, you often do not need extra milk or sweetener.
It is particularly good with iced coffee.
Easy Vietnamese-Style Iced Coffee
Brew strong coffee.
Place 2 tablespoons condensed milk in a glass.
Pour the hot coffee over it.
Stir.
Add plenty of ice.
The result is bold, creamy, and sweet.
Adjust the condensed milk according to preference.
No-Churn Vanilla Ice Cream
Homemade condensed milk is excellent for no-churn ice cream.
Whip 2 cups heavy cream until stiff peaks form.
Fold in about 1 can-equivalent of chilled condensed milk.
Add vanilla.
Freeze until firm.
No ice cream machine is required.
Lemon Icebox Pie
Condensed milk is famous for easy citrus pies.
Combine it with lemon juice and a creamy filling.
The acidity of the lemon helps thicken the mixture while creating a sweet-tart flavor.
Pour into a graham cracker crust and chill.
Key Lime Pie
Key lime pie is another classic use.
Sweetened condensed milk provides most of the sweetness and creaminess.
Combined with egg yolks and lime juice, it creates the signature dense filling.
Tres Leches Cake
Condensed milk is one of the three milks traditionally used in tres leches-style cake.
It contributes sweetness and richness to the milk mixture poured over the sponge cake.
Homemade condensed milk works beautifully here.
Homemade Fudge
Condensed milk can be combined with chocolate to create easy fudge.
A common basic combination uses:
- Chocolate chips
- Sweetened condensed milk
- Vanilla
Heat gently.
Spread in a pan.
Cool until firm.
Caramel Sauce Shortcut
Condensed milk can also be turned into a caramel-style sauce.
However, avoid heating sealed cans or tightly sealed jars because pressure can build dangerously.
If making a caramelized version, always use an open saucepan or another method specifically designed for safe cooking.
Fruit Dip
Mix condensed milk with cream cheese for an easy sweet dip.
Try:
- 8 ounces cream cheese
- 1/2 cup condensed milk
- 1 teaspoon vanilla
Beat until smooth.
Serve with:
- Strawberries
- Apples
- Grapes
- Pineapple
Condensed Milk Pancake Topping
Instead of maple syrup, drizzle a small amount over pancakes.
Add fresh berries.
For even more flavor, mix condensed milk with a splash of warm milk so it becomes easier to drizzle.
Condensed Milk Toast
Toast thick slices of brioche or white bread.
Spread with butter.
Drizzle lightly with condensed milk.
For an extra dessert-like version, add cinnamon or sliced banana.
Banana Condensed Milk Dessert
Slice bananas into a bowl.
Drizzle with chilled condensed milk.
Add:
- Cinnamon
- Chopped nuts
- Coconut
It is one of the simplest desserts you can make.
Strawberry Condensed Milk Dessert
Slice fresh strawberries.
Add a light drizzle of condensed milk.
The slightly tart berries balance the sweetness beautifully.
This also works with raspberries and blueberries.
Chocolate Condensed Milk
Whisk cocoa powder into the warm condensed milk.
Start with 2 tablespoons unsweetened cocoa.
Add more if you want a stronger chocolate flavor.
Use it in coffee, desserts, or as a sauce.
Dulce de Leche-Inspired Version
Continue cooking the condensed milk very gently until the color darkens and the flavor becomes more caramelized.
This takes longer than ordinary condensed milk.
Watch carefully and stir often.
The mixture becomes thicker, darker, and more caramel-like.
Make-Ahead Instructions
Homemade condensed milk is excellent for preparing ahead.
Make the full batch.
Cool completely.
Transfer to a clean airtight container.
Refrigerate.
When needed, stir well.
If it becomes very thick, allow it to sit at room temperature briefly or warm it gently.
Storage
Store homemade sweetened condensed milk in a clean airtight container in the refrigerator.
For best quality, use it within about 1 week.
Always use a clean spoon when removing some from the container.
Discard it if you notice an unusual smell, mold, fermentation, or other signs of spoilage.
Important Note About the Jars in the Image
The jars in the image may give the impression that homemade condensed milk can simply be stored in a pantry.
Do not assume homemade condensed milk is shelf-stable just because it is placed in a sealed jar.
This recipe is intended for refrigerated storage.
Ordinary jars do not make a dairy product safe for room-temperature storage.
Use tested preservation guidance if you are ever considering shelf-stable dairy canning.
Can You Freeze Homemade Condensed Milk?
Yes.
Pour into a freezer-safe container.
Leave a little room for expansion.
Freeze for about 2–3 months for best quality.
Thaw overnight in the refrigerator.
Stir thoroughly after thawing.
The texture may separate slightly, but gentle whisking usually restores it.
Freeze It in Small Portions
If you usually need only a few tablespoons at a time, freeze the condensed milk in small portions.
Silicone ice-cube trays work well.
Freeze.
Transfer the cubes to a freezer-safe container.
Then remove only the amount you need for coffee or small recipes.
Common Mistakes to Avoid
| Common Mistake | Result | Better Method |
|---|---|---|
| Using very high heat | Scorched milk | Simmer gently |
| Boiling aggressively | Grainy or browned mixture | Keep heat moderate |
| Cooking too long | Condensed milk too thick | Stop while still slightly loose |
| Not reducing enough | Thin consistency | Simmer longer |
| Scraping dried milk from pan sides | Lumpy texture | Leave dried solids alone |
| Judging thickness while hot | Easy to overcook | Check after cooling |
| Using thin cookware | Hot spots and burning | Use heavy saucepan |
| Storing at room temperature | Food-safety risk | Refrigerate |
| Adding too much vanilla early | Flavor cooks away | Add after cooking |
| Leaving uncovered in refrigerator | Absorbs odors | Use airtight container |
Troubleshooting Guide
My Condensed Milk Is Too Thin
Let it cool first.
If it is still too thin after refrigeration, return it to the stove and simmer gently for another 5–10 minutes.
My Condensed Milk Is Too Thick
Warm gently with a tablespoon or two of milk.
Stir until smooth.
My Condensed Milk Is Grainy
The sugar may have crystallized or the heat may have been too high.
Warm the mixture gently and whisk.
Strain if necessary.
My Condensed Milk Has Lumps
Pour it through a fine-mesh strainer.
Next time, use lower heat.
My Condensed Milk Turned Dark
It likely caramelized.
If it does not taste burned, it can still be used and may have a pleasant caramel flavor.
It Tastes Burned
Unfortunately, scorched milk flavor is difficult to remove.
Starting over is usually the best option.
Use a heavier saucepan and lower temperature next time.
Pro Tips for Perfect Homemade Condensed Milk
Use whole milk.
Choose a heavy-bottomed saucepan.
Dissolve the sugar completely.
Keep the simmer gentle.
Do not rush the reduction.
Stir more often toward the end.
Do not scrape dried milk solids into the mixture.
Stop cooking before it looks extremely thick.
Add butter after removing from heat.
Add vanilla at the end.
Strain for an extra-smooth finish.
Chill before judging the final consistency.
Batch Size Guide
| Desired Amount | Milk | Sugar |
|---|---|---|
| Small Batch | 2 cups | 2/3 cup |
| Standard Batch | 4 cups | 1⅓ cups |
| Double Batch | 8 cups | 2⅔ cups |
For large batches, use a wider heavy-bottomed pot.
A wider surface area allows evaporation to happen more efficiently.
Do not fill the pan too close to the top because milk can foam.
Nutrition Estimate
Approximate values per 2 tablespoons:
| Nutrition | Approximate Amount |
|---|---|
| Calories | 120–140 |
| Protein | 2–3 g |
| Carbohydrates | 20–24 g |
| Fat | 3–4 g |
| Sugar | 20–22 g |
| Serving Size | 2 tablespoons |
Exact nutrition depends on milk type, sugar amount, and final reduction.
Frequently Asked Questions
What is Homemade Sweetened Condensed Milk?
It is milk and sugar cooked slowly until much of the water evaporates and the mixture becomes thick and sweet.
Is the image definitely condensed milk?
The image appears to show a thick, pale dairy mixture with a consistency very similar to sweetened condensed milk. This recipe is inspired by that appearance rather than claiming the exact original preparation.
How many ingredients do I need?
The simplest version needs only milk and sugar, although butter, vanilla, and salt improve the texture and flavor.
Can I use regular milk?
Yes. Whole milk is ideal.
Can I use 2% milk?
Yes.
Can I use skim milk?
Yes, although it will be less rich.
Can I use powdered milk?
Absolutely. Powdered milk is excellent for the quick version.
Can I use evaporated milk?
You can use it as a starting point, but because it is already concentrated, the ratio and cooking time should be reduced.
Can I use heavy cream?
Yes, preferably mixed with milk.
Can I use coconut milk?
Yes. Full-fat coconut milk makes a good dairy-free alternative.
Do I need cornstarch?
No. Traditional condensed milk thickens through reduction rather than starch.
Why is my condensed milk still thin?
It may need more reduction time or may simply still be warm.
Does it thicken in the refrigerator?
Yes, significantly.
Why did mine become grainy?
The sugar may have crystallized or the mixture may have been cooked too aggressively.
Why did mine turn brown?
The sugars probably caramelized.
Can I add vanilla?
Yes.
Can I add cinnamon?
Yes.
Can I make chocolate condensed milk?
Yes. Stir cocoa powder into the finished mixture.
Can I reduce the sugar?
A little, but large reductions change the texture and performance in recipes.
Can I use it in coffee?
Absolutely.
Can I use it for no-churn ice cream?
Yes.
Can I use it for fudge?
Yes.
Can I use it in pies?
Absolutely.
Can I use it for tres leches cake?
Yes.
Can I store it in jars?
Yes, as refrigerator containers. Simply putting it in a jar does not make it pantry-stable.
Does homemade condensed milk need refrigeration?
Yes.
How long does it keep?
For best quality, use within about one week refrigerated.
Can I freeze it?
Yes, for around 2–3 months for best quality.
Can I make it ahead?
Absolutely.
Make It More Budget-Friendly
Homemade condensed milk can be particularly useful when you already have milk and sugar at home.
Use store-brand whole milk.
Use ordinary granulated sugar.
Skip vanilla if necessary.
Use the basic milk-and-sugar version.
Powdered milk is also useful because it stores longer in the pantry and allows you to make condensed milk only when needed.
If you bake frequently, buying milk powder in a larger package can make the quick version especially convenient.
Best Desserts to Make with Homemade Condensed Milk
Once you have a batch prepared, use it for recipes such as:
- No-churn vanilla ice cream
- Key lime pie
- Lemon pie
- Fudge
- Tres leches cake
- Flan
- Coconut macaroons
- Chocolate truffles
- Banana pudding
- Cheesecake
- Fruit dip
- Coffee drinks
- Caramel desserts
- Poke cake
- Icebox cake
A single batch can become the starting point for many completely different desserts.
Ad-Friendly Article Structure
| Article Position | Suggested Placement |
|---|---|
| After Introduction | Natural first placement |
| After Recipe Overview | Second placement |
| After Ingredient Guide | Third placement |
| Before Main Instructions | High-engagement placement |
| After Main Instructions | Mid-article break |
| Before Variations | Natural placement |
| Before Storage | Additional placement |
| Before FAQs | Strong late-article placement |
| Before Final Thoughts | Optional placement |
Keep the main stovetop instructions together so readers can easily follow the reduction process without interruption.
Final Thoughts
This Homemade Sweetened Condensed Milk is one of those kitchen basics that seems complicated until you make it once.
At its heart, the recipe is simply milk and sugar.
Slow, gentle cooking removes water from the milk while concentrating everything that remains.
The milk becomes richer.
The sugar becomes more noticeable.
The texture turns from thin and pourable into thick, glossy, and creamy.
Butter adds extra richness.
Vanilla adds warmth.
And cooling transforms the mixture into that familiar spoonable consistency used in so many classic desserts.
The most important part of the recipe is patience.
Do not use extremely high heat.
Do not try to reduce the milk as fast as possible.
And do not keep cooking until it looks as thick as refrigerated condensed milk while it is still hot.
Allow time to do the work.
Once you master the basic recipe, you can create endless variations.
Make vanilla condensed milk.
Make chocolate condensed milk.
Use brown sugar for caramel notes.
Try coconut milk for a dairy-free version.
Use powdered milk when you need a five-minute shortcut.
Or make a double batch and freeze some for future desserts.
Whether you need it for pies, coffee, fudge, ice cream, fruit, cakes, puddings, or holiday baking, this is an extremely useful homemade recipe worth keeping.