Introduction
These Ultra-Creamy Vanilla Custard Mousse Cups are thick, silky, airy, and beautifully smooth, with a rich vanilla flavor and a soft spoonable texture that feels somewhere between pastry cream, mousse, and luxurious homemade pudding.
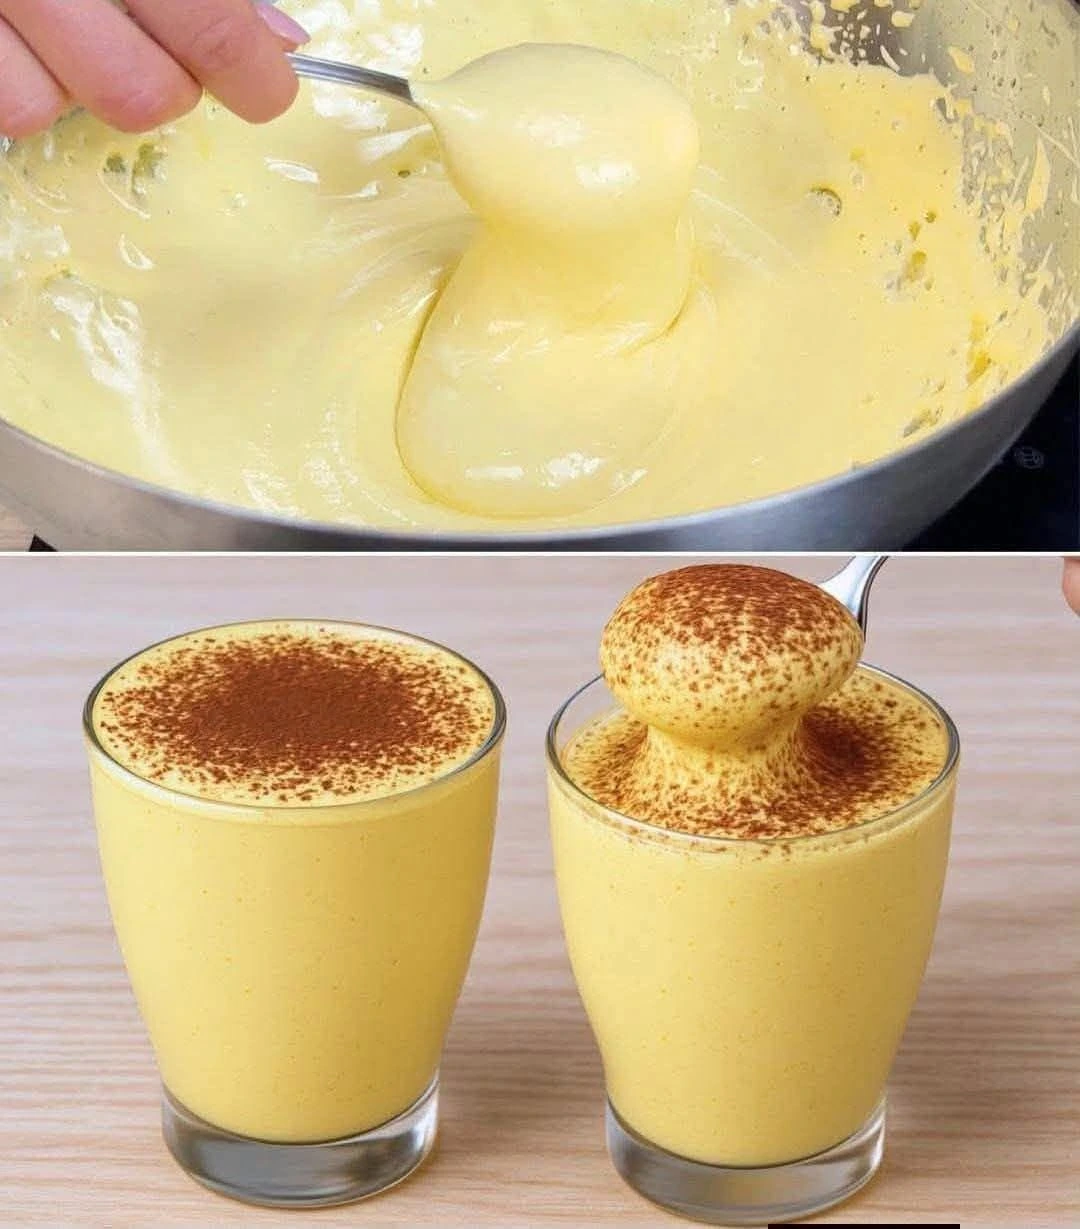
Inspired by the dessert shown in the image, this recipe is designed to create a pale golden cream that is thick enough to lift from the glass in a generous spoonful without running. The top is finished with a fine dusting of cocoa powder, which adds just enough bittersweet flavor to balance the rich vanilla custard underneath.
What makes this dessert especially appealing is the contrast in texture. The base begins as a cooked vanilla custard made with milk, egg yolks, sugar, and cornstarch. Once fully chilled, it is loosened until perfectly smooth, then folded with whipped cream to create a lighter, more cloud-like consistency.
The finished dessert is much more elegant than ordinary pudding but easier than making a complicated pastry or layered cake. There is no baking, no crust, and no difficult decorating. Most of the work is simply cooking the custard correctly and allowing it enough time to cool.
These custard mousse cups are perfect for family dinners, birthdays, holiday desserts, dinner parties, weekend treats, or whenever you want a chilled dessert that looks polished but uses familiar ingredients.
You can keep the recipe classic with vanilla and cocoa, or transform the same base into chocolate, coffee, lemon, caramel, coconut, cinnamon, or fruit variations.
For the best result, give the custard enough time to cook until truly thick, chill it completely, and fold the whipped cream gently. Those three steps are what create the glossy, thick, fluffy texture that makes this dessert special.
Recipe Overview
| Detail | Information |
|---|---|
| Recipe Name | Ultra-Creamy Vanilla Custard Mousse Cups |
| Prep Time | 20 minutes |
| Cook Time | 10–15 minutes |
| Initial Chill Time | 2–3 hours |
| Final Chill Time | 30–60 minutes |
| Total Time | About 3–4 hours |
| Servings | 6 |
| Course | Dessert |
| Cuisine | European-Inspired / No-Bake Dessert |
| Difficulty | Easy |
| Cooking Method | Stovetop + Chilling |
| Main Ingredients | Milk, egg yolks, vanilla, cream |
| Texture | Thick, silky, fluffy, mousse-like |
| Flavor | Rich vanilla, creamy, lightly sweet |
| Best For | Make-ahead desserts, parties, family meals |
| Make-Ahead Friendly | Excellent |
| Best Served | Very cold |
Why You’ll Love This Dessert
This custard mousse feels rich without being as heavy as traditional pastry cream.
The vanilla flavor is warm and familiar.
The texture is smooth enough to feel luxurious.
The whipped cream gives the custard a lighter finish.
The cocoa on top adds contrast without overpowering the vanilla.
Another major advantage is that the dessert is prepared ahead of time. You can make the custard several hours before dinner, assemble the glasses, and leave them refrigerated until serving.
It is also very easy to customize without changing the basic technique.
Once you know how to make the vanilla base, you can use it for many different flavors.
What Is Custard Mousse?
Custard mousse is a chilled dessert that combines two textures.
First, you make a thick cooked custard.
Then you lighten that custard with whipped cream.
The result is somewhere between:
- Pastry cream
- Vanilla pudding
- Bavarian-style cream
- Whipped mousse
The custard provides richness and structure.
The whipped cream provides air and softness.
Together, they create a dessert that can hold its shape but still feels light on the spoon.
What Makes This Version Different from Regular Pudding?
Regular vanilla pudding is usually served exactly as it is cooked.
Custard mousse goes one step further.
The custard is chilled, smoothed, and then folded with whipped cream.
That changes the texture dramatically.
Instead of a dense pudding, you get a filling that is:
- Lighter
- Fluffier
- More elegant
- Easier to pipe
- Better for individual dessert glasses
That is closer to the texture suggested by the image.
Ingredients
Vanilla Custard Base
| Ingredient | Amount |
|---|---|
| Whole milk | 2 cups |
| Egg yolks | 4 large |
| Granulated sugar | 1/2 cup |
| Cornstarch | 3 tablespoons |
| Unsalted butter | 2 tablespoons |
| Vanilla extract | 2 teaspoons |
| Fine salt | Small pinch |
Whipped Cream Layer
| Ingredient | Amount |
|---|---|
| Heavy whipping cream, very cold | 1 cup |
| Powdered sugar | 2 tablespoons |
| Vanilla extract | 1/2 teaspoon, optional |
For the Top
Use one or more:
- Unsweetened cocoa powder
- Finely grated dark chocolate
- Ground cinnamon
- Chocolate curls
- Crushed biscuits
For the appearance in the image, cocoa powder alone is enough.
Choosing the Right Milk
Whole milk gives the best balance between richness and lightness.
It produces a custard that feels creamy without becoming overly heavy.
You can also use half-and-half for an even richer version.
Avoid very low-fat milk if possible because the finished custard will taste noticeably less rich.
Why Egg Yolks Matter
Egg yolks add several important things:
- Richness
- Color
- Smoothness
- Classic custard flavor
They are responsible for much of the pale golden color seen in the finished dessert.
Use yolks rather than whole eggs for the smoothest texture.
Why Cornstarch Is Important
Cornstarch thickens the custard and gives it enough structure to hold whipped cream later.
Without enough thickener, the final mousse can become loose.
Too much cornstarch, however, can make the custard gummy.
The amount in this recipe is designed to create a thick spoonable base without becoming rubbery.
Vanilla Choices
Vanilla Extract
The easiest option.
Use good-quality pure vanilla if available.
Vanilla Bean Paste
Vanilla bean paste gives a deeper aroma and visible vanilla specks.
Use about the same amount as extract.
Vanilla Bean
For a more elegant version, steep half a vanilla bean in the milk before making the custard.
Remove before combining with the eggs.
Equipment Needed
| Equipment | Purpose |
|---|---|
| Medium saucepan | Heating milk and cooking custard |
| Medium mixing bowl | Egg mixture |
| Large chilled bowl | Whipping cream |
| Whisk | Tempering and cooking |
| Rubber spatula | Folding |
| Electric mixer | Whipping cream |
| Fine-mesh sieve | Smoothing custard |
| Dessert glasses | Serving |
| Small sieve | Dusting cocoa |
| Plastic wrap | Preventing custard skin |
Step-by-Step Instructions
Step 1: Prepare Your Ingredients
Measure everything before you begin.
Custard cooks quickly once the milk and egg mixture are combined.
Having all ingredients ready prevents overcooking while you search for something.
Step 2: Heat the Milk
Pour the whole milk into a medium saucepan.
Set over medium heat.
Warm until steam rises and tiny bubbles appear around the edge.
Do not let the milk boil aggressively.
Remove from heat.
Step 3: Whisk Egg Yolks and Sugar
In a separate bowl, combine the egg yolks and granulated sugar.
Whisk for approximately 1 minute.
The mixture should become slightly lighter and smoother.
Step 4: Add the Cornstarch
Add the cornstarch.
Whisk thoroughly until there are no visible lumps.
The mixture will become thicker.
Step 5: Temper the Yolks
Slowly pour a small amount of hot milk into the yolk mixture.
Whisk constantly.
Add a little more milk.
Continue whisking.
This gradually warms the egg yolks so they do not scramble.
Step 6: Combine Everything
Once about half the hot milk has been added gradually, pour the egg mixture back into the saucepan with the remaining milk.
Whisk immediately.
Step 7: Cook the Custard
Place the saucepan over medium-low heat.
Whisk constantly.
Pay special attention to the bottom and corners of the pan.
After several minutes, the custard will begin to thicken noticeably.
Step 8: Watch for the Correct Thickness
The custard is ready when it becomes thick enough that the whisk leaves visible trails.
When lifted, the custard should fall back into the pan in thick ribbons rather than thin liquid.
This is an important stage.
If you stop too early, the finished mousse may not hold its shape.
Step 9: Briefly Bubble the Custard
Once the custard is thick, continue cooking for about 30–60 seconds while whisking.
This ensures the cornstarch is fully cooked.
Do not walk away.
Step 10: Add Butter and Vanilla
Remove from the heat.
Add:
- Butter
- Vanilla
- Pinch of salt
Whisk until the butter melts completely.
The custard should become glossy and smooth.
Step 11: Strain for an Extra-Silky Finish
Pour the warm custard through a fine-mesh sieve into a clean bowl.
Use a spatula to gently press it through.
This step is optional but highly recommended.
It removes any tiny lumps or cooked egg particles.
Step 12: Cover the Custard Directly
Press plastic wrap directly against the surface.
Do not simply cover the top of the bowl.
Direct contact prevents a thick skin from forming.
Step 13: Chill Completely
Refrigerate for at least 2–3 hours.
The custard needs to be fully cold.
It will become much thicker during chilling.
Step 14: Prepare the Whipped Cream
Pour very cold heavy cream into a chilled bowl.
Add powdered sugar.
Beat on medium-high speed.
Stop when the cream reaches medium to stiff peaks.
It should hold its shape but still look smooth.
Step 15: Loosen the Chilled Custard
Remove the custard from the refrigerator.
It may look very firm.
Whisk it briefly by hand or beat on low speed for a few seconds.
The goal is to make it smooth again.
Do not add liquid yet.
Step 16: Lighten the Custard
Add about one-third of the whipped cream.
Fold gently until mostly incorporated.
This first addition softens the custard and makes it easier to combine with the remaining cream.
Step 17: Add Remaining Whipped Cream
Fold in the rest in two portions.
Use slow, broad movements with a spatula.
Do not stir rapidly.
You want to preserve the air in the cream.
Step 18: Check the Final Texture
The final mousse should be:
- Thick
- Smooth
- Glossy
- Airy
- Spoonable
When you lift a large spoonful, it should hold together rather than immediately flattening.
Step 19: Fill the Glasses
Spoon the mousse into dessert glasses.
For the neatest appearance, transfer the mixture to a piping bag.
Fill the glasses almost to the rim.
Step 20: Smooth or Create Soft Peaks
You can smooth the tops with a spoon.
Or create soft swirls and peaks for a more rustic look.
Both styles work.
Step 21: Chill Again
Refrigerate the filled glasses for another 30–60 minutes.
This final chill improves stability and flavor.
Step 22: Dust with Cocoa
Just before serving, place unsweetened cocoa powder in a small sieve.
Dust lightly over each glass.
A thin layer is enough.
Too much cocoa can overpower the vanilla flavor.
How to Achieve the Thick Spoon-Lift Texture
The image shows a spoon lifting a thick portion of cream that keeps its shape.
To get that kind of consistency:
Cook the custard fully.
Use enough egg yolks.
Use the measured cornstarch.
Chill completely.
Do not overmix after adding whipped cream.
Let the finished mousse chill again.
If all these steps are followed, the mousse should be thick enough to mound on a spoon.
How to Know If the Custard Is Cooked Enough
Look for these signs:
The whisk leaves trails.
The mixture coats the whisk heavily.
The custard falls in thick ribbons.
The surface briefly holds a shape when stirred.
It should no longer look like milk.
How to Avoid Scrambled Eggs
The biggest risk happens during tempering.
Pour the hot milk slowly.
Whisk constantly.
Do not dump all the milk into the eggs at once.
Also keep the stovetop heat moderate once the mixture returns to the saucepan.
How to Keep the Custard from Burning
Custard can scorch on the bottom if left unattended.
Use a heavy-bottomed saucepan if possible.
Keep the heat at medium-low.
Whisk constantly.
Scrape the corners of the saucepan with the whisk.
How to Fix Slightly Lumpy Custard
If you notice small lumps:
Remove from heat immediately.
Strain through a fine sieve while still warm.
Whisk until smooth.
Most mild lumping problems can be fixed this way.
Can You Fix Very Thick Custard?
Yes.
After chilling, if the custard feels excessively stiff, whisk in 1 tablespoon cold milk.
Check again before adding more.
Only add enough to restore a smooth texture.
Remember that whipped cream will also loosen the custard.
Can You Fix Custard That Is Too Thin?
If the custard is still warm and too thin, return it to the heat.
Cook longer while whisking.
If it has already chilled and remains too soft, the best solution is usually to remake or supplement the thickener rather than adding raw cornstarch directly.
How to Make It More Fluffy
Increase the whipped cream slightly.
You can use up to 1 1/4 cups heavy cream for a lighter mousse.
The vanilla flavor will become slightly milder, but the texture will be more cloud-like.
How to Make It More Custardy
Reduce the whipped cream to approximately 3/4 cup.
This creates a denser, richer dessert closer to pastry cream.
Classic Cocoa-Topped Vanilla Custard Mousse
For the version closest to the image:
Keep the mousse plain vanilla.
Fill clear glasses.
Chill thoroughly.
Dust generously but lightly with cocoa.
Serve cold.
This simple version lets the smooth texture remain the main attraction.
Chocolate Vanilla Custard Mousse
After cooking the custard, add:
- 4 oz chopped semi-sweet chocolate
Stir until completely melted.
Chill.
Fold with whipped cream.
Top with cocoa or chocolate shavings.
White Chocolate Custard Mousse
Add approximately 3 oz white chocolate to the hot custard.
Because white chocolate is sweet, reduce the sugar slightly.
This variation is richer and sweeter.
Coffee Custard Mousse
Add 1–2 teaspoons instant espresso powder to the warm milk.
Continue with the recipe.
Top with cocoa.
This creates a dessert with a tiramisu-like flavor profile.
Cappuccino Custard Cups
For a stronger coffee version:
Add espresso powder to the custard.
Top with whipped cream.
Dust with cocoa.
Finish with a few chocolate shavings.
Caramel Custard Mousse
Add a few tablespoons of thick caramel sauce to the cold custard before folding in the whipped cream.
Do not add too much or the filling can become overly soft.
Drizzle extra caramel on top.
Salted Caramel Variation
Use caramel sauce.
Add a tiny pinch of flaky sea salt over the top.
The salt helps balance the sweetness.
Lemon Vanilla Custard Mousse
Add:
- 1 teaspoon lemon zest
- Small amount of lemon juice
Add the zest after cooking.
Be careful with the juice so the mousse stays thick.
Orange Vanilla Mousse
Add finely grated orange zest to the warm custard.
Top with dark chocolate shavings.
Orange, vanilla, and chocolate work beautifully together.
Cinnamon Custard Mousse
Add 1/2 teaspoon cinnamon to the milk while heating.
Finish the glasses with cinnamon instead of cocoa.
This gives the dessert a warm, cozy flavor.
Nutmeg Vanilla Custard
Add a very small pinch of nutmeg.
Nutmeg is strong, so use it lightly.
It works especially well for winter desserts.
Coconut Custard Mousse
Replace approximately half the milk with full-fat coconut milk.
Finish with toasted coconut.
This creates a richer tropical variation.
Banana Custard Mousse
Mash one ripe banana.
Fold it into the cold custard before adding whipped cream.
Banana naturally thickens the mixture and adds sweetness.
Strawberry Custard Mousse
Fold a small amount of thick strawberry purée into the cold custard.
Use purée sparingly so the texture remains thick.
Finish with chopped strawberries.
Raspberry Custard Mousse
Add raspberry purée or a thin swirl of raspberry sauce.
The tart berries contrast beautifully with sweet vanilla custard.
Mango Custard Mousse
Fold thick mango purée into the chilled custard.
Mango gives the dessert a bright color and tropical flavor.
Biscuit-Layer Custard Cups
Add crushed cookies to the bottom of each glass.
Good options include:
- Graham crackers
- Vanilla wafers
- Digestive biscuits
- Shortbread
Add mousse over the crumbs.
Finish with cocoa.
Chocolate Biscuit Layer
Use crushed chocolate cookies at the bottom.
This adds deeper cocoa flavor and a slightly crunchy contrast.
Tiramisu-Inspired Custard Cups
Layer:
- Crushed ladyfingers
- Coffee-flavored custard mousse
- More ladyfinger pieces
- Mousse
- Cocoa powder
This is inspired by tiramisu but remains its own custard-based dessert.
Layered Fruit Parfait Version
In tall glasses, alternate:
- Vanilla custard mousse
- Berries
- Crushed biscuits
Repeat.
Finish with mousse and fruit.
This creates a colorful dessert for parties.
Best Toppings
| Topping | Flavor / Texture |
|---|---|
| Cocoa powder | Bittersweet and classic |
| Dark chocolate curls | Rich and elegant |
| Cinnamon | Warm and fragrant |
| Fresh berries | Bright and fresh |
| Toasted almonds | Crunch |
| Crushed biscuits | Texture |
| Caramel sauce | Sweet and rich |
| Coffee powder | Intense mocha note |
| Coconut flakes | Tropical flavor |
How to Dust Cocoa Evenly
Use a fine-mesh sieve.
Add only a small spoonful of cocoa.
Hold the sieve several inches above the glass.
Tap gently.
This creates an even professional-looking layer without heavy patches.
How to Make the Dessert Look Like the Image
Use straight-sided clear glasses.
Fill almost completely.
Leave the top smooth.
Dust with cocoa.
Keep the custard mousse very cold.
For the spoon-lift effect, scoop directly from the center using a rounded spoon.
The mousse should lift in a soft mound.
Serving Temperature
This dessert tastes best very cold.
Remove from the refrigerator only shortly before serving.
A colder mousse also holds its shape better.
Party Serving Idea
Use smaller 4 oz glasses.
Prepare them the night before.
Dust with cocoa just before serving.
Arrange on a large tray.
This creates an easy individual dessert for guests.
Dinner Party Presentation
Use clear stemless glasses.
Top with:
- Cocoa
- One chocolate curl
- One raspberry
Keep the decoration minimal.
The clean presentation makes the dessert feel more elegant.
Family-Style Version
You do not need to use individual glasses.
Spoon the mousse into one large serving bowl.
Chill.
Dust the entire surface with cocoa.
Serve with a large spoon.
Make-Ahead Instructions
The entire dessert can be prepared one day ahead.
Prepare the custard.
Fold in the cream.
Fill the glasses.
Cover.
Refrigerate overnight.
Add cocoa immediately before serving for the freshest appearance.
Storage
Store covered in the refrigerator.
For best quality, eat within 2–3 days.
Because the recipe contains eggs, milk, and cream, keep it refrigerated.
Why You Should Add Cocoa at the End
Cocoa slowly absorbs moisture from the mousse.
If added many hours in advance, it can become dark and wet-looking.
For a dry, velvety finish, dust the cocoa shortly before serving.
Can You Freeze Custard Mousse?
Freezing is possible but not ideal.
After thawing, the custard and cream can lose some of their silky texture.
For the best result, keep the dessert refrigerated rather than frozen.
If You Want a Frozen Version
Spoon the mousse into freezer-safe cups.
Freeze until partially firm.
Let stand for several minutes before serving.
The result will be closer to frozen mousse than classic custard.
Common Mistakes to Avoid
Using High Heat
High heat can scramble the eggs and scorch the custard.
Use medium-low heat.
Walking Away from the Pan
Custard thickens quickly at the end.
Whisk continuously.
Skipping the Chill
Warm custard will melt whipped cream.
Always cool completely.
Overwhipping the Cream
Overwhipped cream can become grainy or buttery.
Stop at medium-stiff peaks.
Stirring Instead of Folding
Aggressive stirring removes air.
Use gentle folding motions.
Adding Too Much Liquid Flavoring
Large amounts of juice, coffee, or sauce can loosen the mousse.
Use concentrated flavorings when possible.
Troubleshooting Guide
| Problem | Likely Cause | Best Fix |
|---|---|---|
| Custard stays thin | Not cooked long enough | Return to heat and whisk |
| Custard is lumpy | Eggs overheated | Strain while warm |
| Custard tastes starchy | Cornstarch undercooked | Cook briefly longer |
| Mousse is runny | Custard too warm | Chill completely |
| Mousse is heavy | Not enough whipped cream | Fold in extra cream |
| Mousse lost volume | Overmixed | Fold more gently next time |
| Cocoa looks wet | Added too early | Dust just before serving |
| Custard has skin | Surface exposed | Cover directly with plastic wrap |
Nutrition Estimate
| Nutrition | Approximate Amount |
|---|---|
| Calories | 270–390 per serving |
| Protein | 5–7 g |
| Carbohydrates | 28–40 g |
| Fat | 16–26 g |
| Sugar | 20–30 g |
| Serving Size | 1 dessert glass |
Nutrition values are approximate and depend on milk, cream, sugar, and serving size.
Frequently Asked Questions
What is vanilla custard mousse?
It is a cooked vanilla custard that is chilled and folded with whipped cream to create a lighter texture.
Is this the same as pastry cream?
No.
Pastry cream is usually denser.
This recipe takes a pastry-cream-style custard and lightens it with whipped cream.
Is it the same as pudding?
Not exactly.
The final mousse is lighter and more airy than traditional pudding.
Does it need an oven?
No.
Everything is prepared on the stovetop and chilled.
Why are egg yolks used?
They give the custard richness, color, and flavor.
Can I use whole eggs?
You can, but yolks create a smoother and richer result.
Can I use custard powder?
Yes, for a shortcut version.
Prepare a thick custard, chill completely, then fold in whipped cream.
Can I use instant pudding mix?
Yes.
Prepare it slightly thicker than package directions, chill, then fold in whipped cream.
The flavor will differ from homemade custard.
Can I use whipped topping instead of heavy cream?
Yes.
Fold thawed whipped topping into the chilled custard.
Can I make it without whipped cream?
Yes.
You will have a rich vanilla custard rather than a mousse.
Why did my custard scramble?
The eggs probably became hot too quickly or the cooking heat was too high.
How do I prevent scrambled eggs?
Temper slowly and whisk continuously.
Why is my custard too thin?
It may need more cooking time.
Why is my custard too thick?
It may contain too much starch or have reduced too much.
Whisk in a small amount of milk.
Can I make it sweeter?
Yes.
Increase powdered sugar in the whipped cream or granulated sugar in the custard.
Can I make it less sweet?
Yes.
Reduce sugar slightly and use unsweetened cocoa.
Can I add chocolate?
Yes.
Chocolate melts beautifully into the warm custard.
Can I add coffee?
Yes.
Espresso powder is one of the best variations.
Can I add caramel?
Yes.
Add thick caramel after the custard cools.
Can I add berries?
Yes.
Use fresh berries as layers or toppings.
Can I add bananas?
Yes.
Banana works especially well with vanilla custard.
Can I add coconut?
Yes.
Use coconut milk and toasted coconut.
Can I layer it with cookies?
Yes.
Cookies add a nice crunchy or cake-like layer depending on how long the dessert chills.
How long should the custard cool?
Until completely cold, usually at least 2 hours.
Can I make this the day before?
Yes.
It is an excellent make-ahead dessert.
How long does it last?
About 2–3 days refrigerated.
Can I freeze it?
Freezing is not recommended for the smoothest texture.
Why do I need plastic wrap touching the custard?
It prevents a skin from forming on the surface.
Why should cocoa be added right before serving?
It stays dry, light, and attractive instead of absorbing moisture.
What is the best way to serve it?
Serve very cold in individual glasses with cocoa dusted on top.
Final Thoughts
These Ultra-Creamy Vanilla Custard Mousse Cups turn a few basic ingredients into a dessert that feels much more special than ordinary pudding.
The foundation is a proper homemade vanilla custard made with egg yolks, milk, sugar, and vanilla. Cooking it until thick gives the dessert structure, while butter adds gloss and richness.
Once completely chilled, the custard is smoothed and folded with whipped cream. That final step transforms it from dense custard into a light, fluffy mousse that can still hold a generous spoonful.
The contrast with cocoa is what finishes the dessert beautifully. The mousse is sweet, creamy, and vanilla-forward, while the unsweetened cocoa brings a mild bitterness that prevents the flavor from becoming overly rich.
The basic recipe is also extremely versatile. Turn it into chocolate mousse, coffee custard, caramel cups, fruit parfaits, or layered biscuit desserts using the same core technique.
For the best result, focus on three things: cook the custard until properly thick, chill it completely, and fold the whipped cream gently.
Do that, and you get a dessert that is silky, thick, airy, elegant, and incredibly satisfying straight from the refrigerator.